Last Updated on January 26, 2026
Transforming your garage doesn’t have to drain your wallet or require a complete renovation. With strategic planning and creative DIY solutions, you can achieve a stunning garage makeover for under $500 that dramatically improves both functionality and aesthetics. Whether you’re dealing with clutter, poor lighting, or simply an uninspiring space, small changes can make a massive impact. The key is to prioritize projects that offer the best return on investment, such as organization systems, fresh paint, and smart storage solutions. By focusing on these budget-friendly improvements, you’ll create a garage that’s not only more practical but also a space you’ll actually enjoy using every day.
1. Fresh Paint on Walls and Ceiling
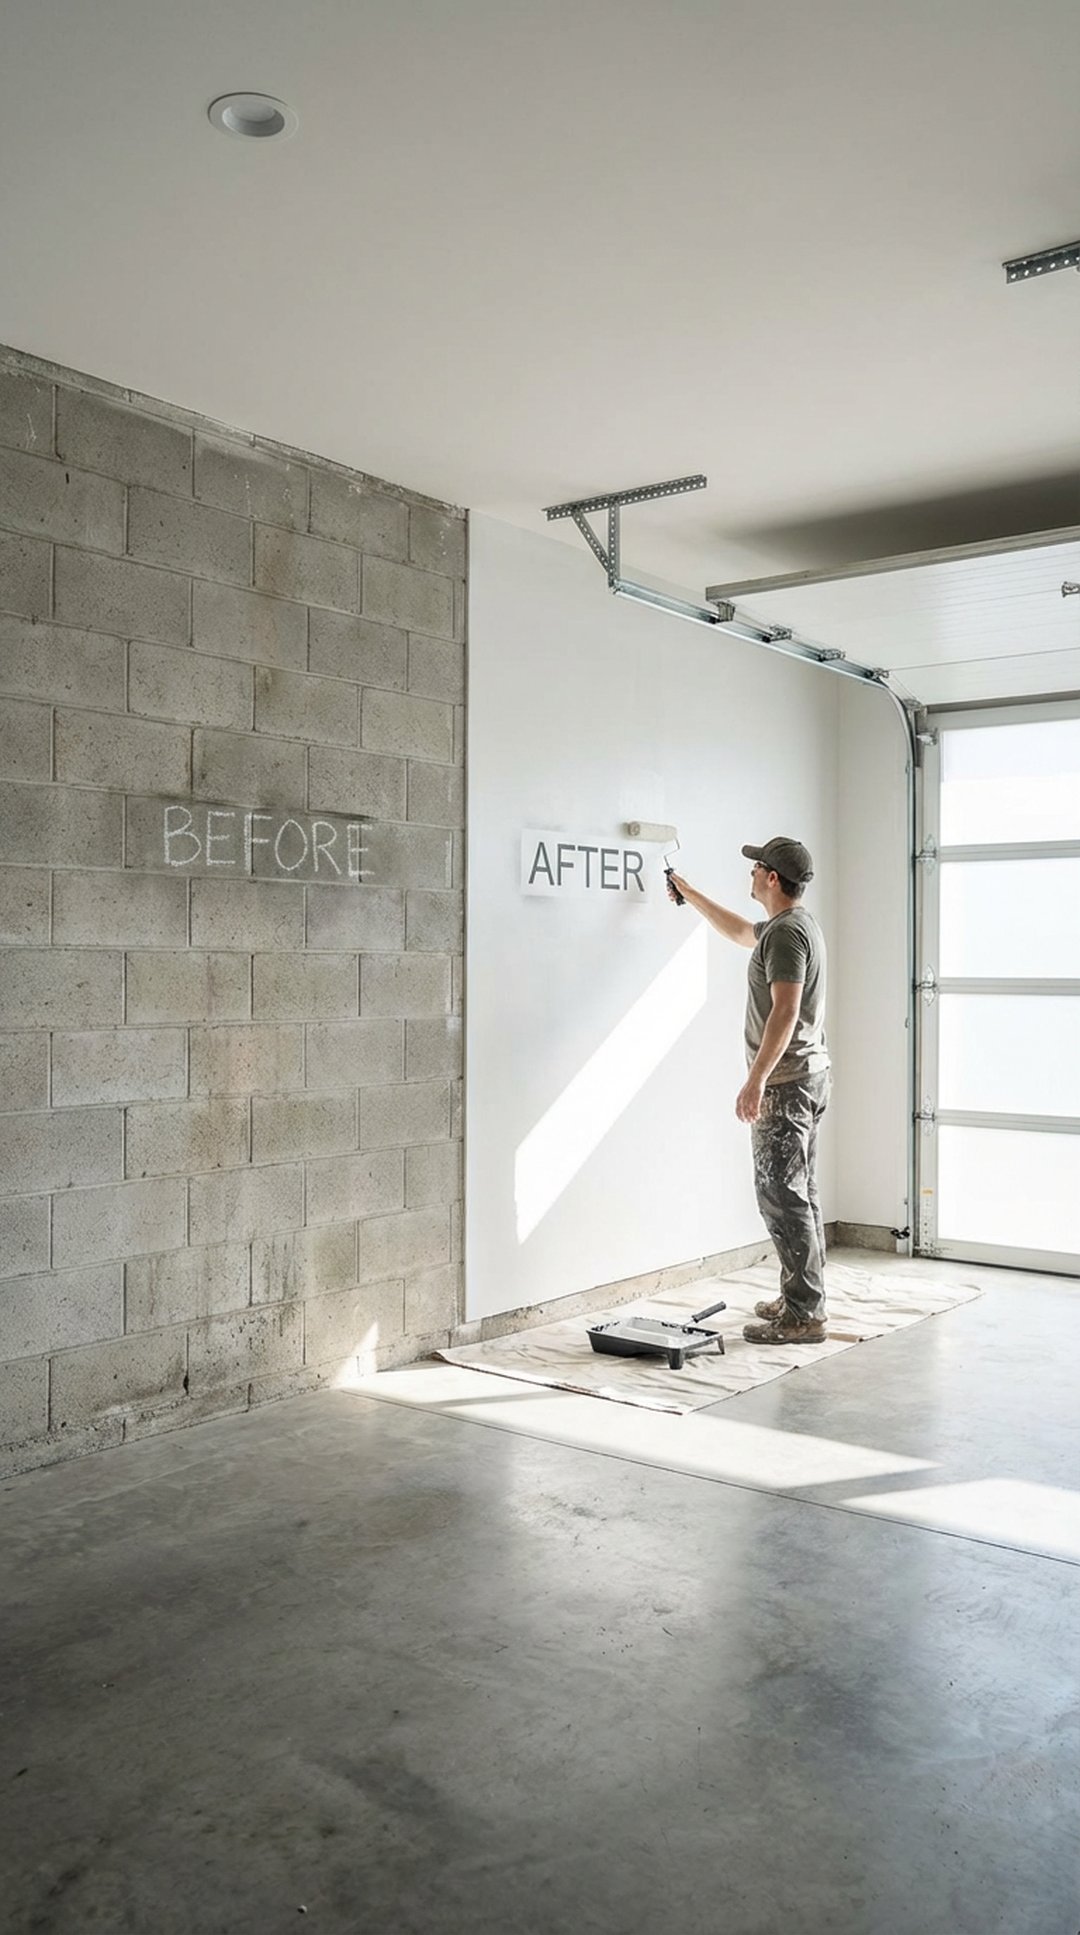
A fresh coat of paint is one of the most cost-effective ways to transform your garage instantly. Choose light colors like white or light gray to brighten the space and make it feel larger. The paint job will also help seal concrete walls, reducing dust and creating a cleaner environment. You can complete this project for under $100 with quality paint from your local hardware store.
Start by cleaning the walls thoroughly and patching any cracks or holes. Use a primer specifically designed for concrete or drywall, depending on your wall type. Apply two coats of semi-gloss or satin finish paint for durability and easy cleaning.
PRO TIP: Use a paint sprayer instead of rollers to cut your painting time in half and achieve a more professional finish. You can rent one from most home improvement stores for about $50 per day.
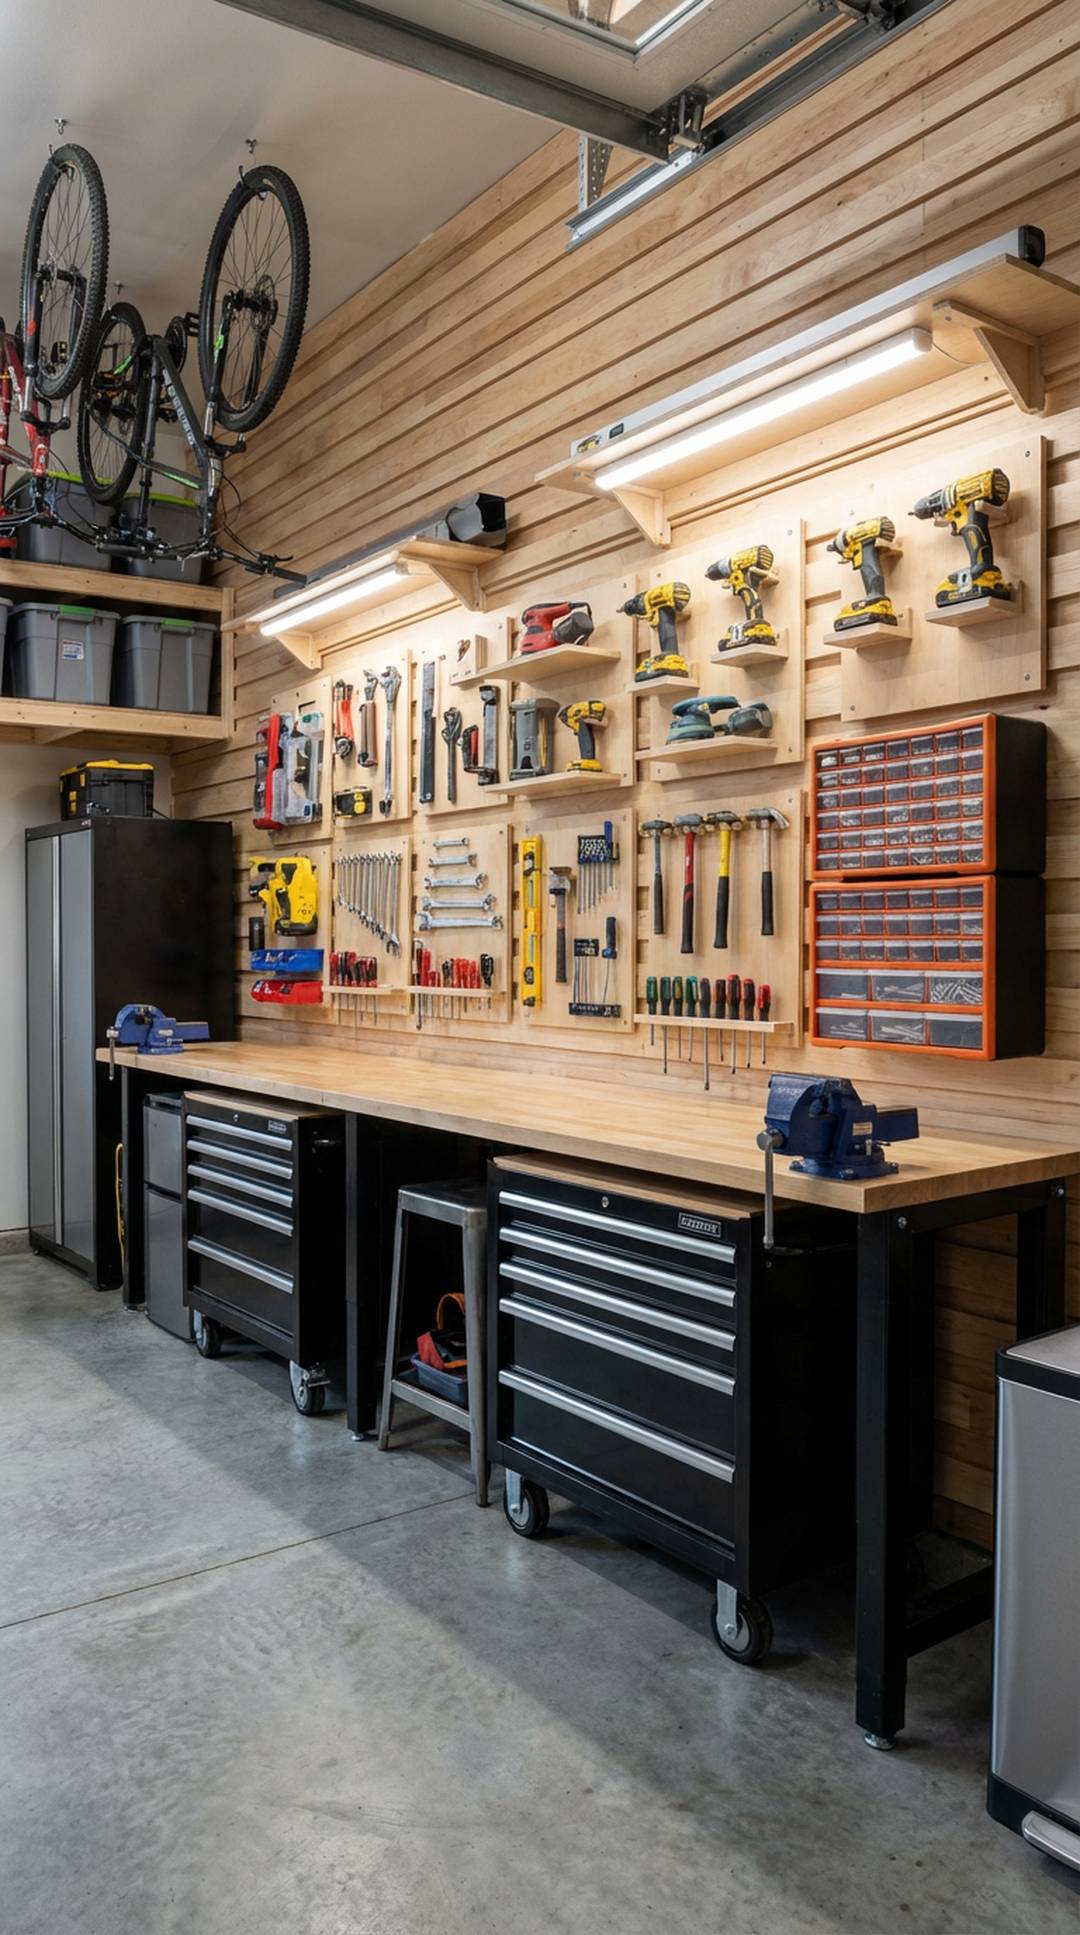
2. DIY Pegboard Organization System
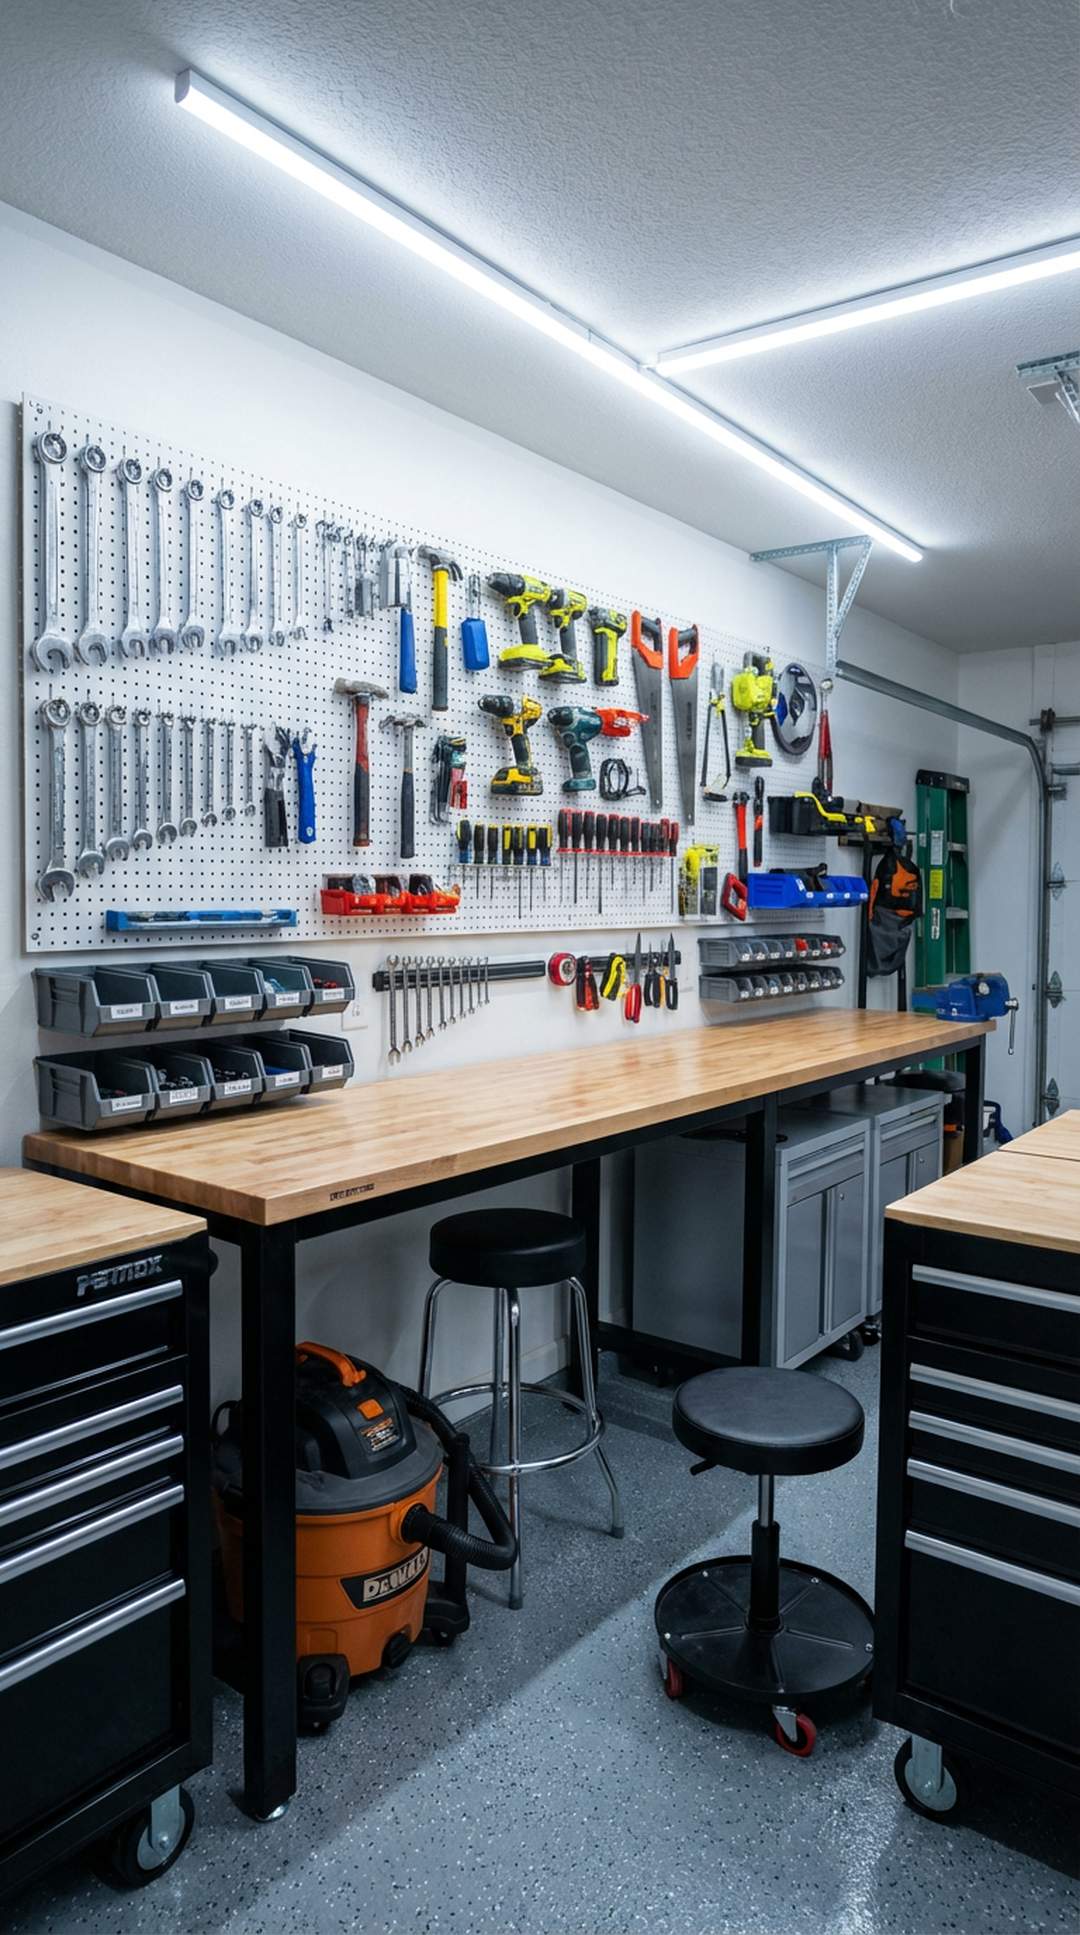
Pegboard walls are the ultimate flexible storage solution for garages. Install a 4×8 foot pegboard panel for around $30-40, and add an assortment of hooks and holders to create customized tool storage. This system keeps your most-used tools visible and within easy reach while maximizing vertical wall space that would otherwise go unused.
Mount the pegboard with spacers behind it to allow room for hook placement. Paint the pegboard in a contrasting color to make tools pop visually. Label sections for different tool categories to maintain organization over time.
PRO TIP: Spray paint your pegboard hooks in color-coded groups (red for power tools, blue for hand tools, green for garden tools) to create an intuitive organization system that the whole family can follow.
3. Epoxy Floor Coating
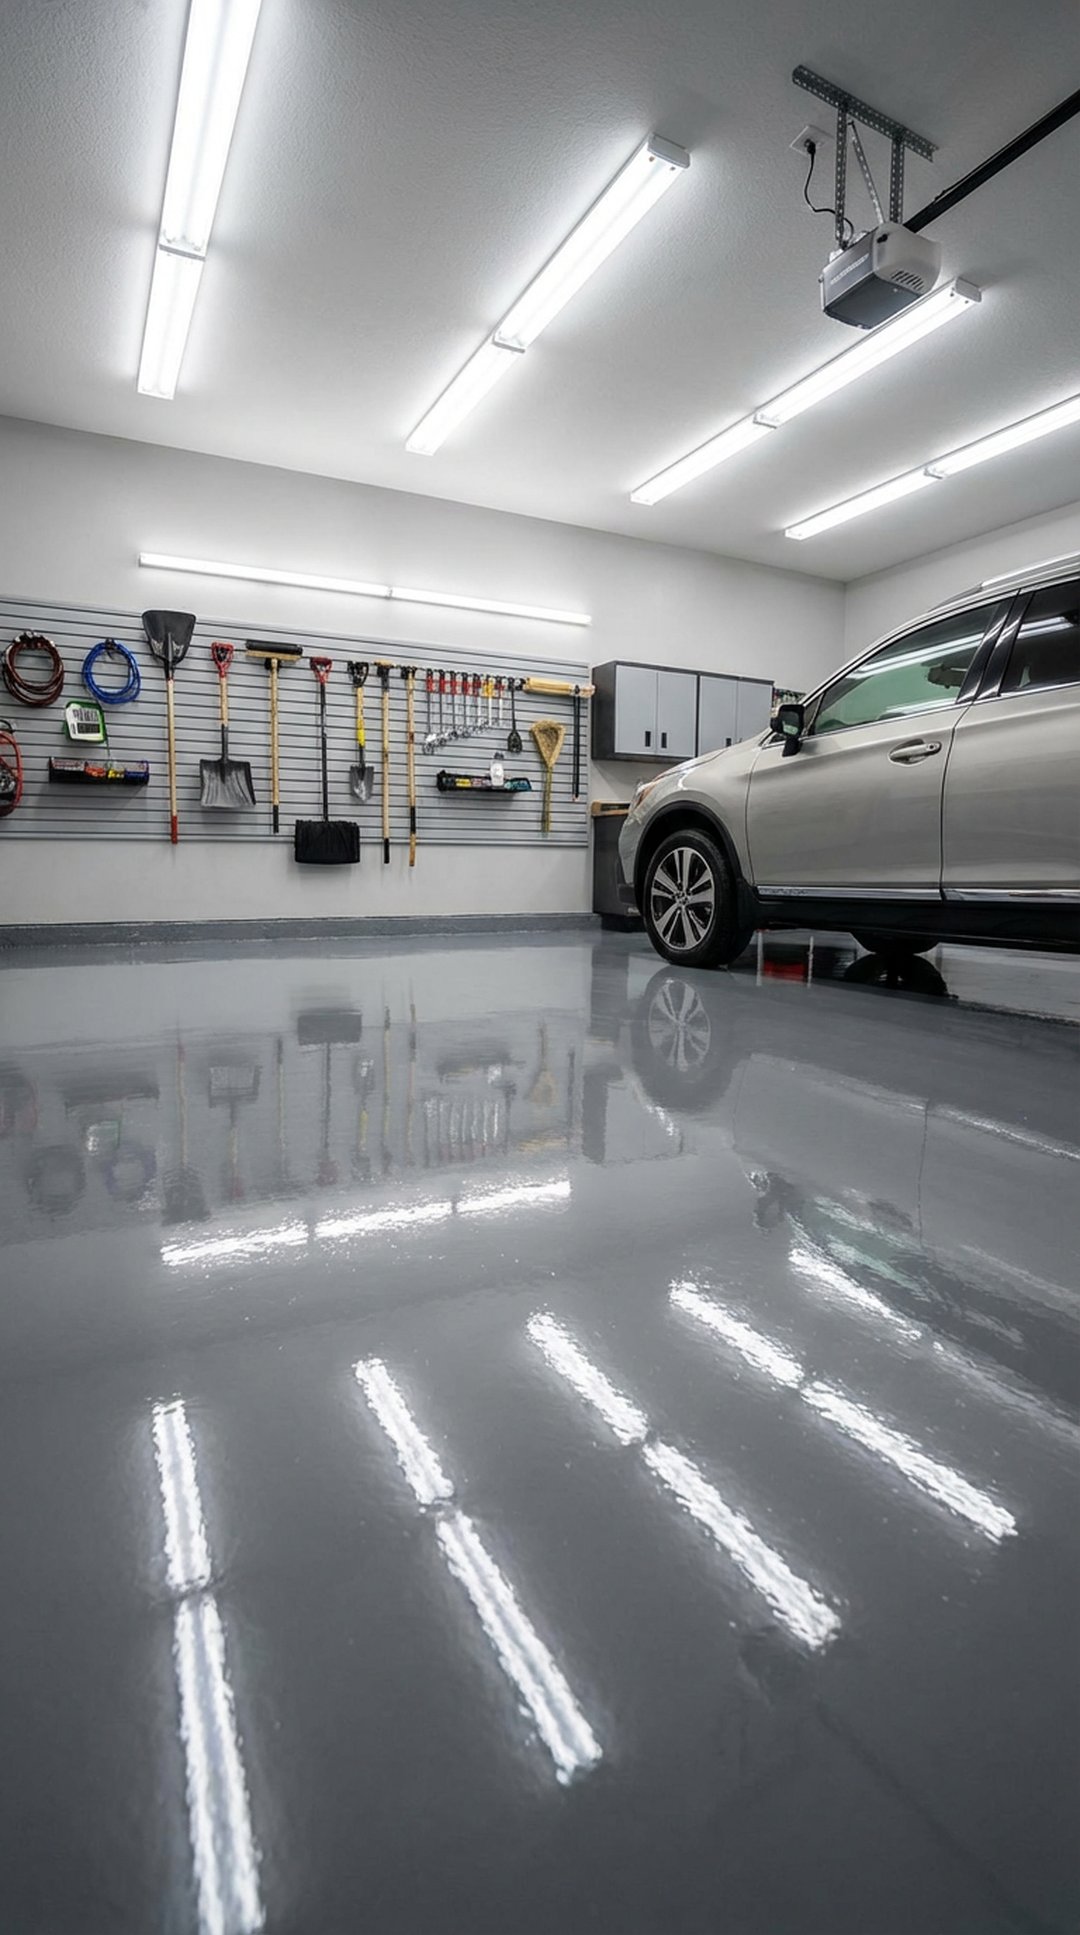
Transform your dingy concrete floor with an epoxy coating kit that costs between $100-200 for a two-car garage. This durable coating resists stains, repels moisture, and creates a showroom-quality finish that’s easy to sweep and maintain. The epoxy surface also reflects light, making your garage brighter without additional lighting.
Proper preparation is crucial for epoxy application. Clean and etch the concrete surface, fill any cracks, and ensure the floor is completely dry. Apply the epoxy on a mild weather day when temperatures are between 60-90°F for optimal curing.
PRO TIP: Add decorative color flakes to your epoxy coating before it cures to hide dirt and create a professional multi-toned finish. Broadcast the flakes liberally for complete coverage, then sweep up excess after curing.
4. Upgrade to LED Shop Lights
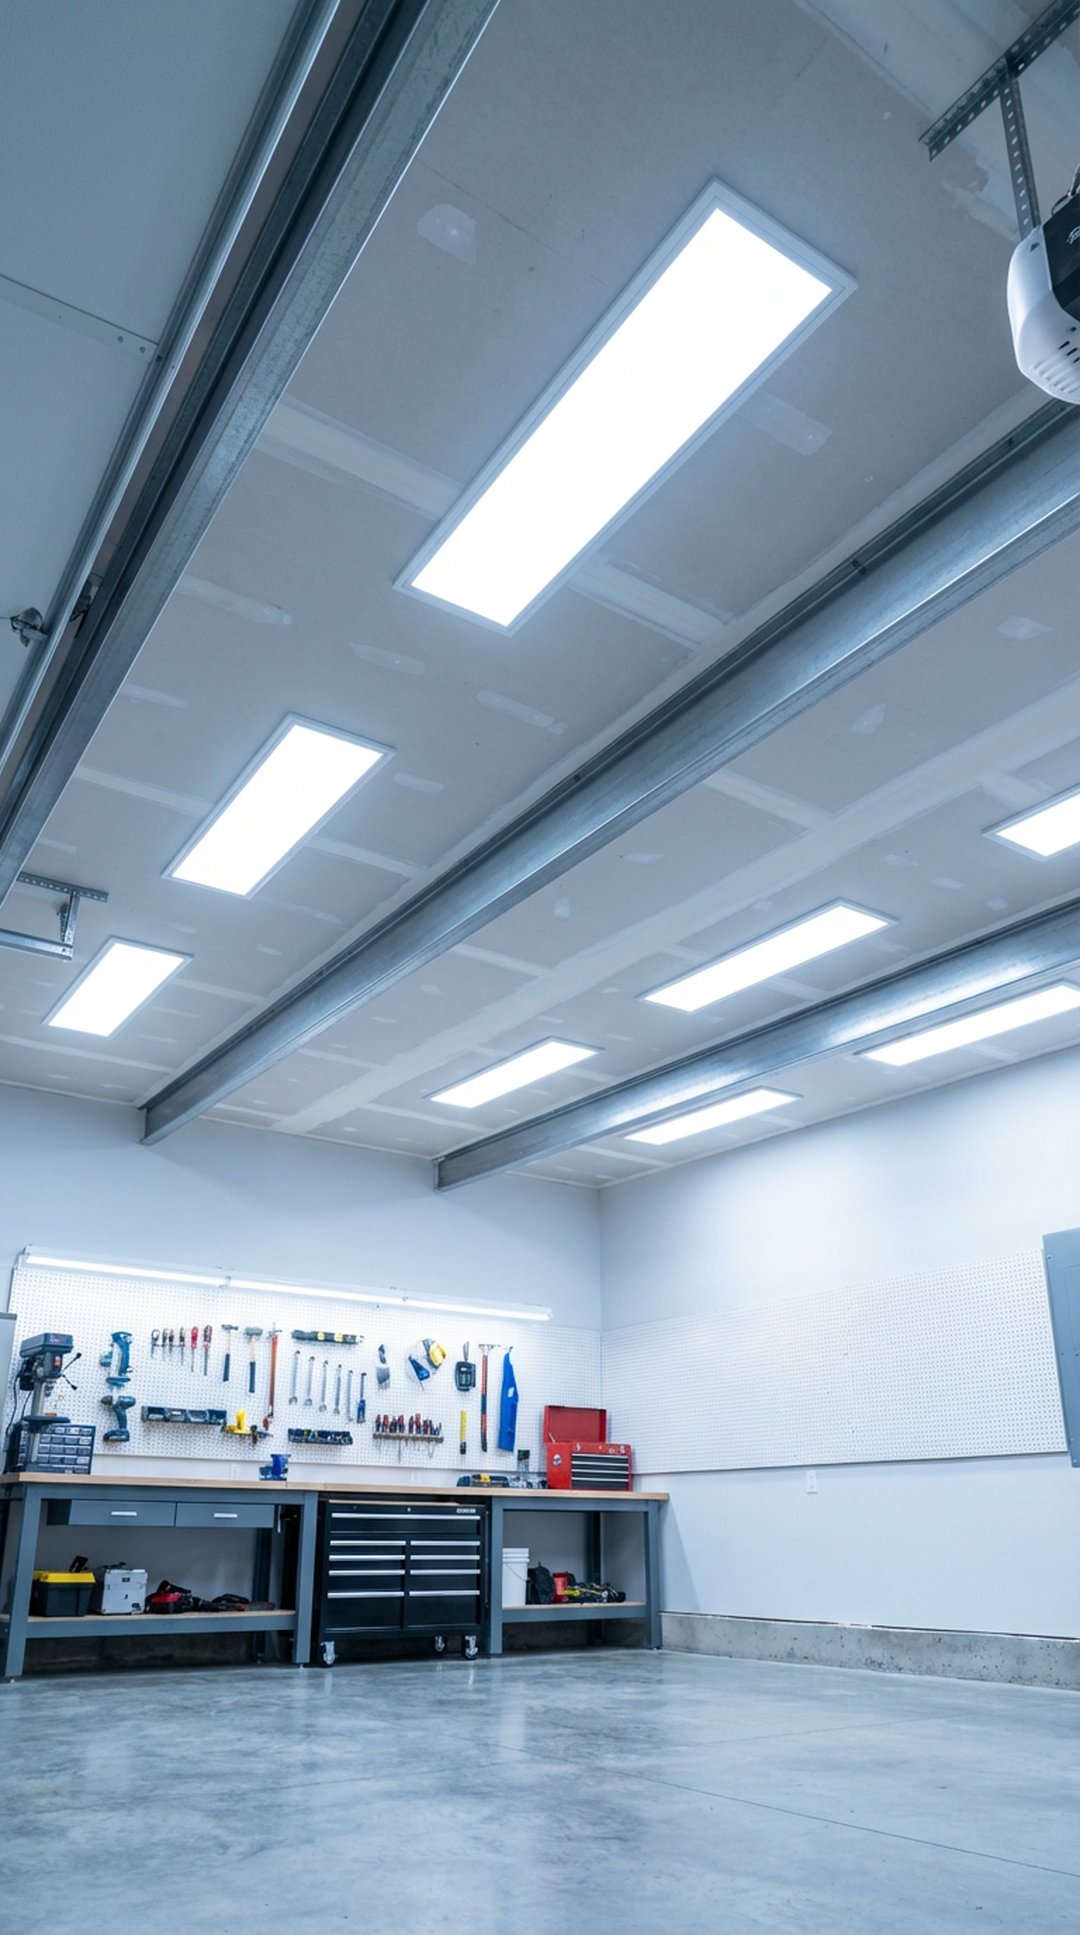
Replace dim fluorescent lights with bright LED shop lights to dramatically improve visibility and reduce energy costs. LED fixtures cost $25-50 each and provide 4000-5000 lumens of daylight-quality illumination. Most units are plug-and-play or require simple hardwiring, making this an easy weekend upgrade that instantly makes your garage more functional.
Install lights in rows parallel to where you park your vehicles for even coverage without shadows. Mount fixtures at least 8-10 feet apart for optimal light distribution. Consider adding motion-sensor switches to save energy when the garage isn’t in use.
PRO TIP: Link multiple LED shop lights together in a daisy-chain configuration to reduce the number of outlets needed. Many models feature built-in connectivity that allows up to 8 lights on a single circuit.
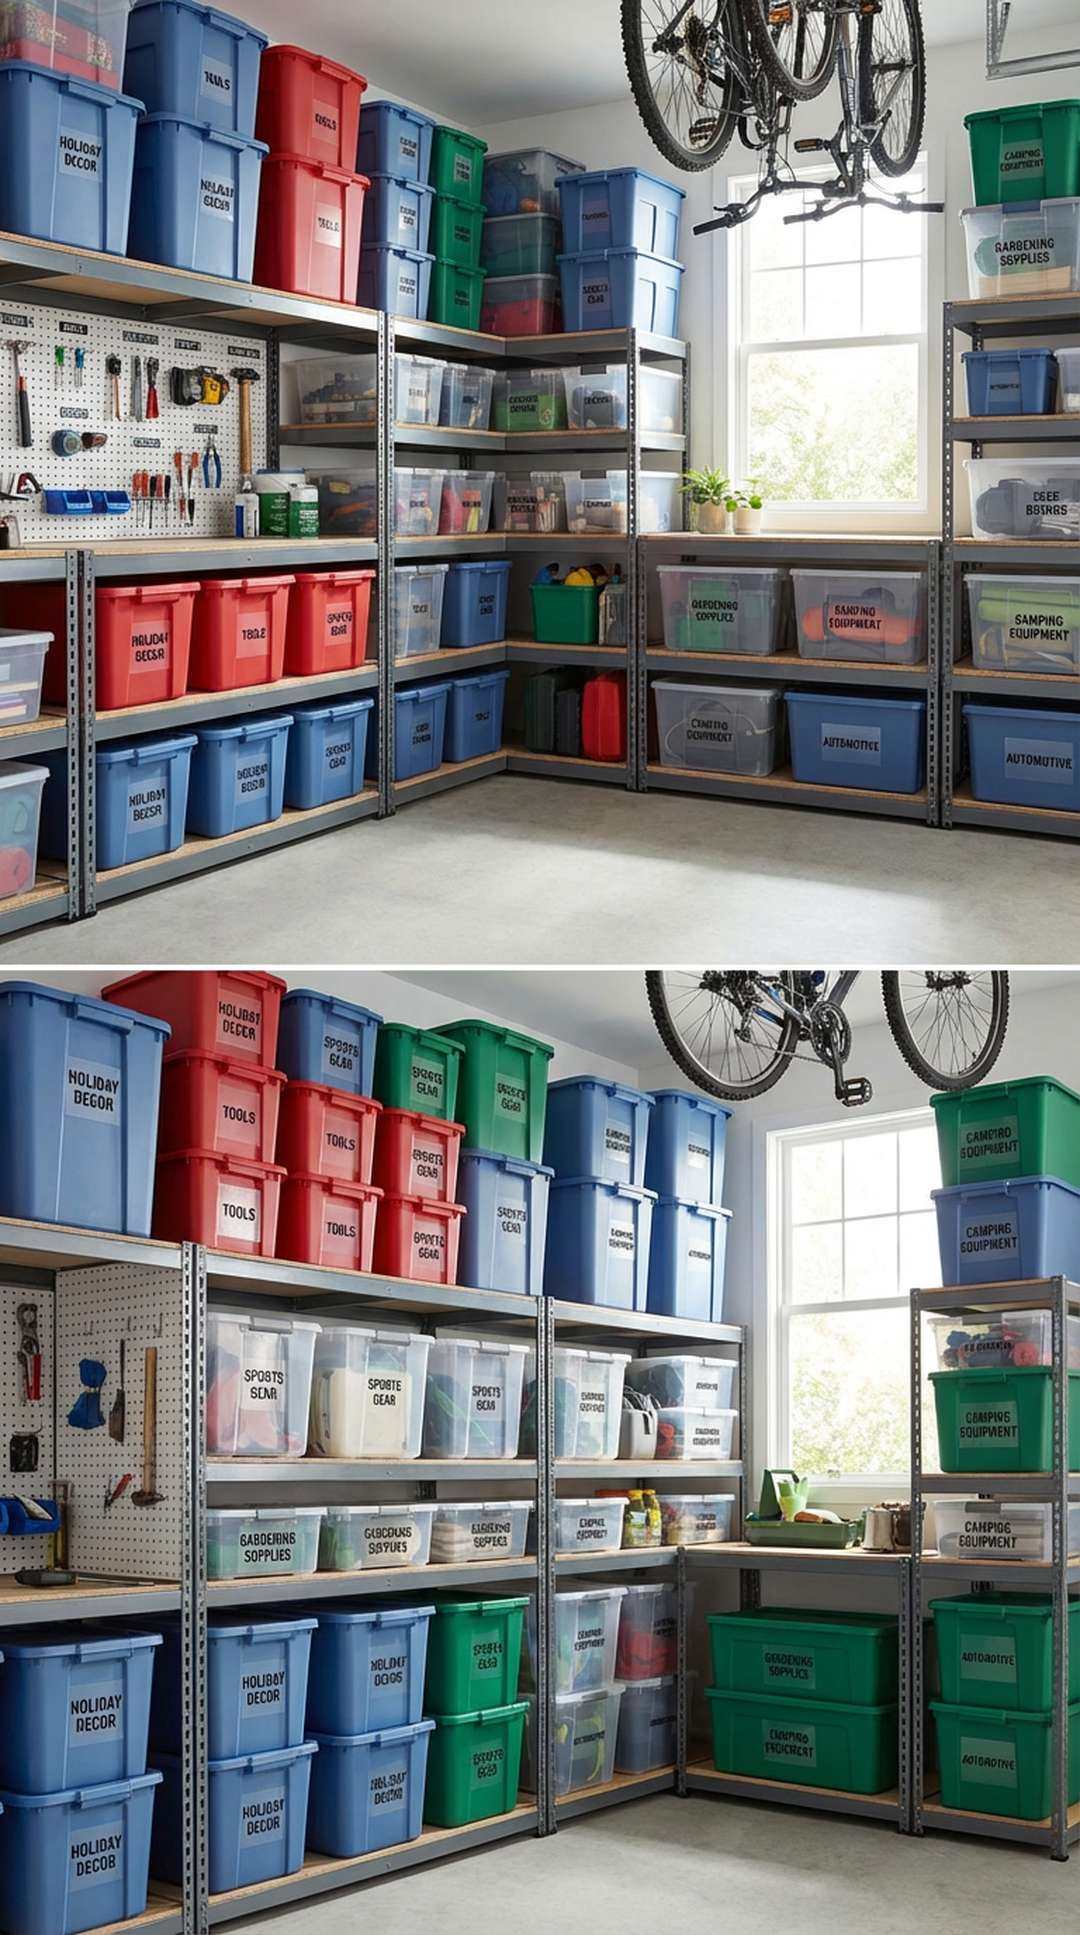
5. Wall-Mounted Clear Storage Bins
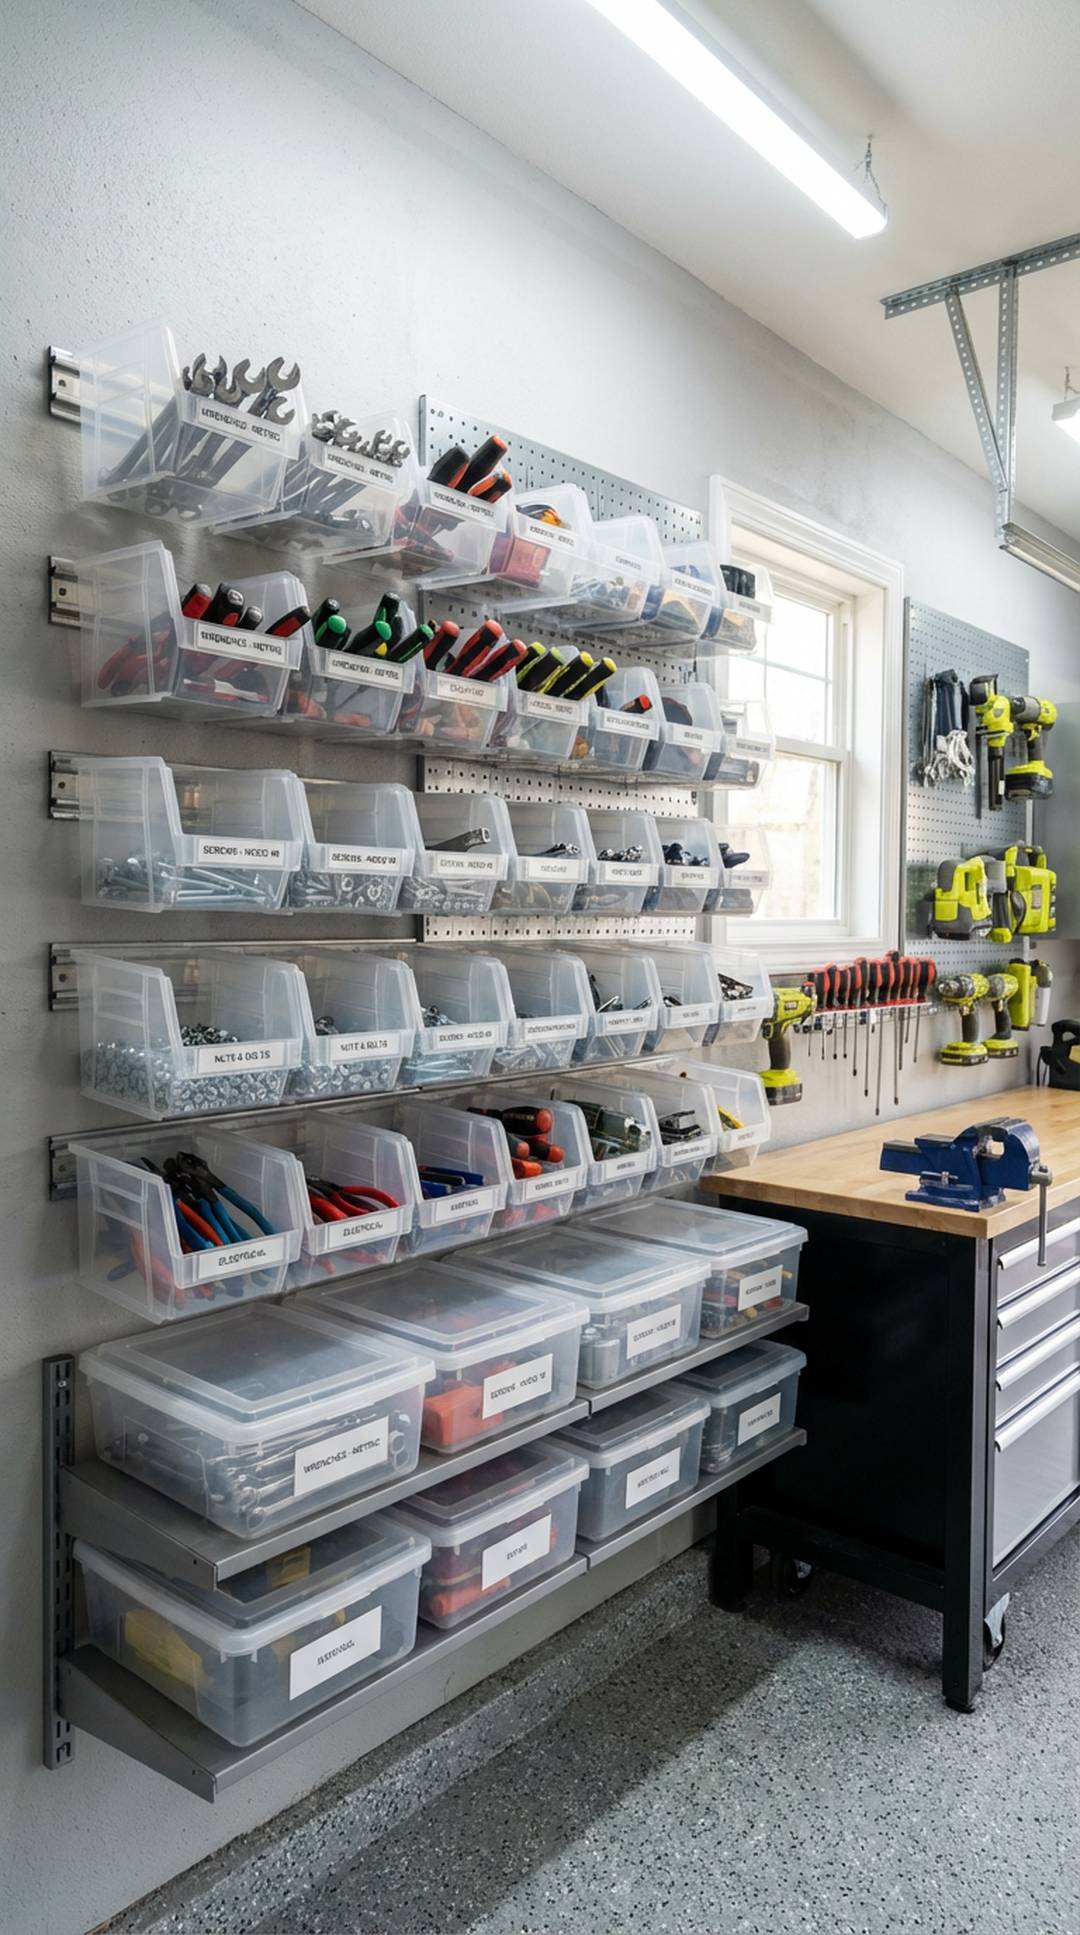
Mount clear plastic storage bins on wall rails or shelving systems to organize seasonal items, sports equipment, and rarely-used tools. The transparency allows you to see contents without opening every container, saving time and frustration. A complete wall system with 10-12 bins typically costs $80-120 and can be configured to fit your specific storage needs.
Group similar items together and label each bin clearly on both the front and spine. Store heavier items in lower bins and lighter seasonal items up high. Use smaller bins for hardware and fasteners to prevent small items from getting lost in larger containers.
PRO TIP: Take photos of bin contents and tape them to the outside of opaque bins as a quick visual reference. This hack works especially well for holiday decorations and seasonal gear stored in less accessible locations.
6. Build a DIY Pallet Workbench
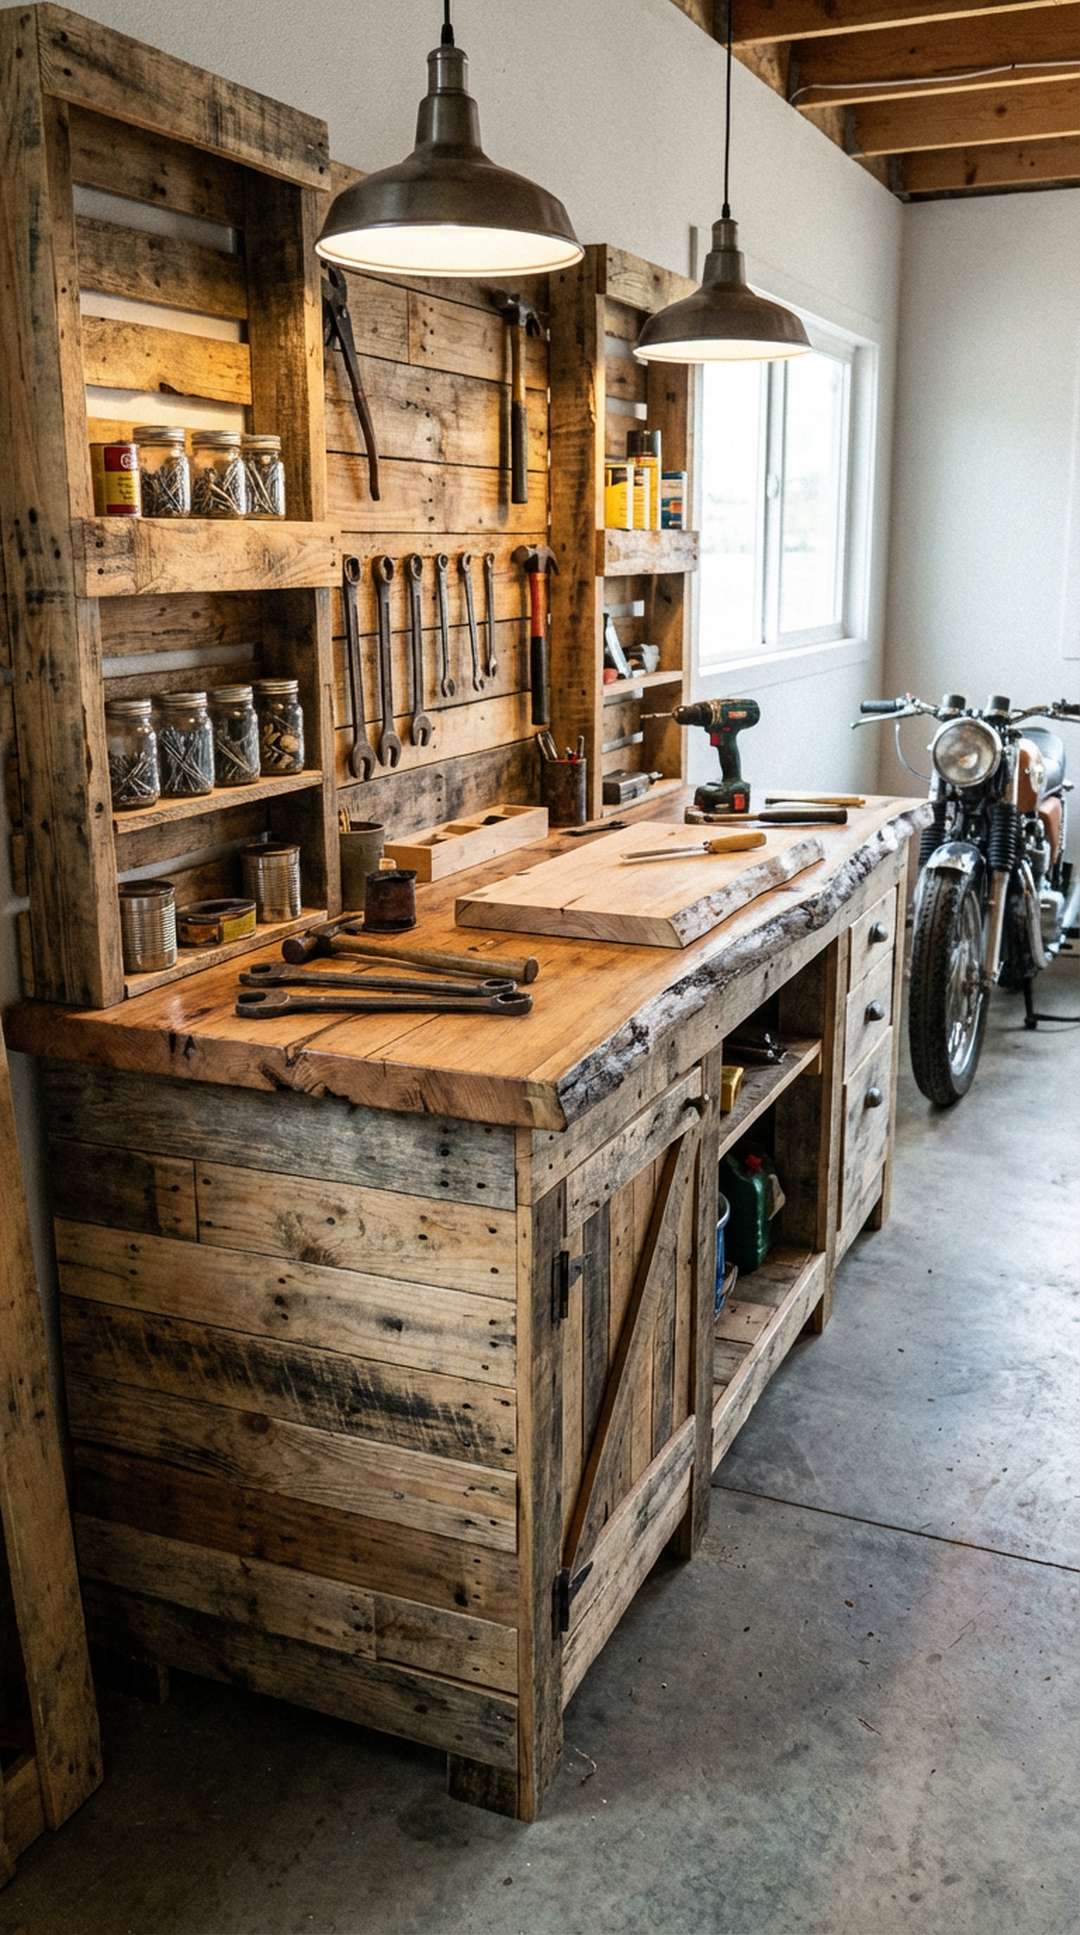
Construct a sturdy workbench from reclaimed wooden pallets for virtually no cost. Sand and treat the wood, then assemble it into a functional workspace with storage underneath. This rustic-industrial piece adds character while providing a dedicated area for projects and repairs. With basic tools and a weekend of work, you’ll have a custom workbench worth $200-300 in retail value.
Reinforce pallet joints with wood screws and construction adhesive for extra stability. Add a plywood or butcher block top for a smooth work surface. Install a pegboard backing or magnetic strips along the rear edge to keep tools organized within arm’s reach.
PRO TIP: Apply several coats of polyurethane or spar varnish to your pallet workbench to protect it from oil, paint, and chemical spills. This treatment creates a wipeable surface that extends the bench’s lifespan significantly.
7. Overhead Ceiling Storage Racks
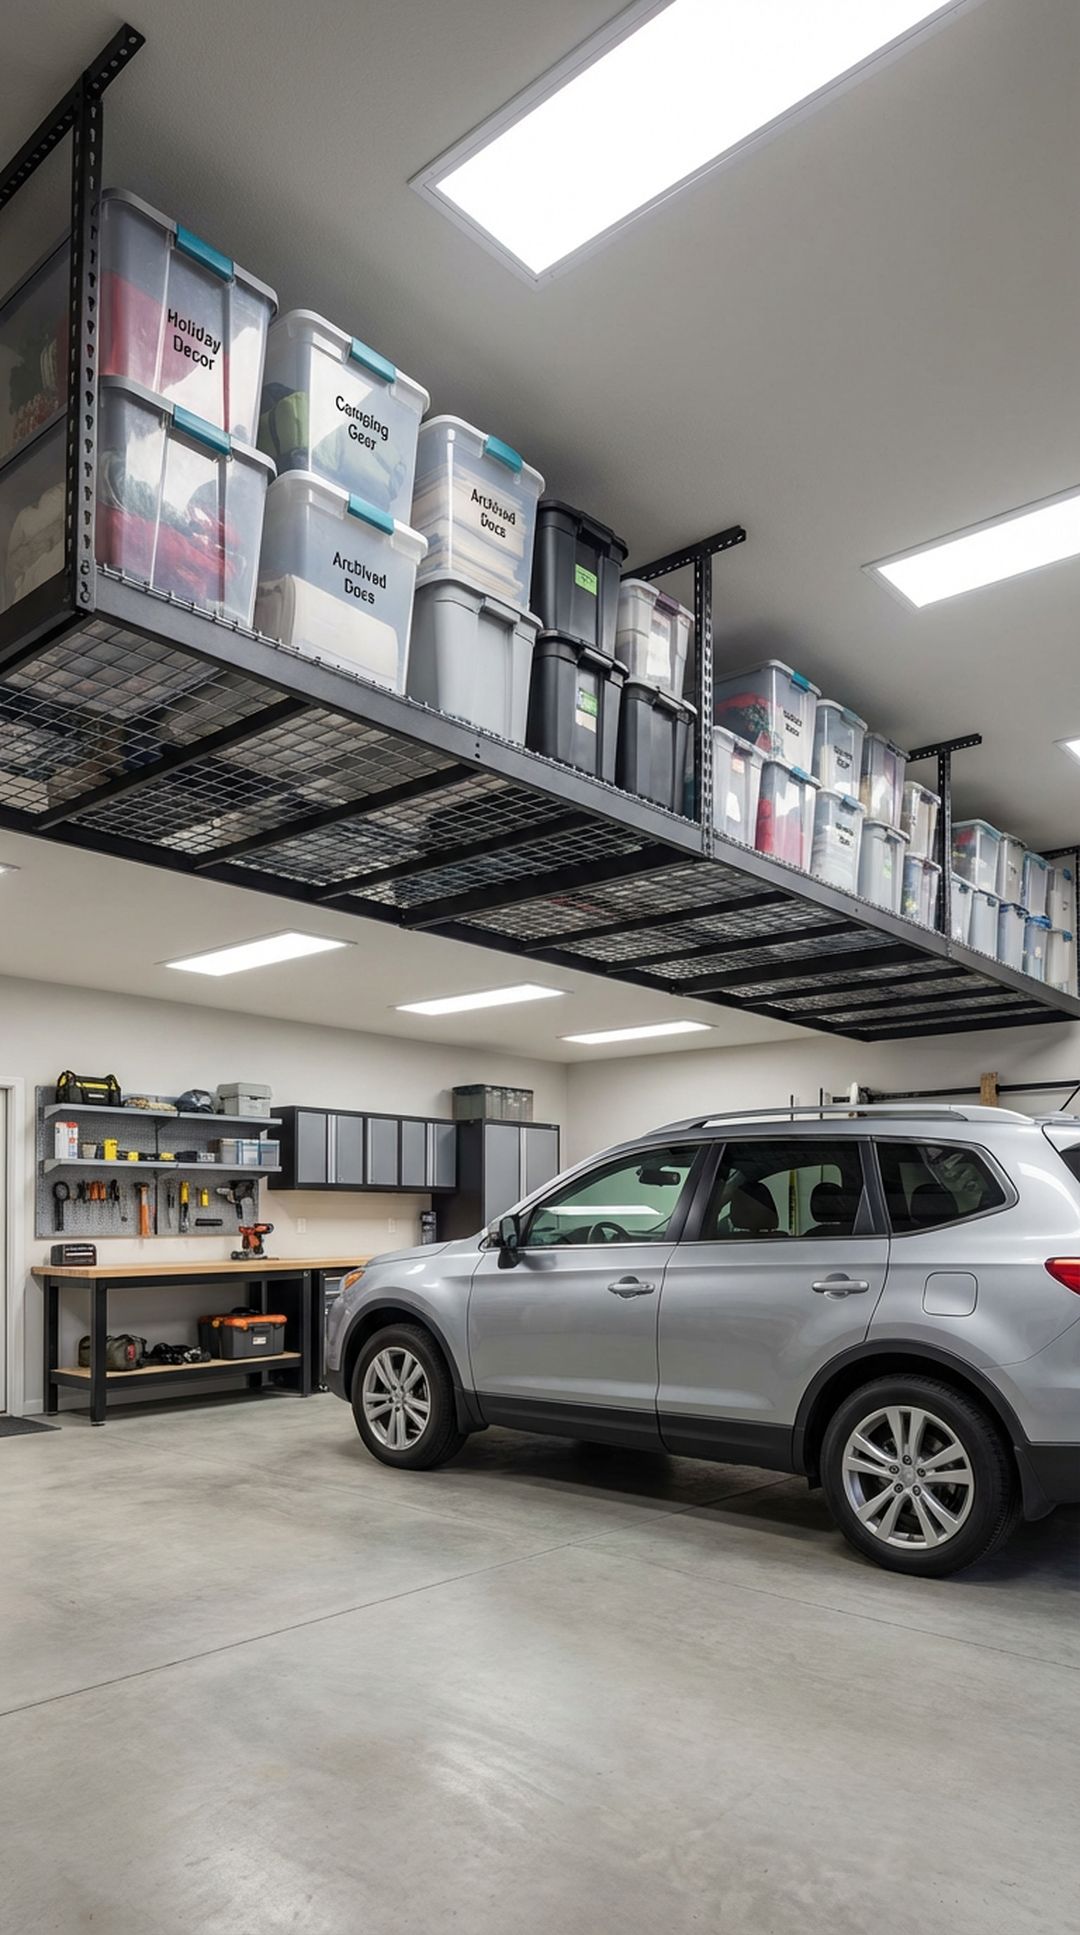
Maximize unused ceiling space with overhead storage racks that hold seasonal decorations, camping gear, and bulky items. Heavy-duty racks supporting 250-600 pounds cost $80-150 and install directly into ceiling joists. This solution frees up valuable floor and wall space while keeping items accessible yet out of the way.
Always locate ceiling joists with a stud finder before installation and use lag bolts for secure mounting. Store only lightweight seasonal items overhead, keeping frequently-used items at ground level. Label all overhead bins clearly on the bottom for easy identification from below.
PRO TIP: Create a simple pulley system with rope and carabiners to lower and raise storage bins from ceiling racks without using a ladder. This DIY solution costs under $20 and makes accessing overhead storage much safer and easier.
8. Magnetic Tool Strips
Install magnetic strips along your walls to hold metal tools, knives, and small parts within easy reach. These powerful magnets cost $15-30 per strip and provide instant organization without the need for hooks or holders. They’re perfect for keeping frequently-used tools visible and accessible right at your workbench or tool station.
Mount magnetic strips at comfortable reaching height near your primary work areas. Clean tools before placing them on magnetic strips to prevent rust transfer. Arrange tools by size or function for quick identification and retrieval during projects.
PRO TIP: Use doubled-up magnetic strips for heavier tools like wrenches and hammers. Stack two strips back-to-back for double the holding power without taking up additional wall space.
9. Rolling Storage Cart on Wheels
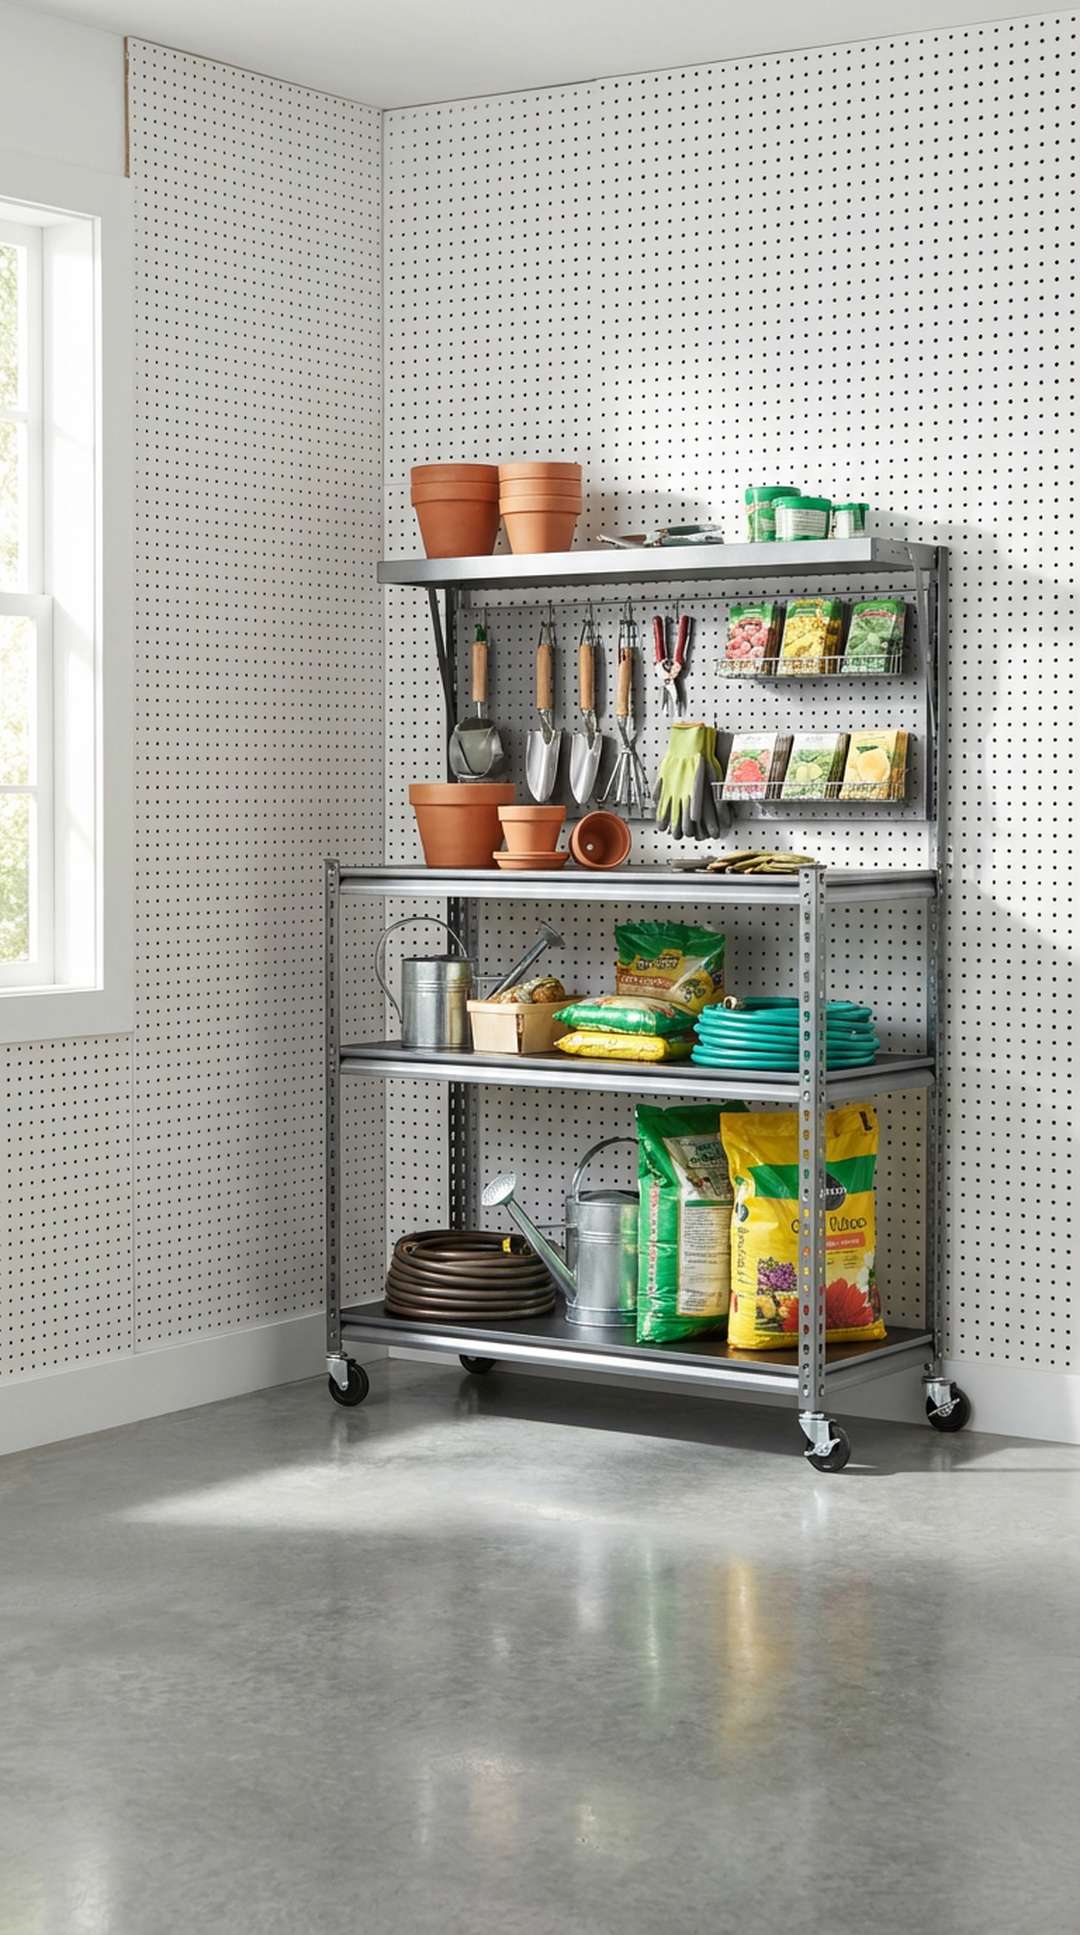
A mobile rolling cart provides flexible storage that can move wherever you need it in the garage or even travel to other project areas. Multi-tier carts cost $30-80 and offer surprising capacity for gardening supplies, automotive products, or craft materials. The mobility factor makes this solution perfect for garages that serve multiple purposes throughout the year.
Choose carts with locking wheels to prevent unwanted movement during use. Organize cart contents by project type or frequency of use. Consider a cart with a handle or push bar for easier maneuverability when fully loaded.
PRO TIP: Add magnetic hooks to the metal sides of your rolling cart for additional hanging storage. Small magnetic containers can hold screws, nails, and other hardware that might otherwise roll around on the cart shelves.
10. PVC Pipe Tool Organizer
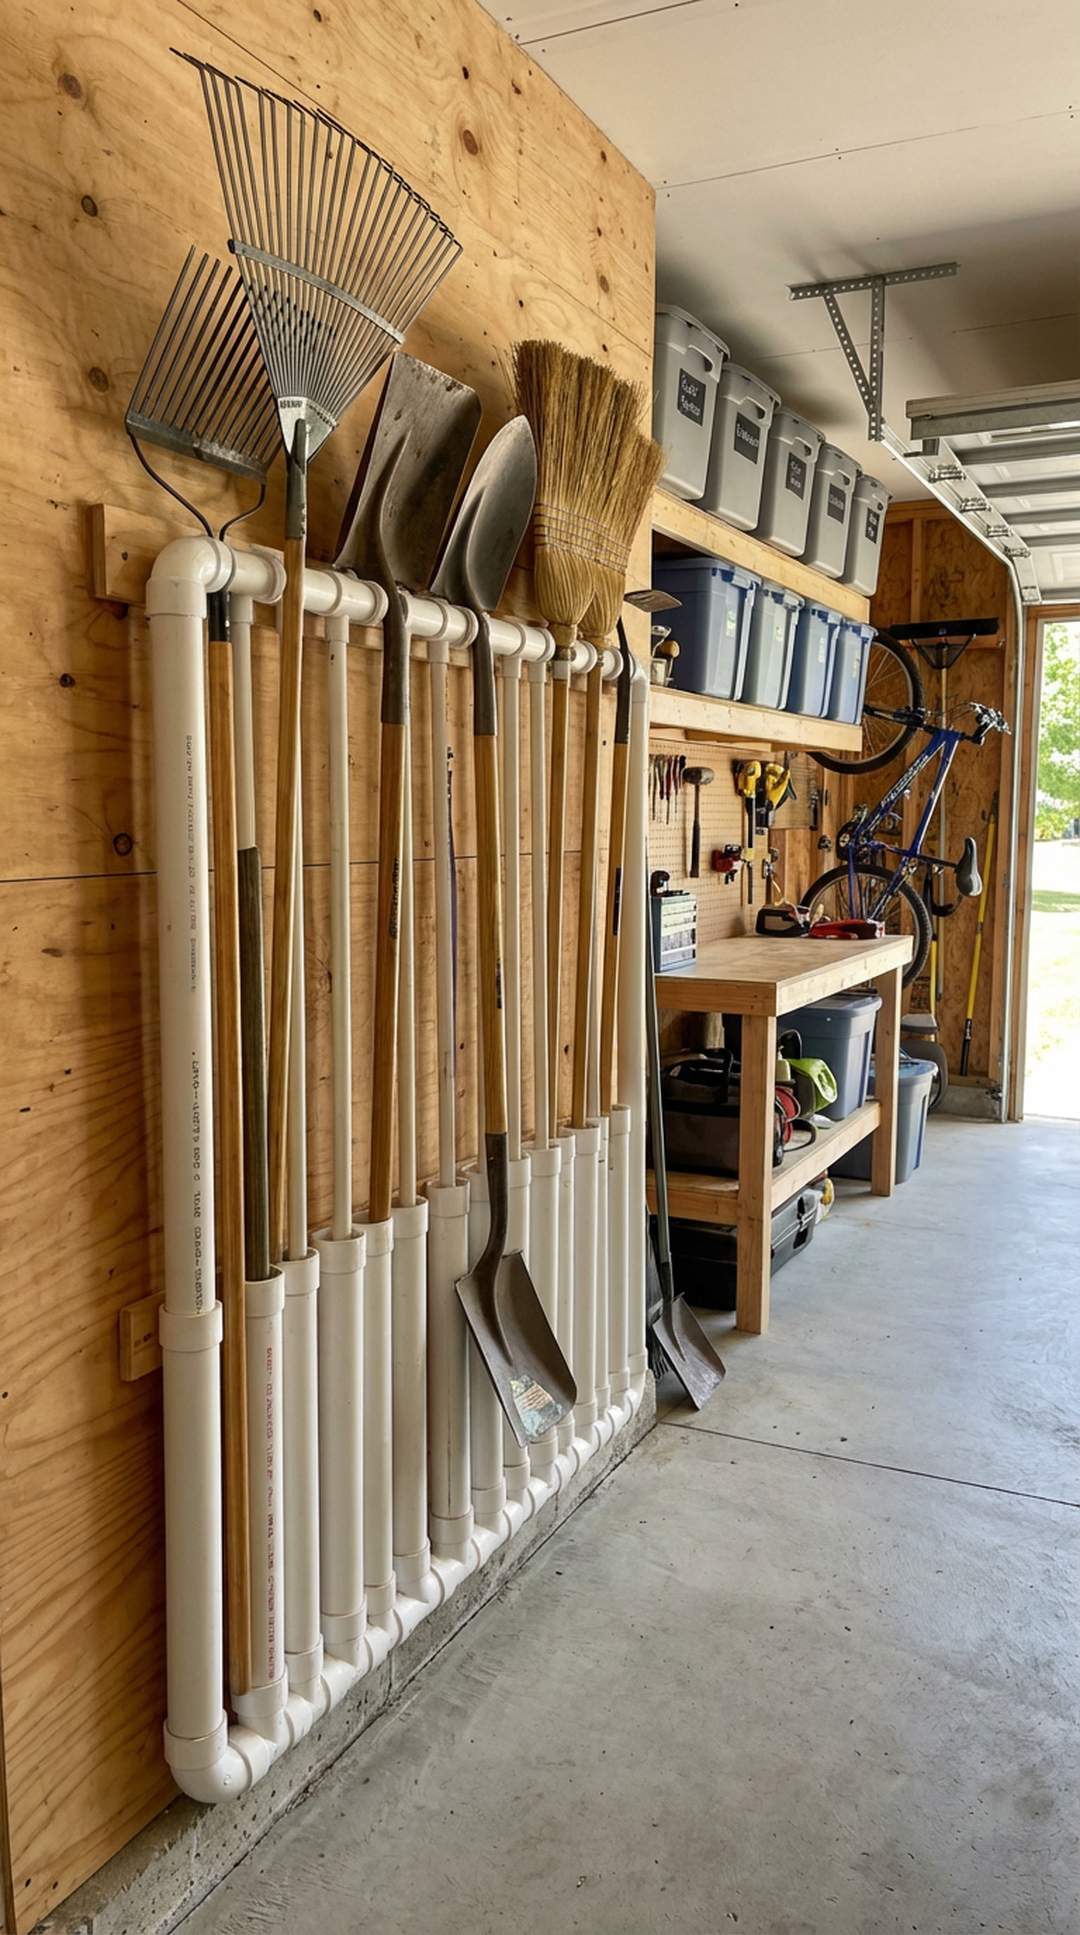
Create a custom tool holder for long-handled items like rakes, shovels, and brooms using PVC pipes mounted horizontally on the wall. Cut 4-6 inch sections of 3-4 inch diameter PVC pipe in half, then mount them to a backing board at an upward angle. This ingenious solution costs under $20 and keeps awkward tools organized and off the floor.
Space pipe holders 12-18 inches apart vertically to accommodate different tool heights. Angle the pipes slightly upward (about 15 degrees) to prevent tools from sliding out. Sand all cut edges smooth to protect tool handles from scratches and splinters.
PRO TIP: Paint your PVC organizers in bright colors to match your garage’s color scheme or create visual zones for different tool types. Spray paint adheres well to PVC and adds a custom, finished look to this budget solution.
11. Implement a Labeling System
Invest in a label maker or use printable labels to clearly mark all storage containers, shelves, and cabinets. A comprehensive labeling system costs $30-50 for a basic label maker and supplies, but pays dividends in time saved searching for items. Clear labels help everyone in the household maintain organization and return items to their proper places.
Use consistent label placement on all containers (front center or upper right corner) for quick scanning. Include general contents and specific details on labels for mixed storage. Consider using color-coded labels to create visual zones or categories throughout your garage.
PRO TIP: Create a master inventory list with photos and label codes using a free smartphone app. This digital catalog lets you search for items quickly and track what you have before making purchases, reducing duplicate buying.
12. Wall-Mounted Bike Racks
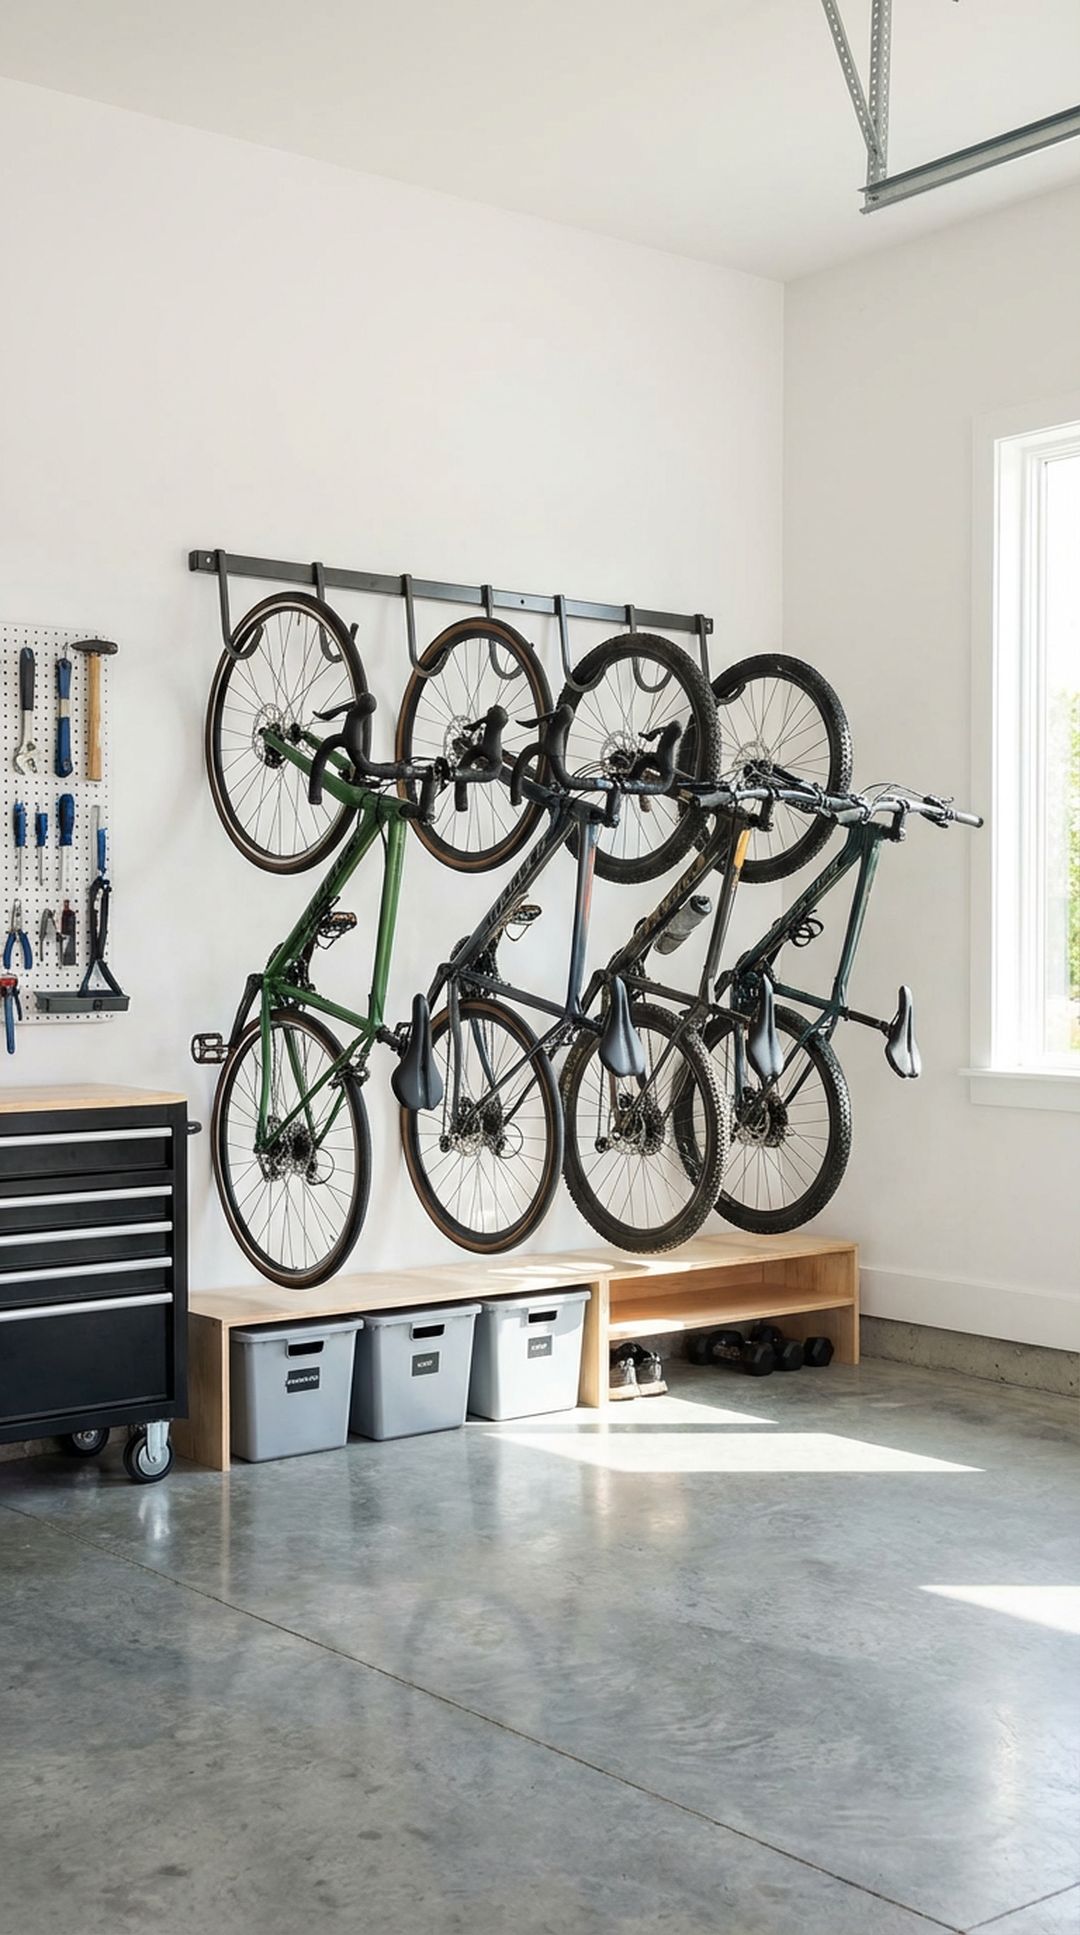
Get bicycles off the floor with vertical or horizontal wall-mounted bike racks that cost $20-40 per bike. This solution saves substantial floor space while protecting bikes from damage and making the garage easier to navigate. Choose from hook-style racks, horizontal arms, or vertical storage systems depending on your wall space and ceiling height.
Mount racks into wall studs using appropriate anchors rated for the weight of your bikes plus 50% extra capacity. Position racks at heights that allow easy lifting without straining. Alternate bike orientations (front wheel, rear wheel) when storing multiple bikes to minimize width requirements.
PRO TIP: Install a small shelf or basket beneath each bike rack to store helmets, locks, and cycling accessories. This keeps all biking gear together in one designated zone and prevents small items from getting misplaced.
13. Repurposed Jar Storage for Small Parts
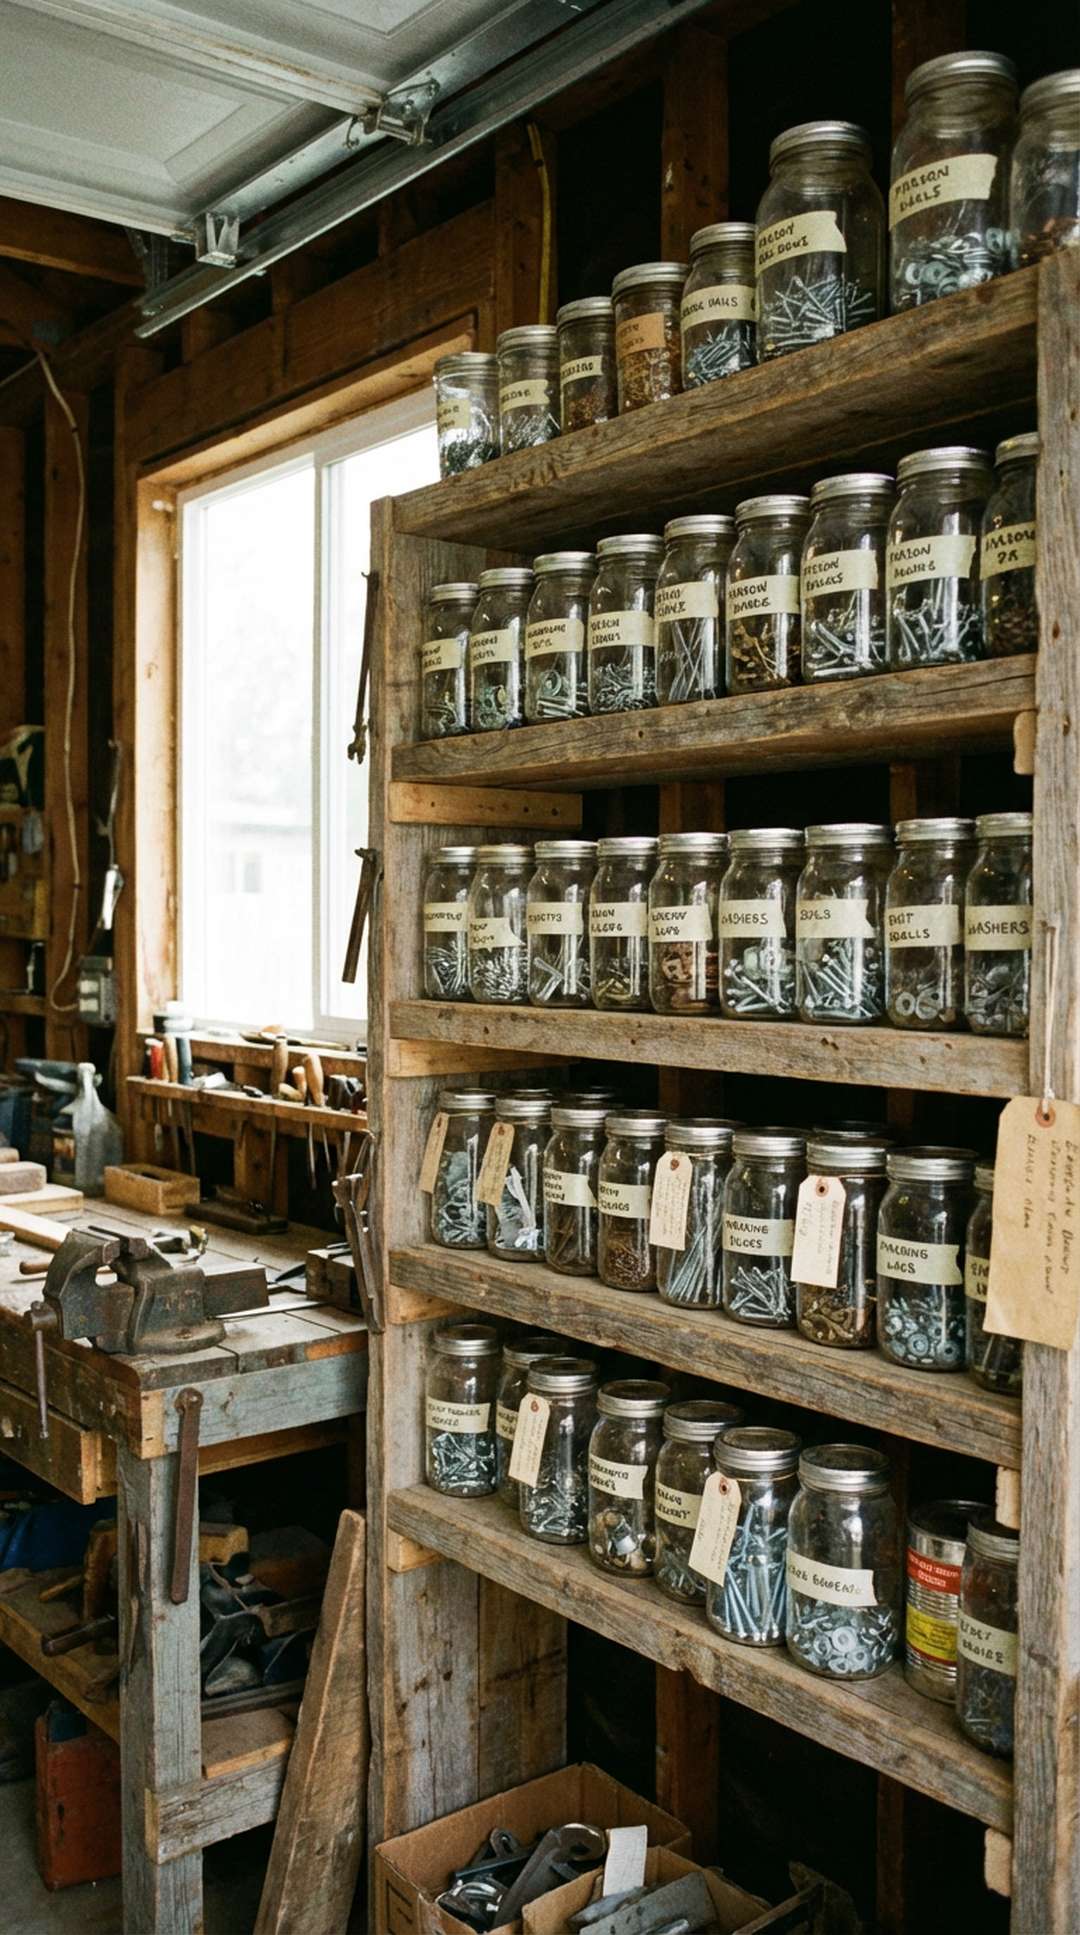
Mount mason jars or recycled food jars under shelves to create visible storage for screws, nails, washers, and other small hardware. Attach jar lids to the underside of shelves with screws, then simply twist jars on and off for access. This nearly-free solution uses materials you already have and turns wasted space into organized storage for hundreds of small items.
Clean and dry all jars thoroughly before use. Sort hardware by size and type into separate jars for easy identification. Write contents on the jar lid with permanent marker for quick reference when looking up from below.
PRO TIP: Upgrade your jar system by spray-painting the lids in metallic finishes or bold colors. This simple touch makes the installation look intentional and decorative rather than purely functional, elevating your garage’s overall aesthetic.
14. French Cleat Wall System
Install a French cleat system for the ultimate in flexible, modular storage. This interlocking bracket system costs $40-80 in materials and allows you to rearrange storage components without making new holes in your walls. Build custom holders for specific tools or equipment that can be repositioned as your storage needs change over time.
Cut cleats from 3/4 inch plywood at a 45-degree angle using a table saw. Mount the wall cleat horizontally into studs every 16 inches for maximum strength. Create matching cleats for bins, shelves, and tool holders that can hang anywhere along the system.
PRO TIP: Paint all French cleat components before assembly to create a cohesive, professional look. Use contrasting colors for the wall cleat and hanging components to make the system visually pop and easier to align when hanging items.
15. Corner Shelving Units
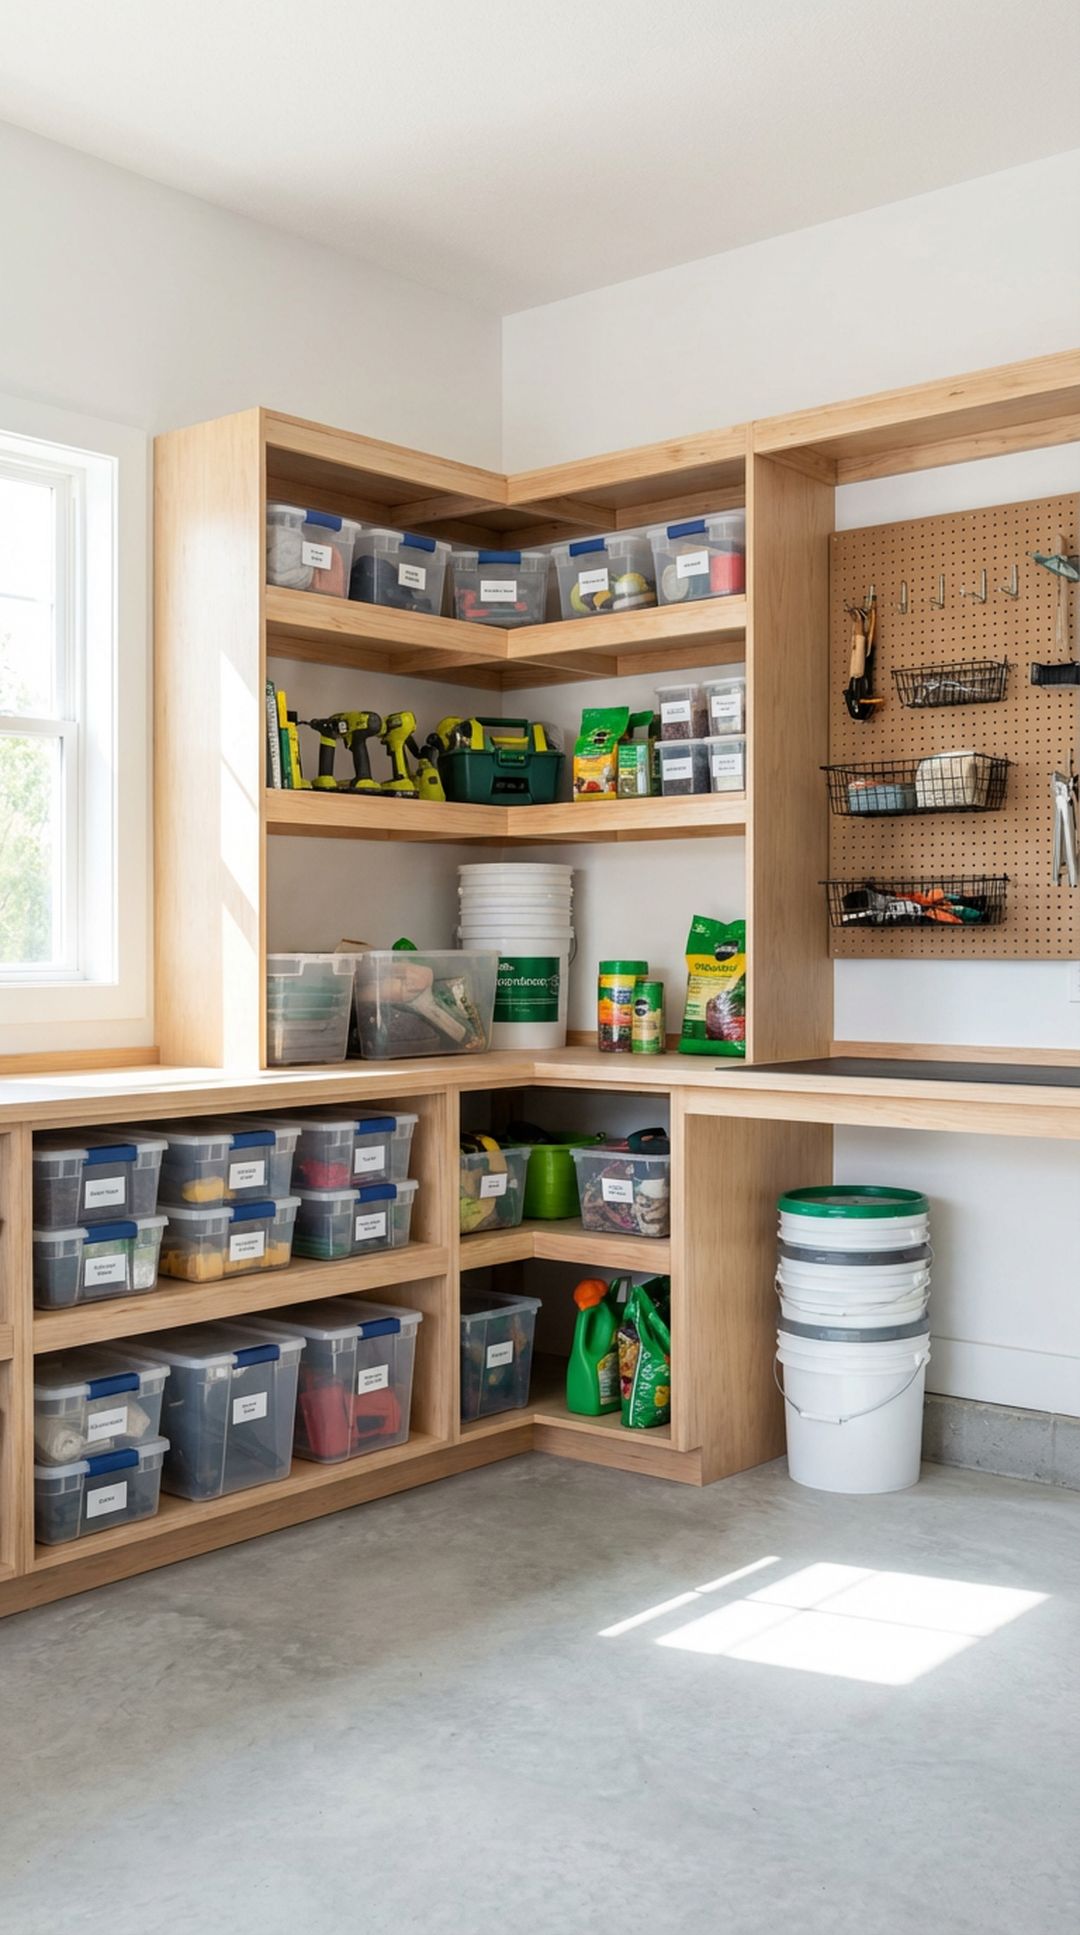
Utilize wasted corner space with triangular or tiered corner shelving units that fit perfectly into those awkward angles. Pre-made corner shelves cost $50-100, or you can build custom units from plywood for even less. These units are ideal for storing automotive fluids, paint cans, and cleaning supplies that don’t require frequent access but need to stay organized.
Secure corner shelves into both adjacent walls for maximum stability. Store heavier items on lower shelves and lighter containers up high. Use corner spaces near the garage door for items you grab on your way in or out, like gardening gloves or dog leashes.
PRO TIP: Add LED strip lighting underneath each corner shelf to illuminate contents and create ambiance. Battery-powered LED strips cost $10-15 and install with adhesive backing, requiring no electrical work whatsoever.
16. Fold-Down Wall-Mounted Workbench
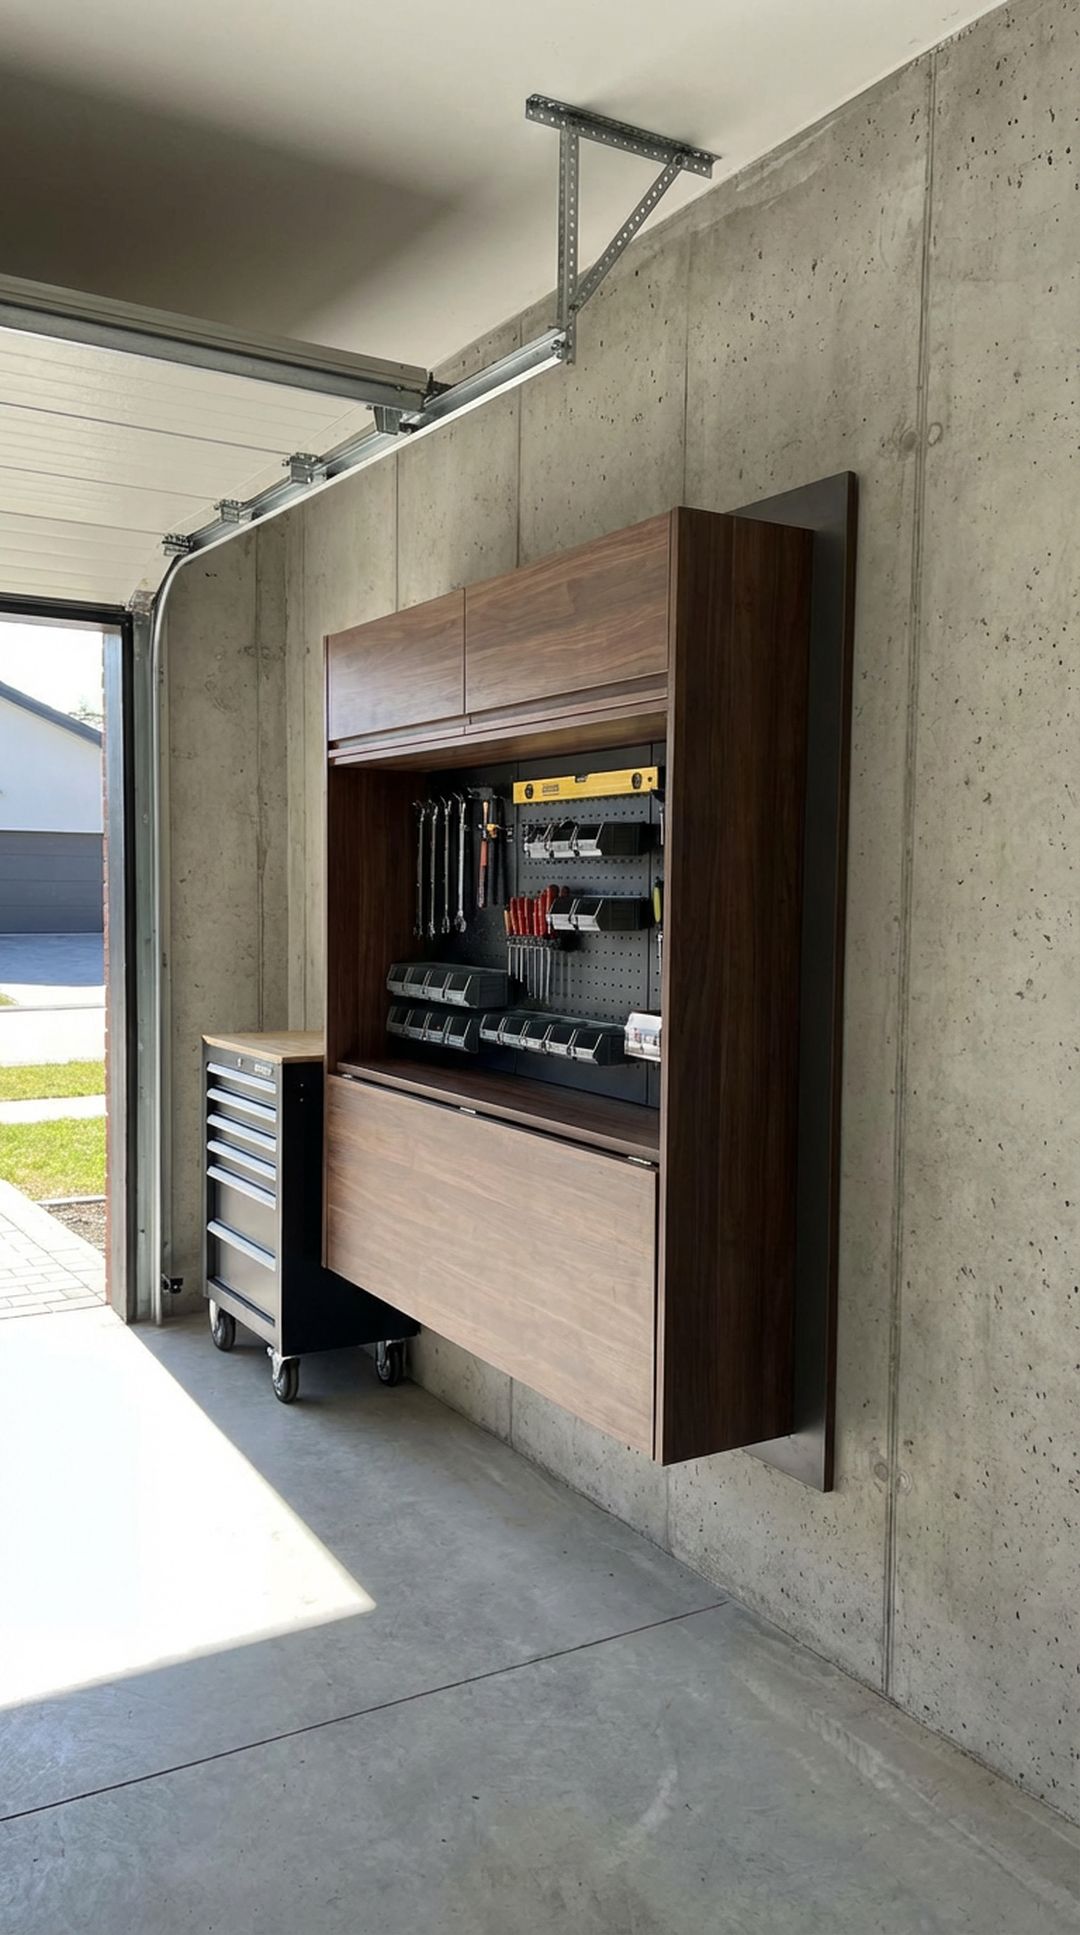
Install a fold-down workbench that flips up against the wall when not in use, preserving valuable garage floor space. DIY plans and hardware kits cost $60-120 and create a surprisingly sturdy workspace perfect for smaller garages or multi-purpose spaces. When folded, the bench becomes nearly invisible, maintaining open floor space for parking and other activities.
Use heavy-duty folding brackets rated for at least 500 pounds to ensure stability. Add a latch or magnet system to keep the bench securely against the wall when folded. Consider installing a pegboard or tool storage on the wall above the bench so tools remain accessible when the bench is both up and down.
PRO TIP: Install a fold-down leg or brace that kicks out automatically when you lower the bench. This simple mechanism, available at hardware stores for $20-30, provides additional support and eliminates the step of positioning a separate leg.
17. Sports Equipment Organizer

Create a dedicated sports zone with specialized racks and baskets for balls, bats, rackets, and protective gear. A combination of wire baskets, hooks, and bat racks costs $50-90 and keeps active equipment organized and ready to grab on the way to practice or games. This organization method teaches kids responsibility for their gear while preventing damage from items being tossed on the floor.
Mount ball storage baskets at kid-friendly heights to encourage independent put-away. Use separate hooks or pegs for each family member’s equipment in different colors. Create a shoe bench or cubby system below sports storage for cleats and athletic shoes that shouldn’t be worn in the house.
PRO TIP: Install a small whiteboard or chalkboard in your sports zone for practice schedules, game times, and equipment checklists. This communication hub helps families stay organized and ensures nothing gets forgotten on game day.
18. Tension Rod Storage for Spray Paint
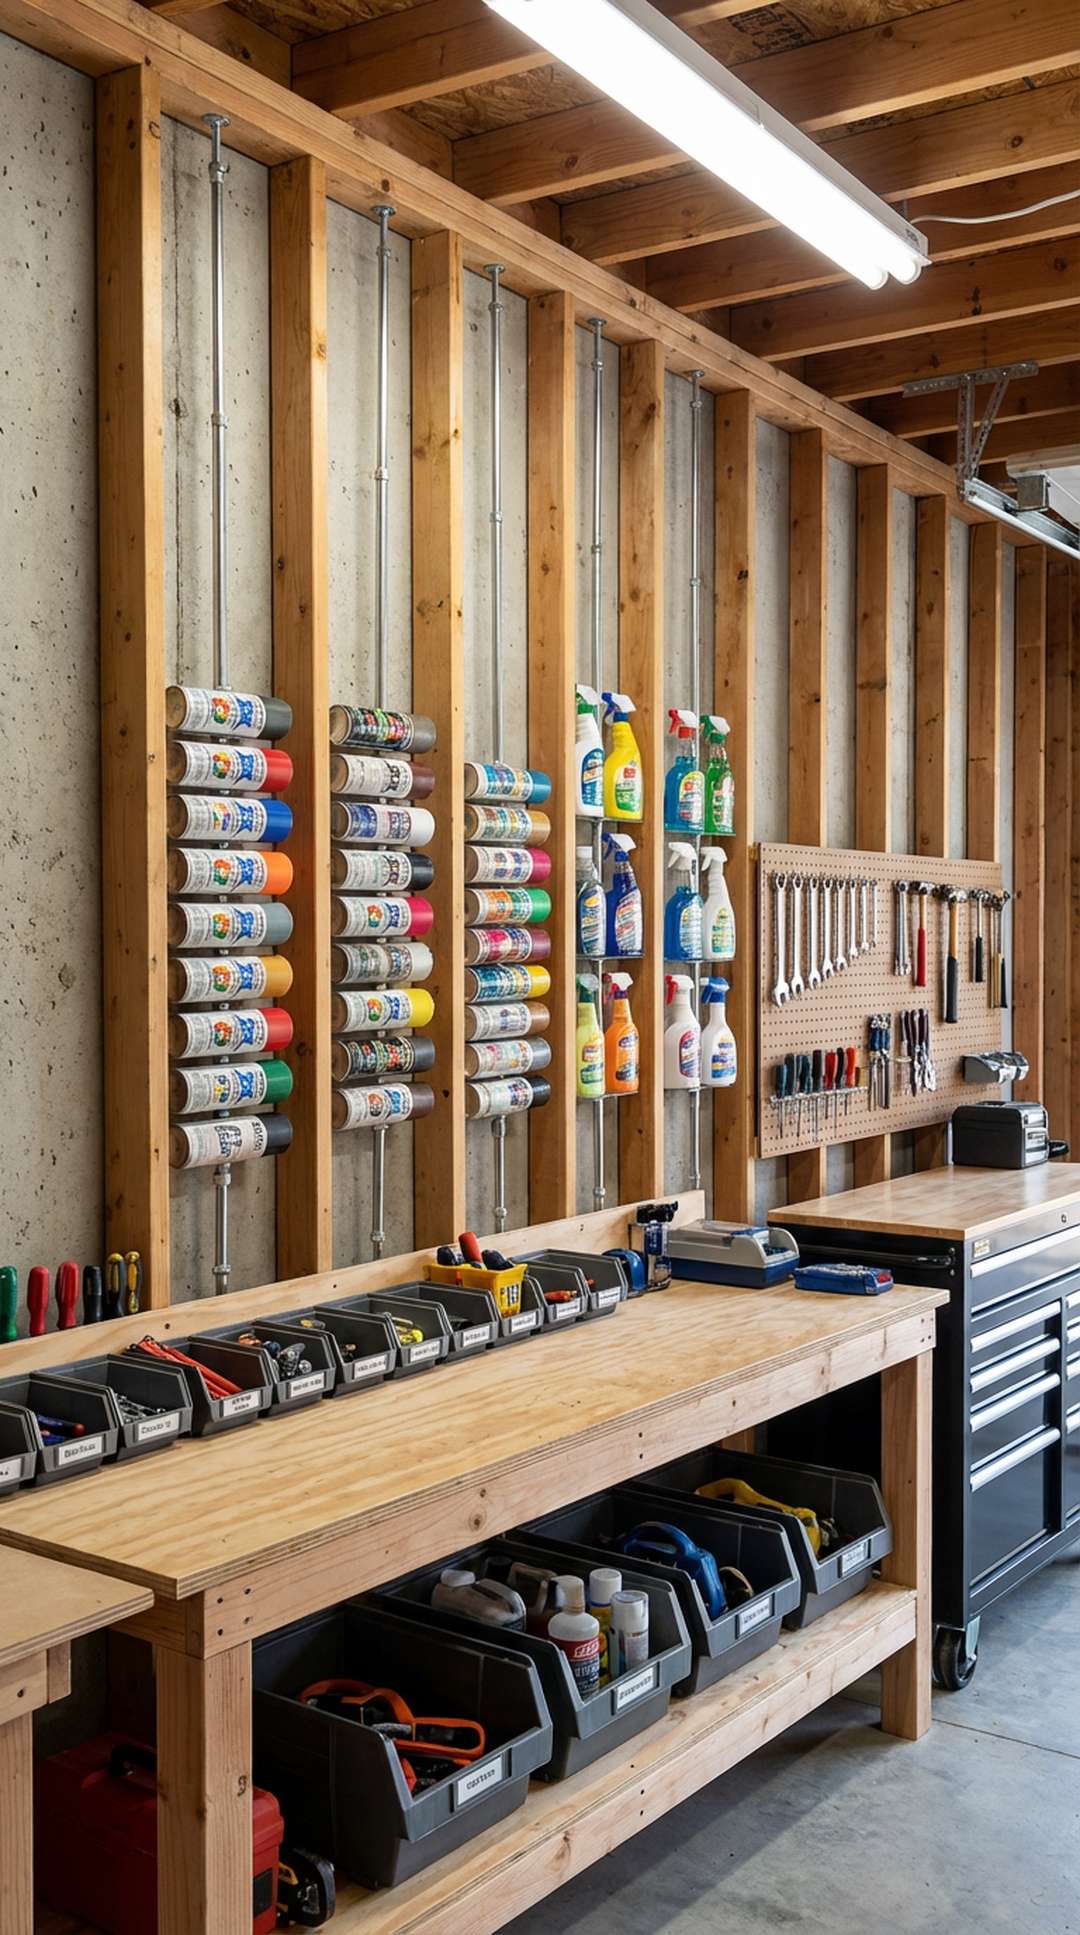
Install spring-loaded tension rods between wall studs or inside cabinets to create instant storage for spray paint cans, bottles, and other cylindrical items. Tension rods cost just $8-15 each and require no hardware or holes. This clever hack keeps cans organized, prevents them from rolling around, and makes it easy to see your full inventory at a glance.
Space multiple rods vertically to create tiered storage for different can heights. Group spray paints by color family or project type for easy selection. Label the ends of each rod with the category of items stored there for quick reference.
PRO TIP: Use tension rods inside deep cabinets or closets to create adjustable dividers for tall bottles and containers. You can reposition rods instantly as your storage needs change without any tools or wall damage.
19. Wall-Mounted Folding Chair Storage
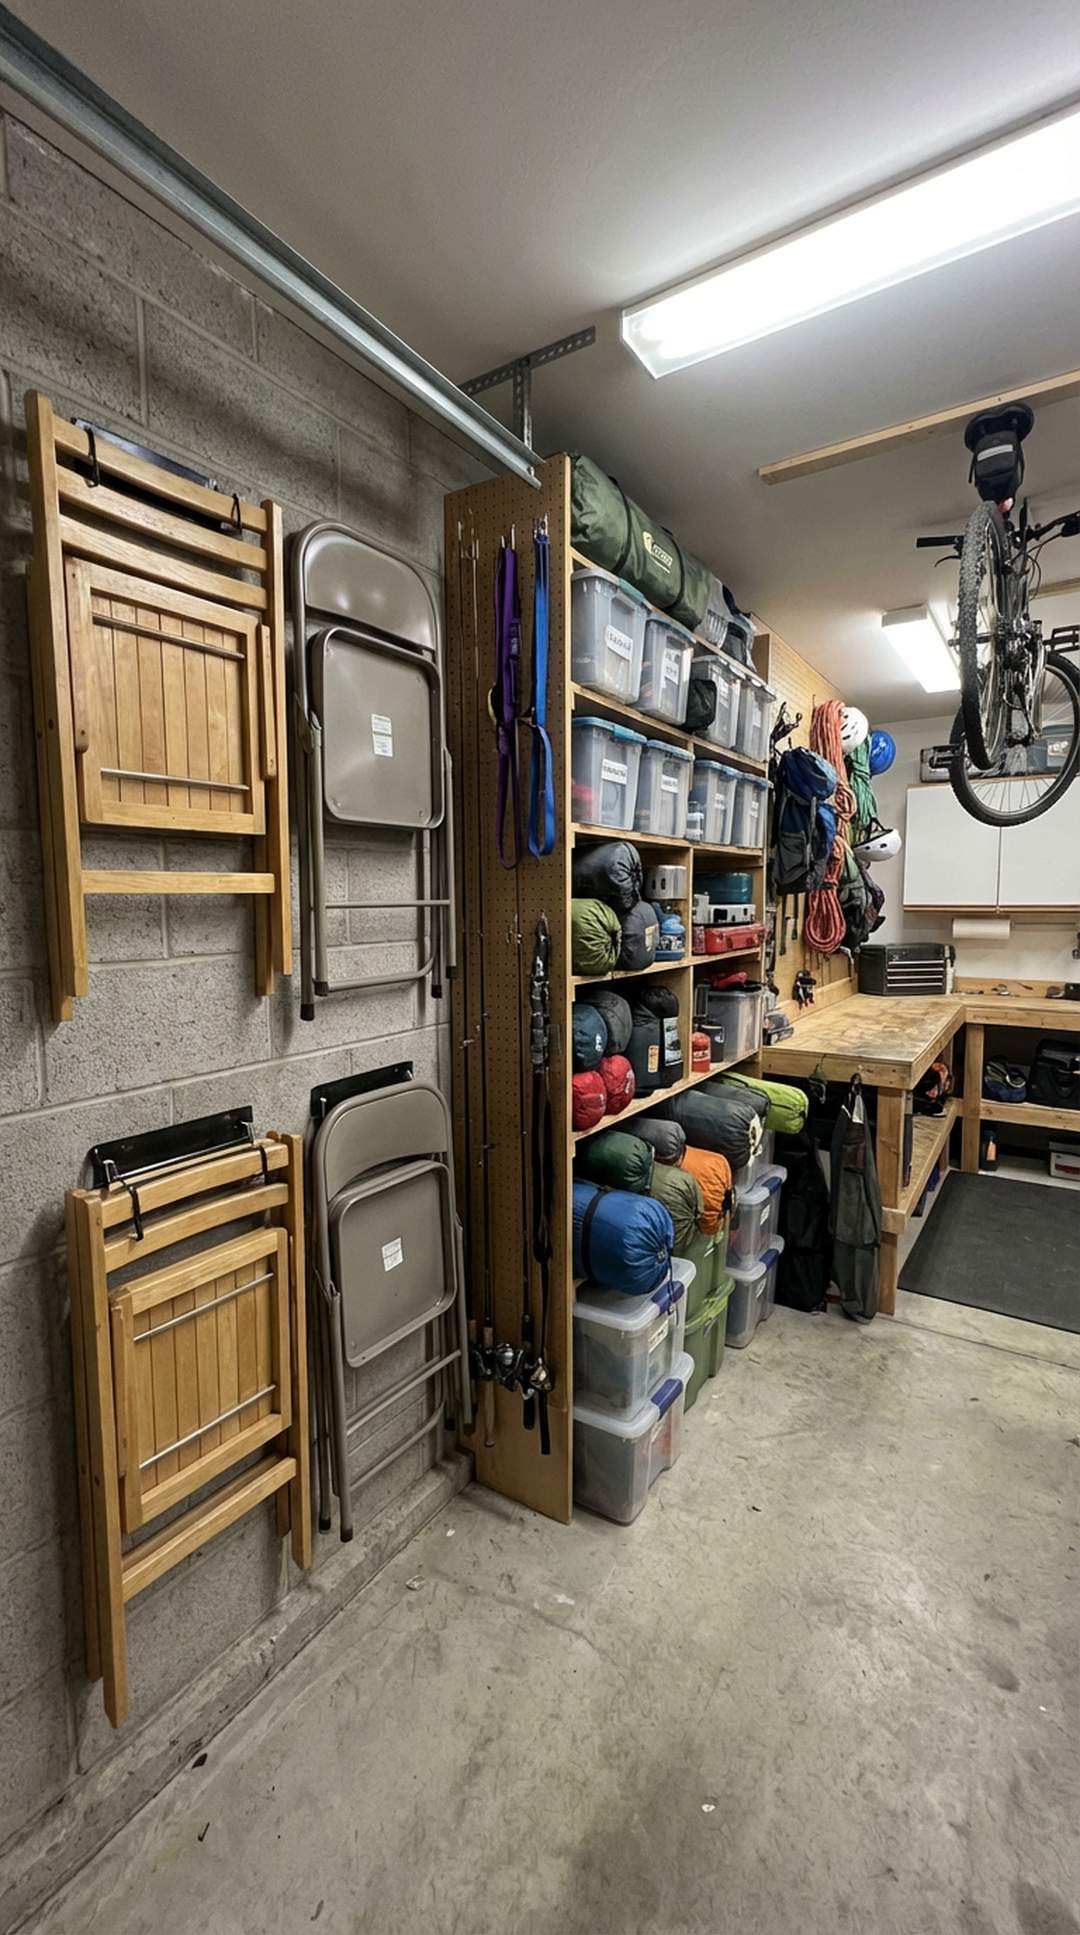
Install wall-mounted hooks or racks specifically designed to hold folding chairs and camping gear off the floor. A simple storage system costs $20-35 and keeps seasonal outdoor equipment organized between uses. This vertical storage approach prevents chairs from getting damaged or creating tripping hazards while making them easily accessible when needed.
Hang chairs with seats facing the wall to minimize how far they protrude into the garage space. Store related items like portable tables and canopies in the same area for complete outdoor event preparation. Consider adding hooks below for camping equipment bags and coolers.
PRO TIP: Spray paint your folding chair frames in matching colors before storage to create a coordinated set that looks intentional and well-maintained. This $10 upgrade makes budget chairs look premium and extends their lifespan by protecting metal from rust.
20. Cord and Hose Reel Organizers
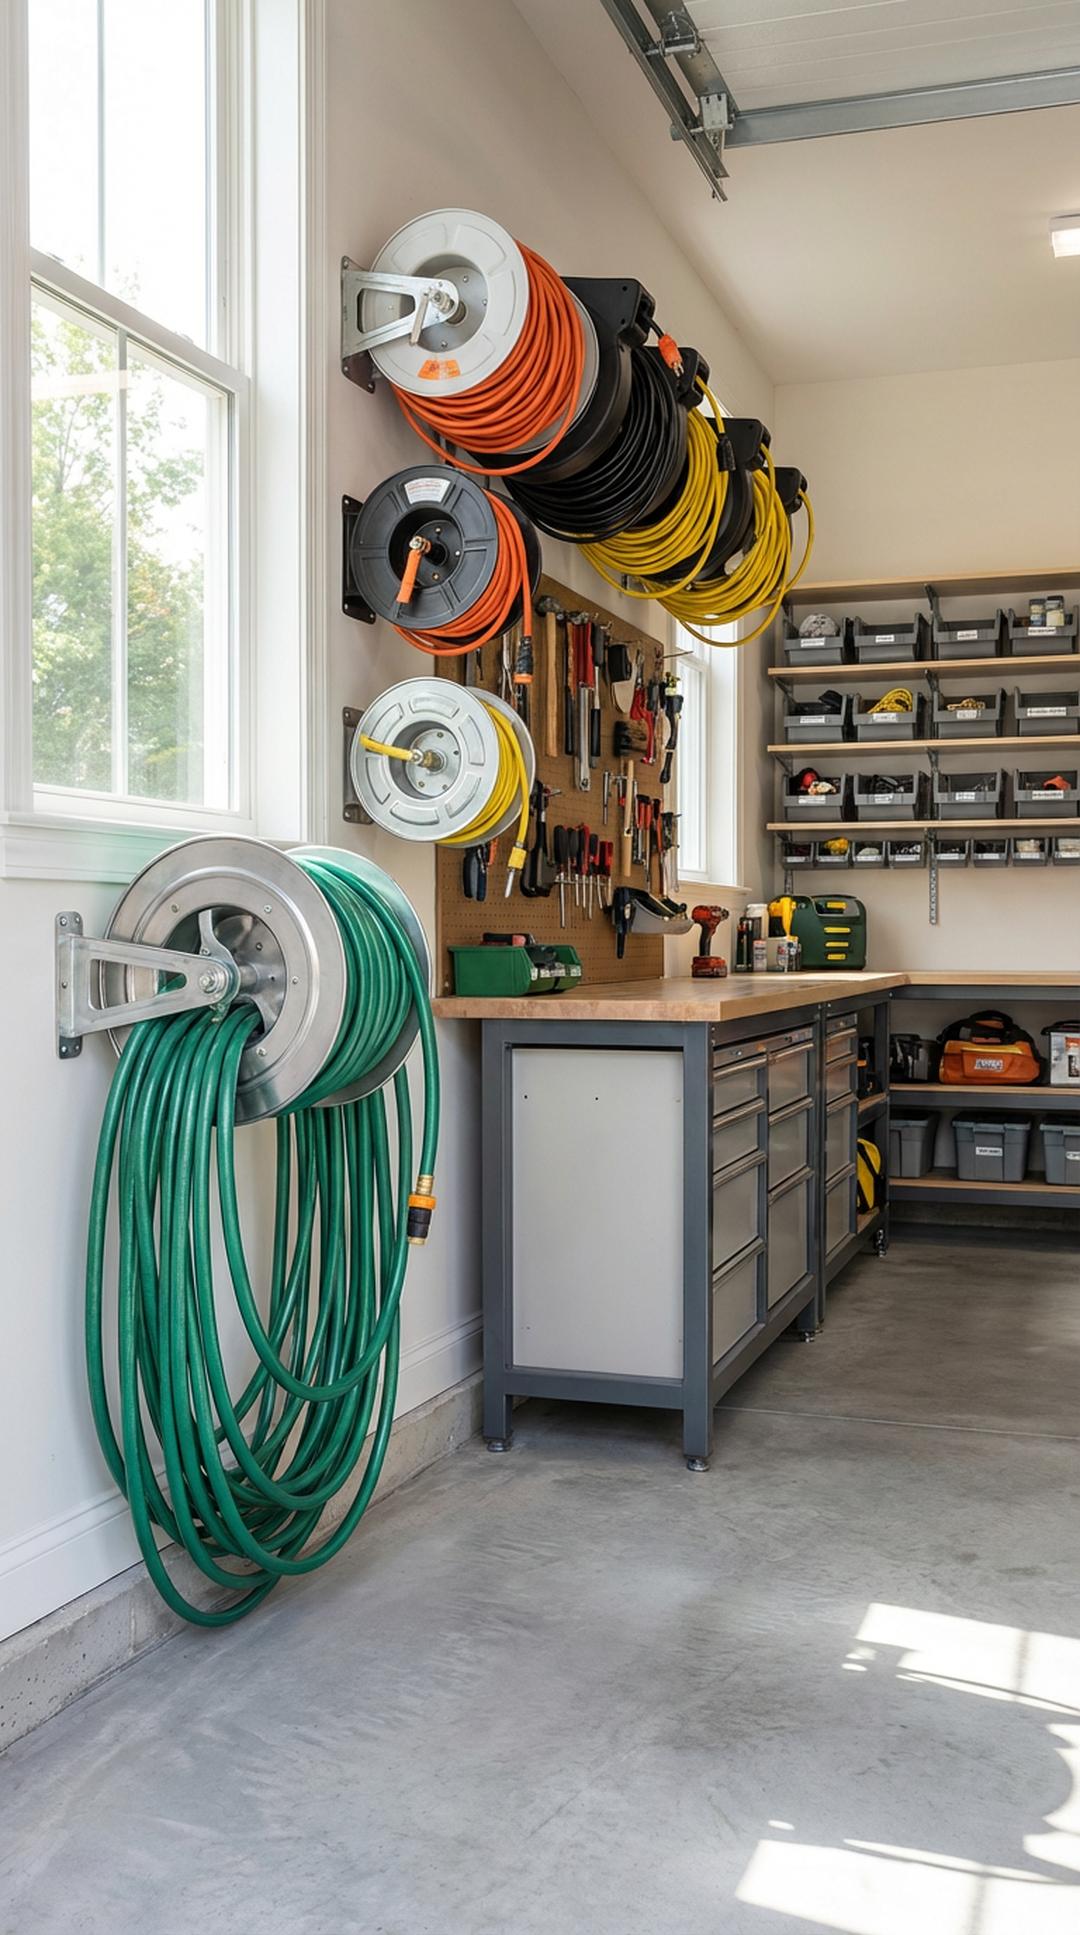
Mount reels or hooks specifically designed for extension cords and garden hoses to prevent tangles and extend the life of these expensive items. Wall-mounted reels cost $15-40 each and keep cords and hoses neatly coiled and ready to use. Proper storage prevents kinking and cracking that can render these items useless long before their time.
Install cord reels near power outlets for convenient access to extension cords. Position hose reels close to the garage door or outdoor faucet for easy hose deployment. Wind cords and hoses loosely to avoid stressing the materials and creating weak points.
PRO TIP: Label each cord reel with the cord length and gauge (50ft/12-gauge, 25ft/14-gauge) using permanent marker or labels. This simple step helps you grab the right cord for any job without unrolling multiple cords to check.
21. Plastic Drawer Tower Storage

Add mobile drawer towers to organize small parts, craft supplies, or automotive accessories in translucent drawers that show contents at a glance. A 5-7 drawer unit costs $40-70 and can roll anywhere in the garage as needed. The drawer system keeps items separated and protected while remaining easily accessible for projects and repairs.
Dedicate each drawer to a specific category and label the front clearly. Use drawer dividers or small containers within drawers to further organize tiny items. Place the tower on a non-slip mat if parking on an inclined driveway to prevent unwanted rolling.
PRO TIP: Hot glue or zip-tie small magnetic sheets inside drawer fronts, then attach metal washers to small containers and parts bags. This magnetic system prevents items from sliding around when you move the tower or open drawers quickly.
22. Add an Accent Wall with Paint
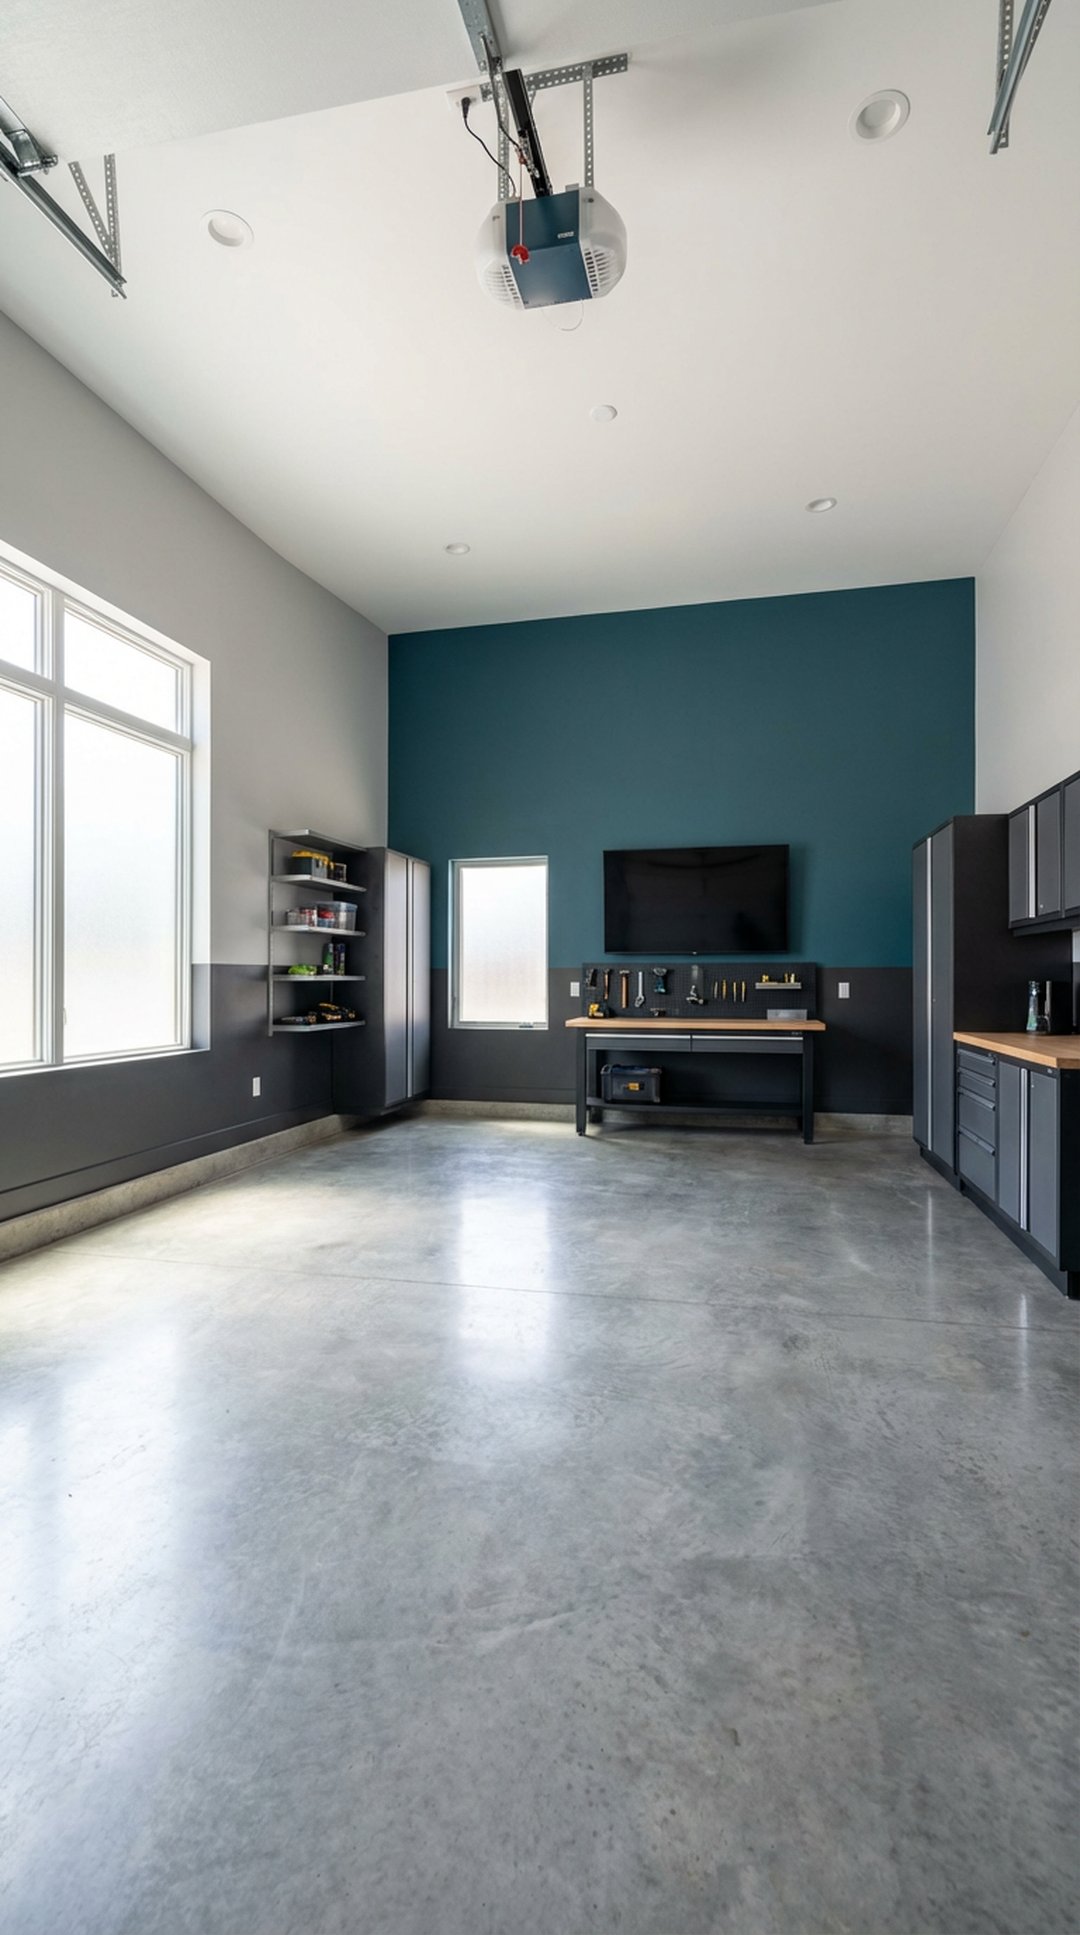
Create visual interest and define work zones by painting one wall in a bold accent color that contrasts with your main wall color. An accent wall costs only $25-40 in paint and adds personality to an otherwise utilitarian space. This design touch makes your garage feel more like an intentional workspace rather than just a storage dump.
Choose the wall behind your main work area or the wall you see when entering from the house for maximum impact. Use colors from your home’s interior palette to create cohesion between spaces. Consider a dark color on the accent wall to hide dirt and grease stains better than light colors.
PRO TIP: Add painter’s tape stripes or geometric patterns to your accent wall for a custom mural effect that costs nothing extra. This creative touch can hide imperfections in the wall while giving your garage a magazine-worthy feature wall.
23. Dedicated Recycling and Trash Station
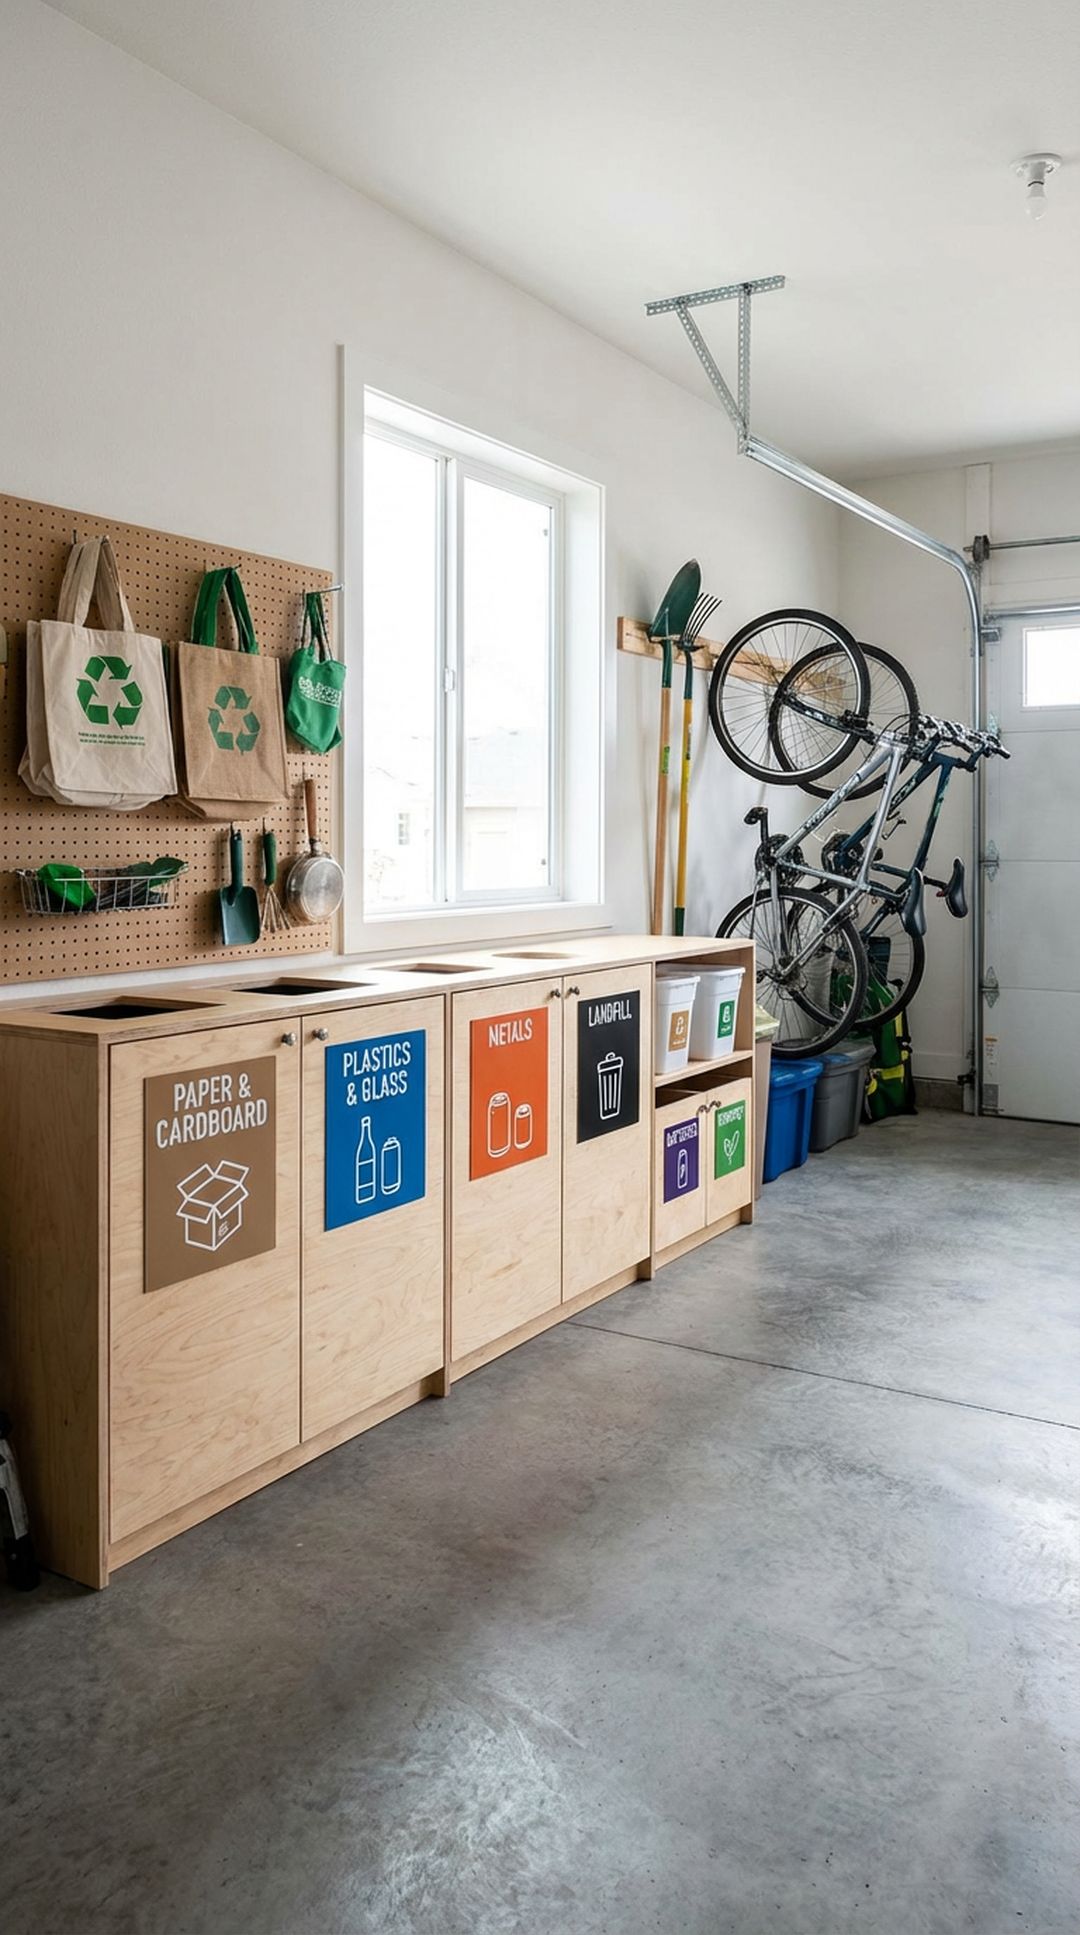
Set up a proper waste management station with separate bins for trash, recycling, and potentially compost or hazardous waste. A multi-bin system costs $40-80 and encourages proper sorting while keeping garbage contained and organized. Clear labeling and proper bin sizing makes it easy for everyone to dispose of items correctly and keeps your garage cleaner.
Position the recycling station near the door to your house for convenient disposal of kitchen recyclables on your way to the car. Choose bins with lids to control odors and keep pests out. Designate a separate small container for hazardous items like batteries and light bulbs that require special disposal.
PRO TIP: Mount a bag dispenser on the wall above your recycling station to always have trash bags on hand. Install it high enough to dispense bags but low enough to reach comfortably, typically around 5-6 feet from the ground.
24. DIY Sliding Door Cabinets
Build or retrofit cabinets with sliding barn-style doors to save space compared to traditional swing-out cabinet doors. Sliding door hardware kits cost $40-80 and can transform existing cabinets or be incorporated into new builds. This modern design element also adds visual interest while creating cleaner sight lines throughout your garage.
Use lightweight materials like 1/4 inch plywood or even fabric panels for doors to minimize stress on sliding hardware. Install doors so they overlap in the center for complete closure. Add soft-close mechanisms to prevent slamming and extend hardware life.
PRO TIP: Upcycle old interior doors or fence boards as sliding cabinet doors for a rustic farmhouse look. Sand and stain the reclaimed wood to match your aesthetic while spending almost nothing on materials.
25. Install Window Treatments for Privacy
Add blinds, curtains, or window film to garage windows for privacy, light control, and improved climate control. Basic window treatments cost $30-60 per window and make your garage feel more like finished living space than exposed storage. Privacy coverings also deter theft by preventing potential thieves from seeing your valuables from outside.
Choose moisture-resistant materials designed for bathrooms or outdoors since garages experience temperature and humidity fluctuations. Install blackout options if you use your garage for woodworking or other projects requiring controlled lighting. Consider reflective films that block heat in summer while allowing natural light to filter through.
PRO TIP: Use magnetic curtain rods that attach directly to metal garage doors for temporary privacy without drilling holes. This $15 solution is perfect for attached garages where you want privacy from the street without permanent installation.
26. Create a Power Tool Charging Station

Designate a wall area with a power strip or outlet for charging all your cordless power tools in one convenient location. Add custom-cut foam inserts or brackets to hold tools and batteries upright while charging. This $30-50 setup ensures tools are always charged and ready to go while keeping all your power equipment organized in one dedicated zone.
Mount tools at eye level for easy monitoring of charge status lights. Create labeled spots for each tool and its corresponding batteries. Use a surge protector with individual switches to save energy and prevent phantom power draw when tools aren’t charging.
PRO TIP: Install a small shelf above your charging station to store instruction manuals, warranty cards, and spare parts for each tool. Having documentation at hand makes troubleshooting and maintenance much easier.
27. Add Weatherstripping and Insulation

Seal gaps around doors and windows with weatherstripping to keep out drafts, pests, and moisture. A complete weatherstripping kit costs $30-60 and makes your garage more comfortable year-round while potentially lowering your home’s energy bills if the garage is attached. This improvement pays for itself through energy savings and creates a cleaner, more pleasant working environment.
Replace worn weatherstripping on the garage door bottom seal first, as this is typically the largest source of air leakage. Check and seal around service doors, windows, and any penetrations for electrical or plumbing. Add door sweeps to create an additional barrier against pests and water.
PRO TIP: Use spray foam insulation to fill gaps around light fixtures, outlets, and cable penetrations for a complete seal. A $5 can of foam seals dozens of small gaps that collectively allow significant air movement and pest entry.
28. Install a Safety Station

Create a dedicated safety zone with a mounted fire extinguisher, first aid kit, and emergency contact information clearly visible. Safety equipment costs $50-80 total but could save lives in an emergency. Position these items near the exit door and ensure all family members know their location and how to use them properly.
Choose a fire extinguisher rated for ABC fires (the most versatile type) and mount it between 3-5 feet off the ground for easy access. Check the first aid kit quarterly to replace expired items. Post emergency numbers for fire, poison control, and utilities where they’re visible even in poor lighting.
PRO TIP: Add a battery-powered motion-sensing LED light above your safety station to ensure equipment is visible even during power outages. This $15 addition could make the difference in locating critical safety equipment during an emergency.
29. Mudroom-Style Shoe and Coat Storage
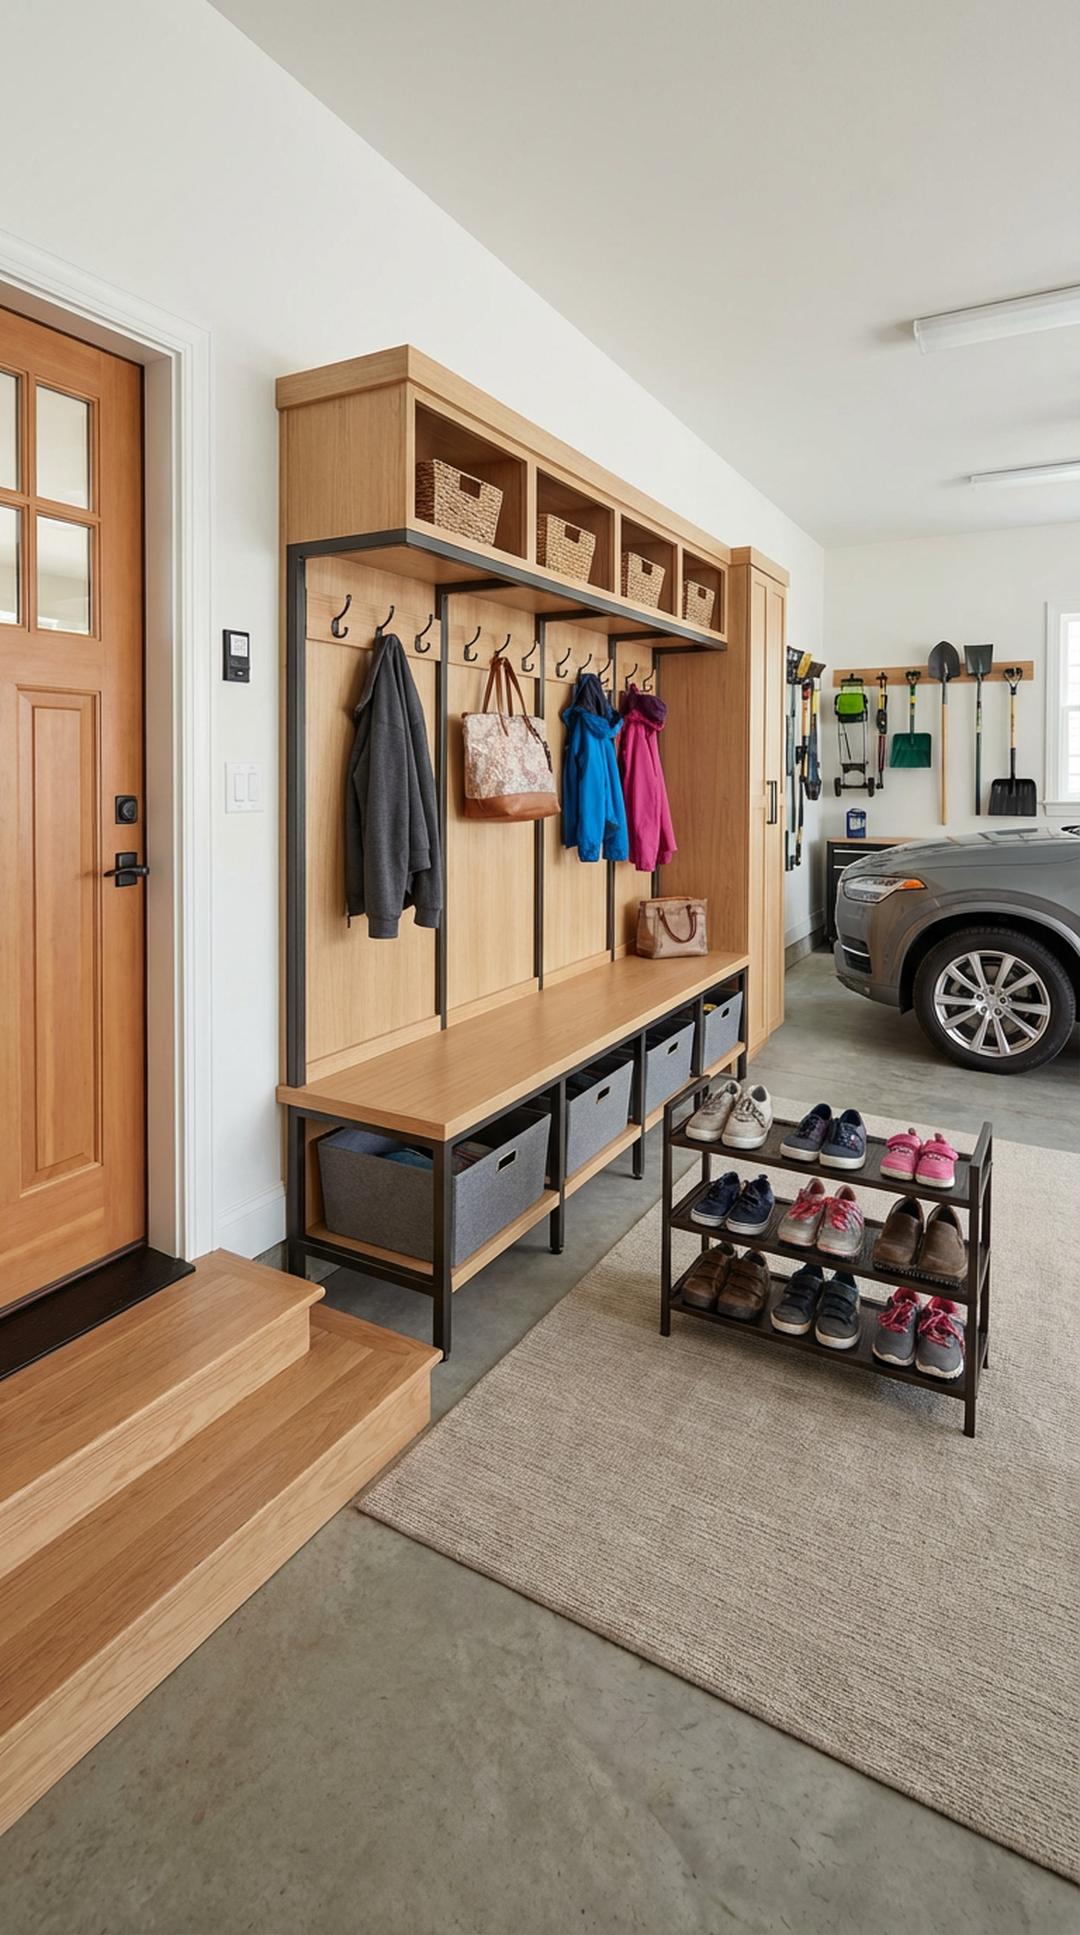
Install hooks and a shoe rack near the door from your garage to the house to create a functional mudroom area. This transition zone costs $40-70 and prevents dirt and clutter from migrating into your home. Providing a specific place for shoes, coats, and bags encourages good habits and keeps your home cleaner with minimal effort.
Position hooks at various heights to accommodate both adults and children. Use a bench with storage underneath for putting on shoes comfortably. Add a small tray or mat underneath for wet or dirty shoes to protect your garage floor finish.
PRO TIP: Install a full-length mirror near your mudroom area to do last-minute appearance checks before leaving home. This $20 addition is surprisingly useful and makes your garage entry area feel more thoughtful and complete.
30. Personalize with Decorative Wall Art
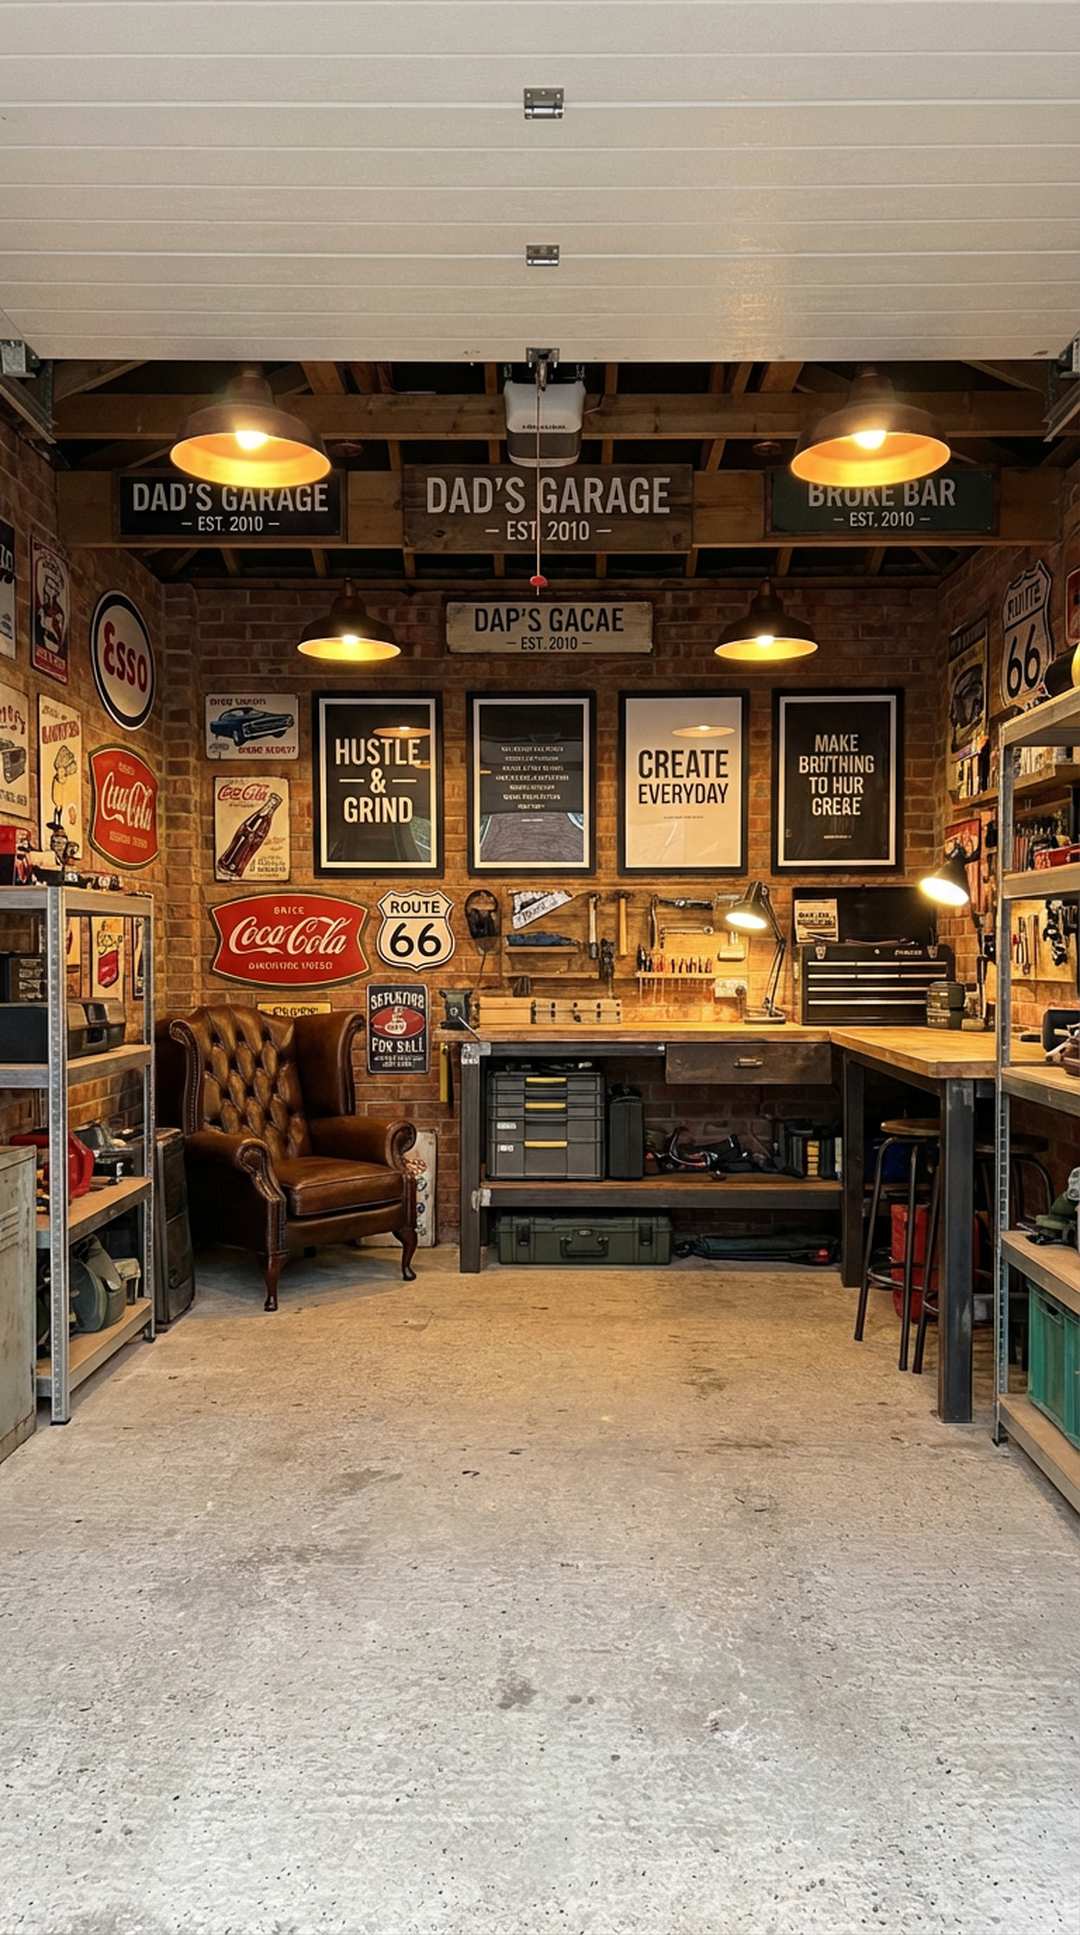
Finish your garage transformation by adding personality with vintage signs, motivational posters, or family photos in weather-resistant frames. Decoration costs $30-80 depending on your choices and makes your garage feel like an intentional space worthy of time and attention. This final touch celebrates your hard work and creates a space you’ll actually want to spend time in.
Choose items that reflect your hobbies and interests—automotive posters for car enthusiasts, sports memorabilia for athletes, or vintage tool advertisements for craftspeople. Seal paper items in frames or laminate them to protect against garage humidity. Create a gallery wall featuring family photos from past projects completed in this newly transformed space.
PRO TIP: Visit thrift stores and flea markets for authentic vintage signs and industrial decor at a fraction of retail prices. These aged pieces add instant character and tell a story that new reproductions simply can’t match.


