Last Updated on October 15, 2026
A single freeze-thaw cycle can crack an engine block in under 24 hours. That is the blunt reality facing any boat owner who skips winter prep, and it is why insurance adjusters report freeze damage as one of the most expensive, most preventable claims they handle every spring. The good news: a thorough Boat Winterization Checklist: Engine, Fuel System, Batteries, Plumbing, and Trailer Storage turns a potentially catastrophic repair bill into a weekend of straightforward maintenance.
This guide breaks winterization into the five systems that matter most, with separate steps for outboard, sterndrive, and inboard engines, plus a dedicated section for trailered boats. It also flags the spring commissioning mistakes that undo good winter prep, so the work holds up until launch day.
Key Takeaways
- Engine prep differs by drive type: outboards need fogging oil and lower-unit draining, sterndrives need outdrive and manifold draining, and inboard diesels need coolant flushing and filter changes[1][4].
- Fuel should be stabilized, tanks topped off to reduce condensation, and the engine run long enough to circulate treated fuel through lines and filters[5].
- Batteries should be fully charged, cleaned, and stored in a cool, dry place rather than left connected and discharging over winter[10].
- Freshwater, sanitation, and raw-water plumbing need to be fully drained and treated with non-toxic antifreeze to prevent cracked pumps, hoses, and fittings[5][6][10].
- Trailered boats need hull washing, wiring and cable inspection, tire checks, and proper cover tensioning to avoid water pooling and ice damage over winter[1][8][9].
Why a Full Boat Winterization Checklist Matters More Than a Quick Rinse
Many boat owners treat winterization as a quick rinse-and-cover job. Updated 2026 guidance from marine retailers and training organizations tells a different story. Discover Boating, Boat-Ed, and West Marine all structure their current winterizing advice as a strict sequence: consult the owner’s manual first, then service the engine, treat the fuel, drain the plumbing, handle the batteries, and finish with covering and storage[1][5][6][10]. Skipping or reordering these steps is how freeze cracks, corroded fuel injectors, and dead batteries happen.
The reason sequence matters is mechanical. Warm engine oil holds contaminants in suspension, so it has to come out before the engine cools and sits all winter[1][4]. Fuel stabilizer needs run time to reach every line and injector[5]. Water left anywhere in a raw-water circuit, head, or livewell will expand when it freezes and split whatever is holding it[6][9][10]. Treating winterization as one connected system, rather than a handful of unrelated chores, is what separates a boat that fires up clean in April from one that needs a tow to the shop.
For boaters who want the condensed version of this process, the 5-step winterizing guide for 2026 is a useful quick reference alongside this deeper checklist. And if winterization is just one piece of a broader maintenance routine, the complete beginner’s guide to boat ownership and maintenance covers the year-round picture.
Engine Winterization by Drive Type: Outboard, Sterndrive, and Inboard Steps
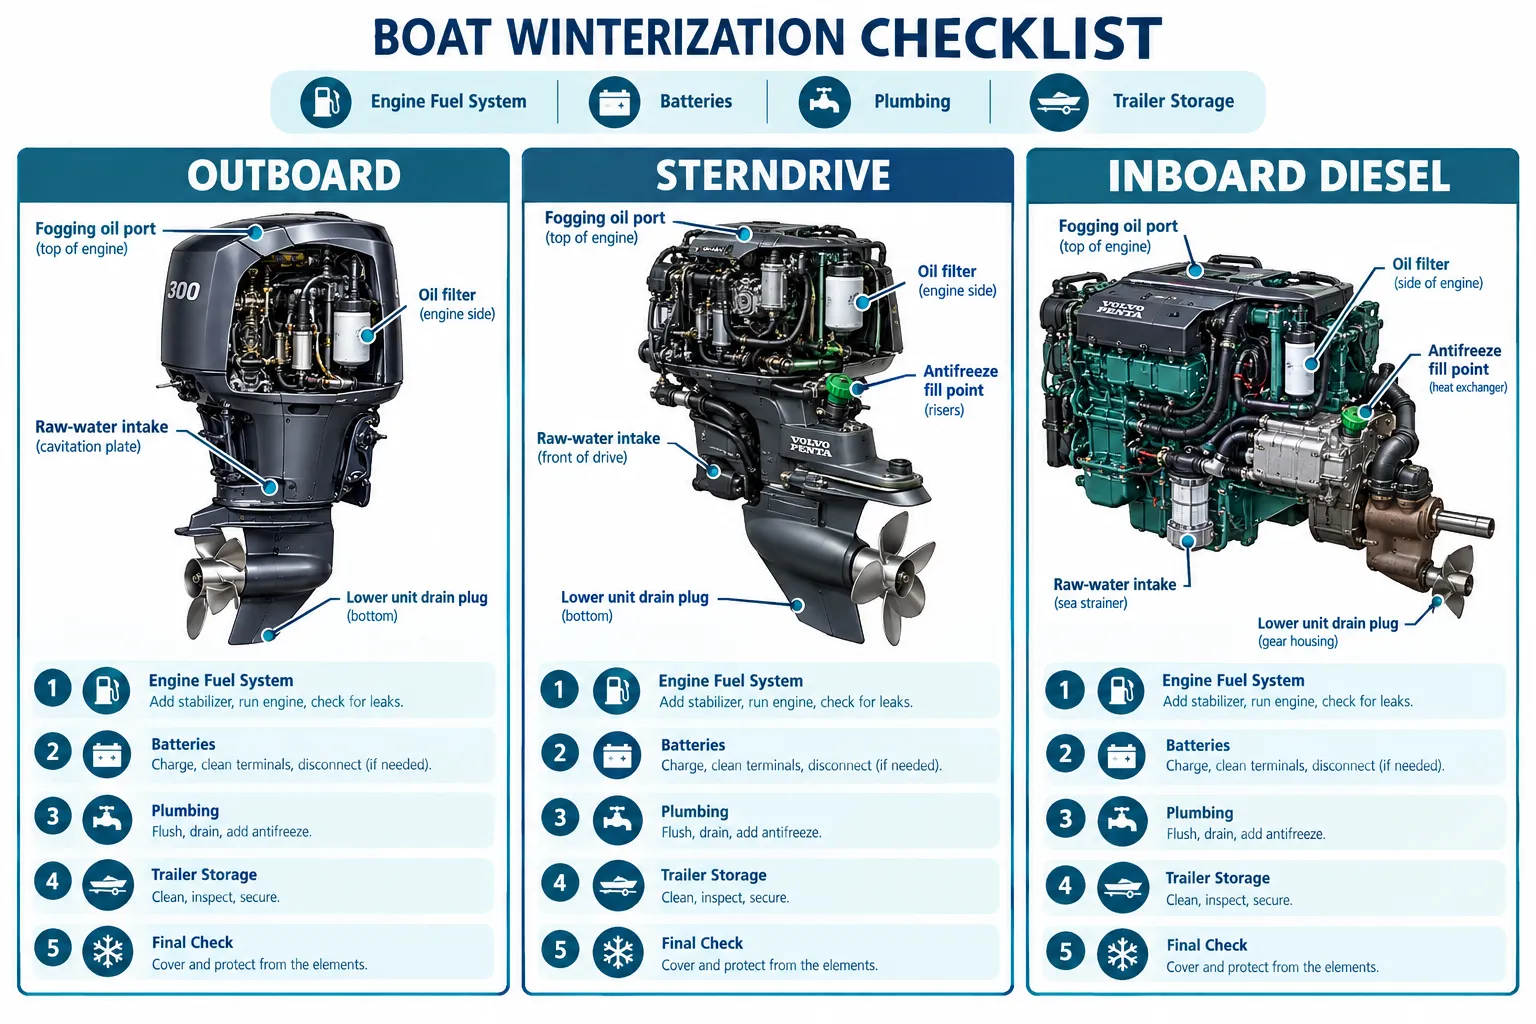
Engine service sits at the core of every authoritative winterization checklist, and the exact steps shift depending on whether the boat runs an outboard, a sterndrive, or an inboard engine. The universal starting point, though, is the same across drive types: warm the engine to operating temperature first. Warm oil flows out faster and carries more acids and contaminants with it, which is why RYA’s engine winterizing guidance and Vetus’s marine diesel guidance both insist on draining oil while it is still warm, then fitting a new filter with fresh oil smeared on the sealing ring[4].
Outboard engines:
- Run the engine with fogging oil fed into the air intake to coat cylinder walls and prevent internal rust over winter[4].
- Drain and refill the lower unit (gear case) with fresh gear lubricant, checking for water contamination in the old fluid.
- Remove the propeller to check for fishing line wrapped around the shaft, which can damage seals over an idle winter.
- Disconnect the battery and store it separately, following the battery steps below.
Sterndrive (inboard/outboard) engines:
- Drain the outdrive and manifolds, following the engine manual’s location guide for every drain point, since missed plugs are the single most common source of sterndrive freeze cracks[7].
- Flush the raw-water cooling system, then circulate a 50/50 antifreeze and fresh water mixture through it to protect against internal corrosion and freezing.
- Change engine oil and the oil filter while the engine is still warm, following the same acid-removal logic used for inboards[1][4].
- Grease the gimbal bearing and check the bellows for cracking before storage.
Inboard diesel and gas engines:
- Warm the engine, then drain the oil and replace the filter, seating a lightly oiled sealing ring to protect internal components during lay-up.
- Flush the raw-water circuit and close seacocks, then refill with a strong antifreeze solution and briefly run the engine so the new mixture fully circulates through the block[4].
- Locate every coolant and oil drain point from the engine manual before starting; diesel and generator systems often have more drain points than gas sterndrives, and West Marine’s diesel winterizing guidance recommends methodical draining rather than guesswork[7].
- Remove the air intake filter and block the intake and exhaust openings with an oily rag, then turn the engine over briefly without starting it, which distributes a protective oil film over cylinder walls[4].
Owners dealing with recurring outboard issues during the season should also review common outboard powered boat issues before winterizing, since some symptoms point to problems that are easier to fix in the fall than to discover in spring.
Fuel System Checklist: Stabilizing, Filtering, and Preventing Condensation
Fuel sitting untreated over a cold winter is one of the fastest ways to end up with a no-start boat in spring. Ethanol-blended fuel is especially prone to absorbing moisture from condensation inside a partially empty tank, which separates fuel components and can gum up injectors and carburetors.
The current standard fuel-system sequence, consistent across Discover Boating, Sailors for the Sea, and regional reporting on winterizing best practices, runs like this[5]:
- Top off the fuel tank to roughly 90 to 95 percent full. This limits the airspace where condensation can form.
- Add a marine-grade fuel stabilizer rated for the fuel type in the tank, following the product’s dosing instructions for tank size.
- Run the engine for 10 to 15 minutes after adding stabilizer so the treated fuel reaches every line, the carburetor or injectors, and the fuel filter.
- Replace fuel filters and water separators rather than reusing ones that may already hold trapped moisture or debris.
- Check fuel lines and hoses for cracking, soft spots, or discoloration while the system is open for filter replacement.
A pull quote worth remembering here:
Fuel stabilizer only works on fuel it actually touches. Running the engine after treatment is not optional; it is how stabilizer reaches the injectors, carburetor, and filter instead of just sitting in the tank.
This is also a good moment to inspect fuel-related wiring and connections near the engine bay, since corroded or chafed wiring in a fuel-rich environment is a known fire risk. The boat fire safety and emergency response guide covers prevention steps worth folding into a fall inspection.
Battery Care and Storage for Winter Layup
Battery damage from winter storage is almost always avoidable, and it almost always comes from the same mistake: leaving a partially charged battery connected and discharging slowly over several cold months. A fully charged battery resists freezing far better than a depleted one, because the electrolyte in a charged battery has a much lower freezing point than in a discharged one.
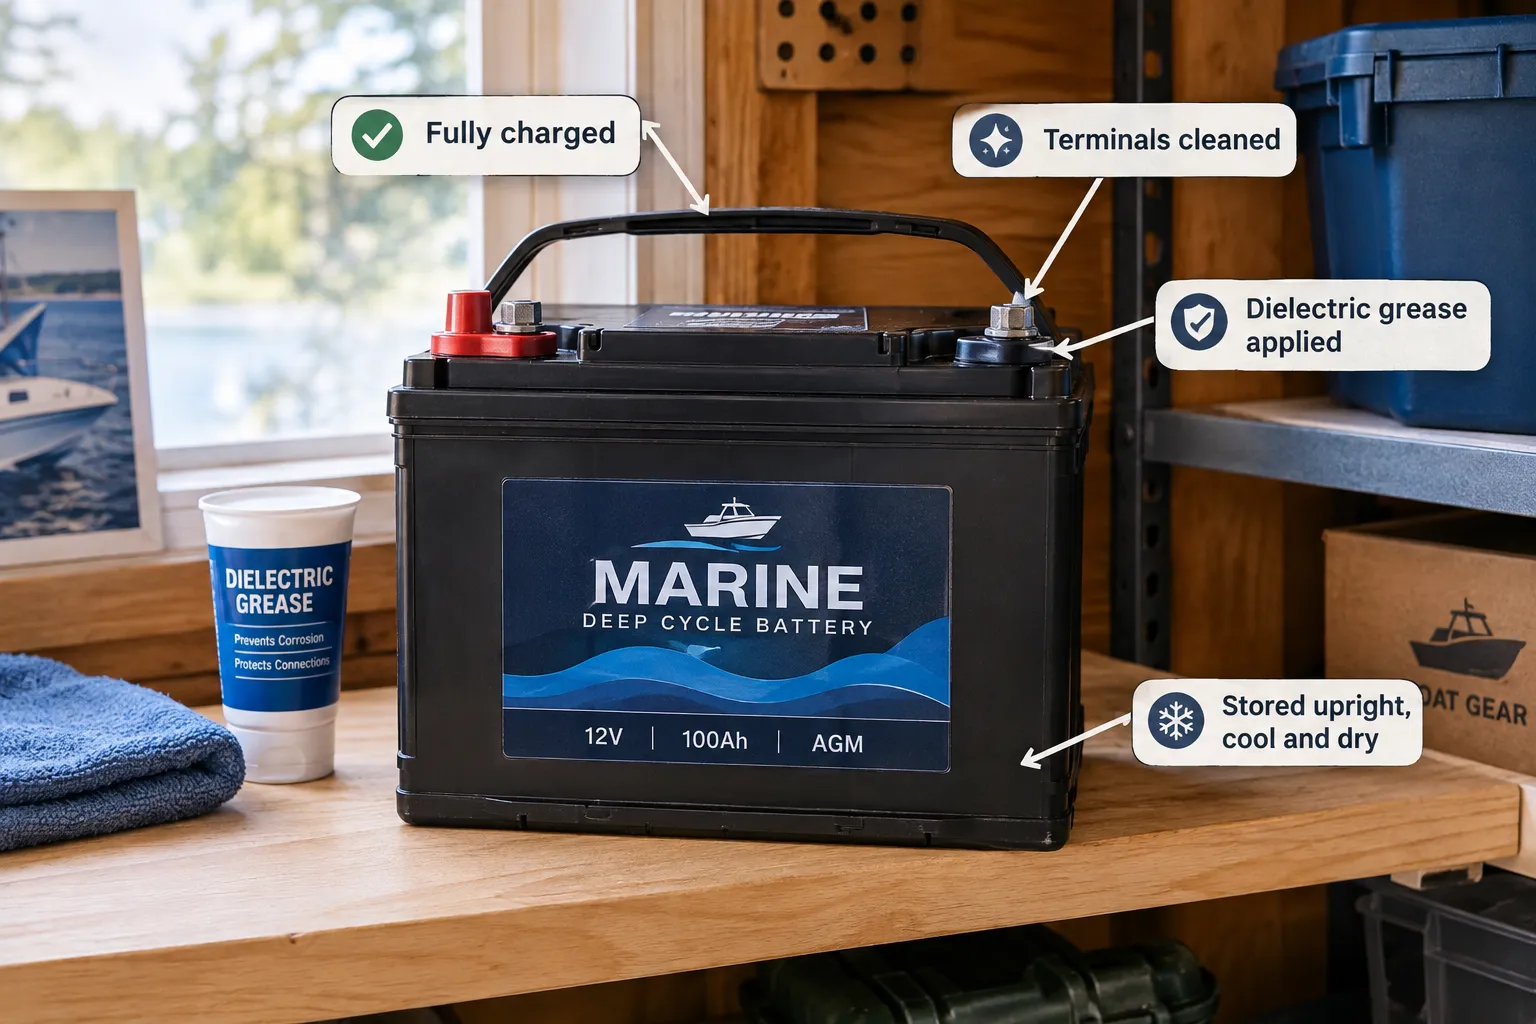
Current battery guidance from storage specialists and seasonal maintenance articles converges on the same short sequence[10]:
- Charge the battery fully one last time before disconnecting it for the season.
- Clean the terminals of corrosion and buildup, then apply a thin layer of dielectric grease to slow future oxidation.
- Disconnect or remove the battery entirely from the boat’s electrical system rather than just switching off a battery switch.
- Store it upright in a cool, dry, well-ventilated space such as a garage or basement, never a freezing unheated shed[10].
- Check the charge periodically through winter, since even a disconnected battery slowly self-discharges and may need a top-up charge mid-season.
Boats with more complex electrical setups, such as those with multiple house batteries, inverters, or solar charging, benefit from the same core logic used in RV electrical troubleshooting. The RV electrical system troubleshooting guide explains diagnostic steps that translate well to marine house battery banks facing similar seasonal discharge issues.
Plumbing, Freshwater, and Sanitation System Winterization
Water left anywhere inside a boat’s plumbing is a freeze crack waiting to happen, and this is the step most often rushed or incompletely done. Modern winterization checklists treat freshwater systems, sanitation systems, and auxiliary circuits like livewells and washdowns as separate tasks that all need attention[5][6][10].
Freshwater system:
- Drain the freshwater tank completely, then drain all faucets, the water heater, and connecting lines.
- Bypass the water heater using a bypass kit before adding antifreeze, so the antifreeze does not fill and waste space inside the heater tank[10].
- Pump non-toxic (propylene-glycol) antifreeze through the system until it runs pink or orange from every faucet, including the shower if equipped[6].
Sanitation system:
- Pump out the holding tank at an approved marine pump-out station before adding any antifreeze[10].
- Flush the head thoroughly with fresh water, then run non-toxic antifreeze through it until it appears at the discharge.
- Add antifreeze directly to the holding tank through the deck pump-out fitting to protect the tank itself and its plumbing.
Auxiliary systems:
- Drain livewells, baitwells, and washdown pumps completely, then run a small amount of antifreeze through each circuit.
- Remove and store any inline water filters, since trapped water inside them can freeze and crack the housing[10].
- Check the bilge pump and float switch for proper operation before storage; a working bilge pump matters even during winter lay-up if snowmelt or rain collects in the bilge.
Propylene-glycol antifreeze is specifically recommended over ethylene-glycol products for anything touching potable water or sanitation systems, both because it is far less toxic and because it still provides reliable freeze protection down to rated temperatures. Standardized printable checklists from marine maintenance resources are a practical way to make sure none of these smaller plumbing branches get missed, since it is easy to drain the main tank and forget a washdown pump tucked in a transom locker[2][3].
Trailer Storage and Winter Prep for Trailered Boats
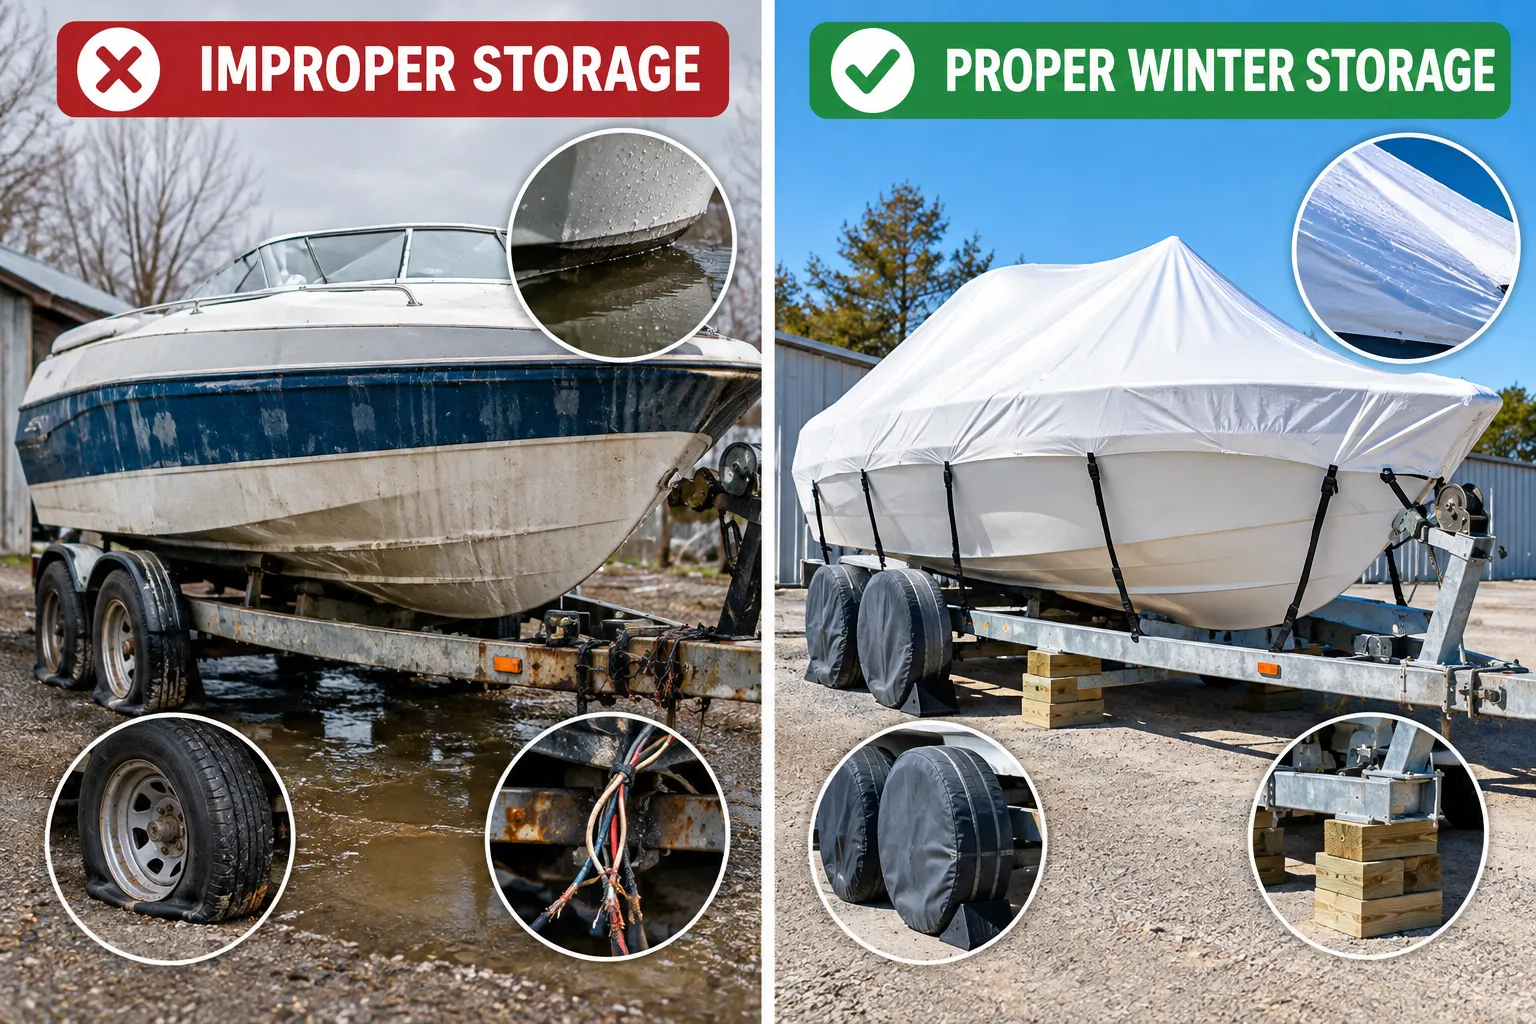
Trailered boats face a different set of risks than boats stored in a marina slip or on a lift, and this part of the Boat Winterization Checklist: Engine, Fuel System, Batteries, Plumbing, and Trailer Storage deserves its own attention. Virginia’s Department of Wildlife Resources, in its updated 15-tip winterizing guidance, stresses a full visual inspection of the boat, motor, and trailer together, paying particular attention to wiring, control cables, and battery cables, which corrode and fray in ways that are easy to miss during a quick walk-around[9].
Hull and deck:
- Rinse the hull and deck thoroughly with fresh water before placing the cover on, removing salt, algae, and debris that can etch gelcoat over winter[8].
- Pressure-wash the underwater hull if the boat was in the water during the season, checking for blistering or soft spots in fiberglass while the surface is clean[1][8].
Trailer mechanics:
- Check tire pressure and tread, and consider using tire covers or plywood pads under the tires to prevent flat-spotting and UV damage during months of sitting still.
- Inspect wheel bearings and repack them if the trailer was submerged often during the season, since water intrusion into bearings is a common spring breakdown cause.
- Test trailer lights and wiring connections, since corrosion from road salt and winter moisture is a frequent cause of lighting failures discovered right before the first spring launch.
Cover and positioning:
- Position the trailer so no part of the hull, deck, or trailer frame has low spots where rain or melting snow can pool and freeze, since standing water around hull fittings is a direct freeze-crack risk even on a boat that is otherwise fully winterized[8].
- Use a properly fitted tarp or shrink-wrap cover with enough slope to shed water and snow, and secure it so wind cannot work it loose over winter[6].
- Chock the wheels and consider blocking up the trailer frame to take weight off the tires during long-term storage.
Owners researching covered storage options, whether a dedicated structure or a repurposed garage bay, may find ideas in this roundup of lake house boat garage designs useful for planning a more permanent winter storage setup. For those storing a boat alongside a travel trailer or RV, the same freeze-protection logic applies across equipment; the guide on avoiding common travel trailer setup mistakes covers overlapping lessons about leveling, weight distribution, and avoiding water pooling that apply just as well to boat trailers.
Spring Commissioning Mistakes That Undo Good Winterization
Good winter prep can still fail at launch time if spring commissioning is rushed. The most common mistakes follow a predictable pattern:
| Mistake | Why It Causes Problems | Better Approach |
|---|---|---|
| Starting the engine before removing fogging oil residue or checking the lower unit | Can cause excessive smoke or gear lube contamination to go unnoticed | Inspect gear lube color and consistency before the first start |
| Skipping a full inspection after unwrapping shrink-wrap | Hidden mold, pest nests, or chewed wiring from a long lay-up can go unnoticed | Do a complete walk-through, including bilge, lockers, and wiring runs |
| Reconnecting batteries without checking charge | A battery that discharged over winter may not hold a full charge even after months on a trickle charger | Load-test batteries before reinstalling, replace any that fail |
| Launching before flushing antifreeze from raw-water systems | Leftover antifreeze can clog small passages or raw-water strainers | Run the engine briefly on muffs to flush antifreeze before launch |
| Forgetting to reinstall water filters and bypass fittings removed for winterizing | Leads to leaks or unfiltered water reaching fixtures | Keep a written list of every part removed in fall, check it off in spring |
A brand-certified mechanic can also catch problems that a visual check will miss, particularly on fuel-injected four-stroke outboards, where complex fuel and electronic systems are harder for an owner to fully diagnose without specialized tools[9]. Vetus’s diesel guidance makes a similar point about marine diesels: filter, coolant, and battery servicing needs to closely follow manufacturer procedures, and a professional is often the safer choice when the owner is unsure of a step.
When to Call a Professional Instead of DIY
Not every winterization task is a good candidate for a weekend DIY project. Diesel engines, generators, and fuel-injected four-stroke outboards carry enough electronic and fuel-system complexity that a missed step can cause expensive damage[7][9]. A marine mechanic familiar with the specific engine brand is worth the cost in these situations:
- Any engine the owner has never personally serviced before, especially a recently purchased used boat.
- Diesel engines and onboard generators, where drain point locations vary significantly by model and manufacturer.
- Boats with extensive electronics, multiple battery banks, or complex plumbing that spans several decks or compartments.
- Any boat showing signs of engine trouble during the season that was never fully diagnosed, since winterizing an engine with an unresolved issue can mask a bigger spring problem.
For boats that stay on the water or at a marina rather than being trailered, reviewing broader seasonal upkeep in the boat category hub is a good way to stay current on maintenance topics beyond winterization alone.
Conclusion
Winterization is not a single afternoon task; it is five connected systems that all need attention in roughly the right order. Warm the engine and change its oil first, then stabilize and run fuel through the system, then charge and remove the batteries, then drain and antifreeze every plumbing branch, and finish with a careful trailer and cover check that eliminates any spot where water can pool and freeze[1][5][6][9][10].
The owners who skip steps almost always regret it in spring, usually in the form of a cracked block, a dead battery that would not hold a charge, or a sanitation hose split by ice. Following this Boat Winterization Checklist: Engine, Fuel System, Batteries, Plumbing, and Trailer Storage from start to finish, and consulting a professional for diesel or fuel-injected systems when in doubt, is the most reliable way to protect the investment and make spring commissioning a short, simple process instead of an expensive repair bill.
References
[1] Boat Owners Guide To Winterization – https://www.westmarine.com/west-advisor/boat-owners-guide-to-winterization.html [2] The Yacht Maintenance Hubs Boat Winterization Checklist – https://theyachtmaintenancehub.com/wp-content/uploads/2026/06/The-Yacht-Maintenance-Hubs-Boat-Winterization-Checklist.pdf [3] Winterizing20checklist – https://www.westmarine.com/on/demandware.static/-/Sites-WestMarine-Library/default/dw4c6dd241/PDF/Winterizing20Checklist.pdf [4] Winterising Your Boat Engine – https://www.rya.org.uk/water-safety/boat-safety-and-maintenance/winterising-your-boat-engine/ [5] Winterizing – https://www.discoverboating.com/ownership/storage/winterizing [6] How To Winterize Your Boat Our Expert Guide – https://www.boat-ed.com/blog/how-to-winterize-your-boat-our-expert-guide/ [7] Winterizing Your Marine Diesel Or Genset – https://www.westmarine.com/west-advisor/Winterizing-Your-Marine-Diesel-or-Genset.html [8] Getting Your Boat Winter Ready – https://www.bavariayachts.com/we-are-bavaria/stories/getting-your-boat-winter-ready/ [9] 15 Tips For Winterizing Your Boat And Motor – https://dwr.virginia.gov/blog/15-tips-for-winterizing-your-boat-and-motor/ [10] How To Winterize A Boat – https://smartstopselfstorage.com/about-us/our-blog/how-to-winterize-a-boat