
Last Updated on September 15, 2026
Five major RV brands issued electrical wiring recalls in the first seven months of 2026 alone. Keystone, Forest River, and Grand Design all had to fix wires that could spark, melt, or start fires, not because owners did anything wrong, but because of factory wiring mistakes[2][3][5][6]. That means some RV electrical system problems are not your fault at all, and no amount of breaker-flipping will fix them.
This guide walks through how to find the real cause of rv electrical system problems, step by step, using the same order that professional RV technicians use. It also covers when a “simple” electrical glitch is actually a recall issue that needs a dealer, not a screwdriver.
Key Takeaways
- Always figure out first whether an RV electrical problem happens on shore power only, battery power only, or both. This one question points you toward the fix faster than anything else[1].
- Keep a multimeter, a three-light outlet tester, spare fuses, and a flashlight in your RV toolbox at all times[1].
- Many rv electrical system problems trace back to loose terminals, tripped breakers, or a bad shore power cord, not expensive parts[9].
- Several 2026 recalls show that pinched wires near slide-outs, exposed conductors, and miswired outlets can cause the exact same symptoms as normal wear and tear[2][3][5][7].
- Repeated GFCI tripping is rarely “nuisance” behavior anymore. Under updated code language, it usually points to a real leakage current or wiring fault[4].
Why RV Electrical System Problems Start With One Simple Question
Before touching a single wire, ask this: Does the problem happen only when plugged into shore power, only when running on battery, or both? This single question splits every RV electrical issue into two separate worlds, the 12-volt system and the 120-volt system[1].
The 12-volt side runs your lights, water pump, furnace fan, and slide-out motors. It gets power from your RV battery or from the converter, which turns 120-volt shore power into usable 12-volt power. The 120-volt side runs your outlets, air conditioner, microwave, and anything you’d plug in at home.
Here is why this matters so much. If your lights are dim and your water pump is weak, but your microwave and outlets work fine, the problem is almost certainly in the 12-volt system, probably the battery or converter. If your outlets have no power but your lights work fine off the battery, the problem is in the 120-volt system, probably the shore cord, breaker, or pedestal.
Skipping this step is the number one reason RV owners waste hours chasing the wrong part. A tech who starts here can usually narrow down rv electrical system problems in minutes instead of hours[1].
Tools Every RV Owner Needs Before Chasing RV Electrical System Problems
You do not need a full workshop to troubleshoot most RV electrical issues. A short list of tools handles almost every job[1]:
- Multimeter, measures voltage, so you can check batteries, outlets, and converter output.
- Three-light plug-in outlet tester, plugs into any outlet and uses colored lights to show wiring faults instantly.
- Spare fuses and inline breakers, matched to the sizes already in your RV, so a blown fuse does not end your trip.
- Flashlight or headlamp, electrical panels are almost always in dark cabinets or under beds.
- Screwdrivers and a socket set, for opening panels and tightening loose terminal screws.
- Notebook or phone camera, write down or photograph voltage readings so you can compare them over time.
Keep these items in one bag near your electrical panel. When something trips at 9 p.m. in a dark campground, you will be glad you did not have to search for a screwdriver in the dark.
Step-by-Step: How to Diagnose RV Electrical System Problems
Once you know whether the fault sits in the 12-volt or 120-volt side, work through the system in order. Skipping steps is how simple problems turn into all-day repair jobs.
Step 1: Check the Battery
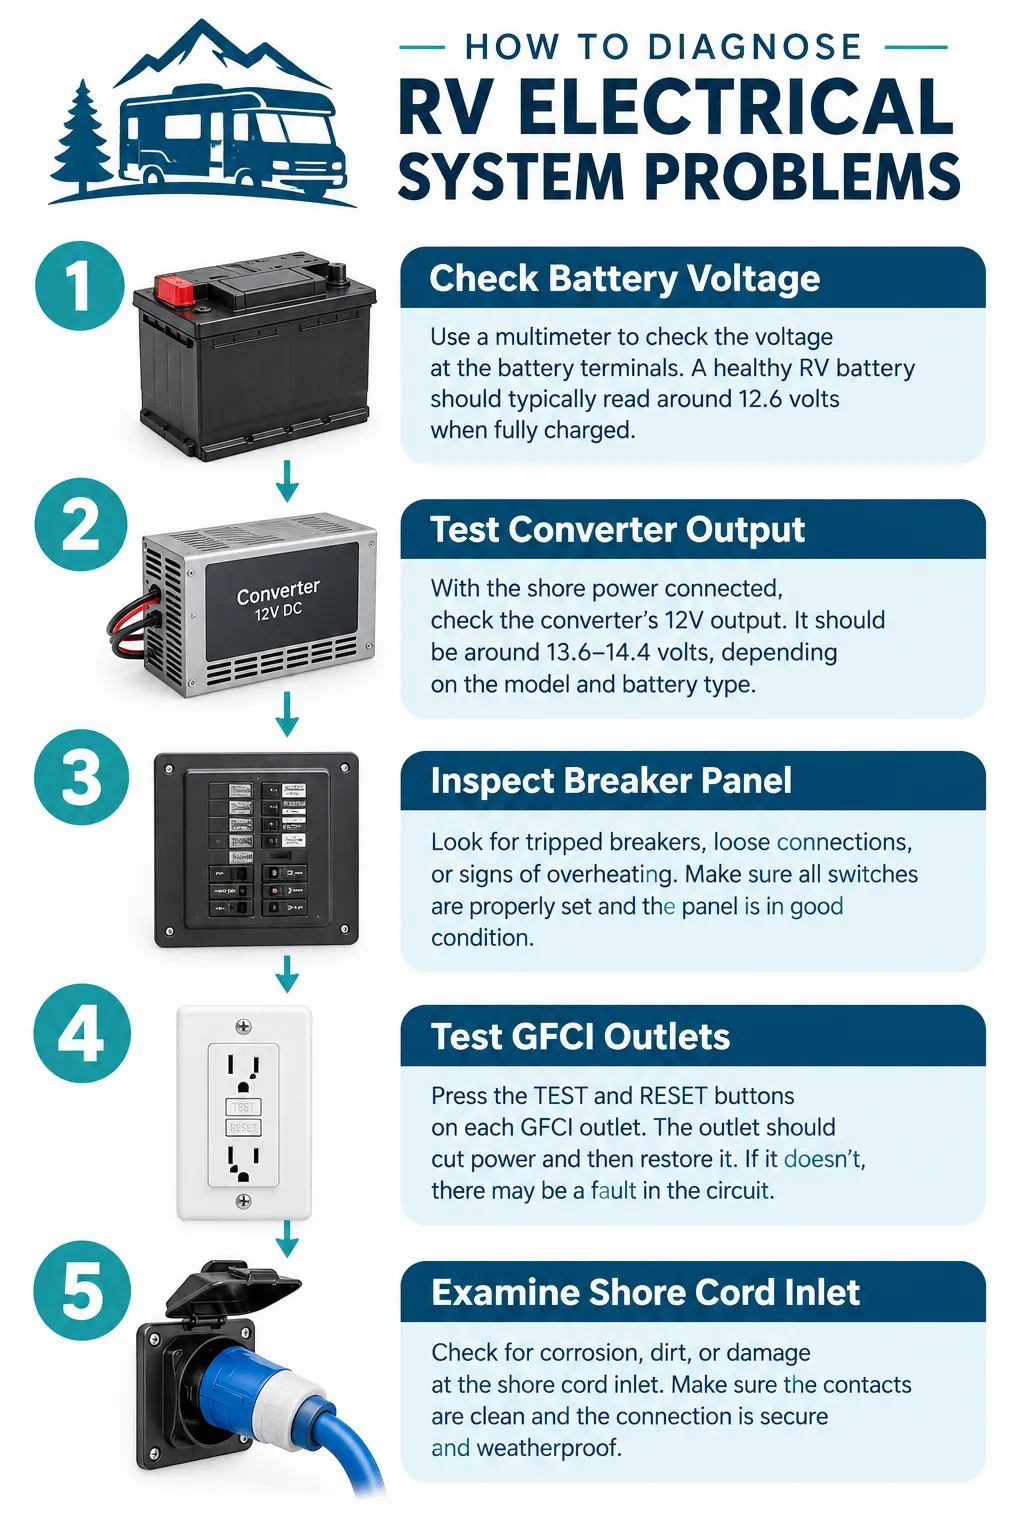
Start with a multimeter on the battery terminals. A fully charged 12-volt battery should read close to 12.6 volts at rest. Anything under 12 volts means the battery is low or aging. Look at the terminals too, white or greenish crust means corrosion, which blocks the flow of power even if the battery itself is fine[1][9].
Step 2: Test the Converter
The converter takes 120-volt shore power and turns it into 12-volt power for your lights and small appliances. With shore power connected, the converter should show roughly 120 volts AC coming in and about 13.5 to 14.4 volts DC going out[1]. If the input looks right but the output is low or missing, the converter itself is likely the problem.
Step 3: Inspect the Breaker Panel
Open the main 120-volt breaker panel and look closely. A tripped breaker often sits halfway between ON and OFF instead of fully in either position[9]. Flip it fully off, then fully on. If it trips again right away, do not keep resetting it, that is a sign of a short circuit or an overloaded circuit, and repeated resets can be a fire risk.
Step 4: Test the GFCI Outlets
GFCI outlets protect you from shock near water sources, like the bathroom and kitchen. Press the reset button on each one. If an outlet will not reset, or it trips again within seconds of resetting, that points to real leakage current somewhere in the circuit, not just a random glitch[4].
Step 5: Examine the Shore Power Cord and Inlet
Finally, check the thick cord that connects your RV to the campground pedestal. Look for cuts, melted plastic, bent prongs, or a loose fit at either end[9]. A damaged cord can cause flickering power, tripped breakers, or a complete loss of power even when the pedestal itself is fine.
Following these five steps in order, battery, converter, breaker panel, GFCI outlets, shore cord, mirrors the exact troubleshooting order recommended in current RV electrical checklists[1]. It turns a confusing mess of symptoms into a short, logical checklist.
Common RV Electrical System Problems and How to Fix Them
Most rv electrical system problems fall into a handful of repeat offenders. The table below breaks down what usually causes each symptom and the first fix to try.
| Symptom | Likely Cause | First Fix to Try |
|---|---|---|
| Battery drains fast even when parked | Parasitic draw from a device left on, or an old battery | Check for anything left running; test battery with a multimeter monthly[9] |
| Breaker keeps tripping | Circuit overload, damaged wire insulation, or a short | Unplug appliances on that circuit one at a time; if it still trips, stop and inspect wiring[9] |
| No power at any outlet | Tripped main breaker, bad shore cord, or dead converter | Test the shore cord with an outlet tester; check the main breaker first[1] |
| Lights flicker or dim | Loose or corroded battery terminal, weak converter | Clean terminals with a baking-soda-and-water paste; recheck voltage[9] |
| GFCI outlet won’t reset | Real ground fault or moisture in the outlet box | Do not force it; call for inspection if it keeps tripping[4] |
| Outlet or plug face feels hot | Loose wire connection creating resistance | Stop using the outlet immediately; this is a fire warning sign[7][10] |
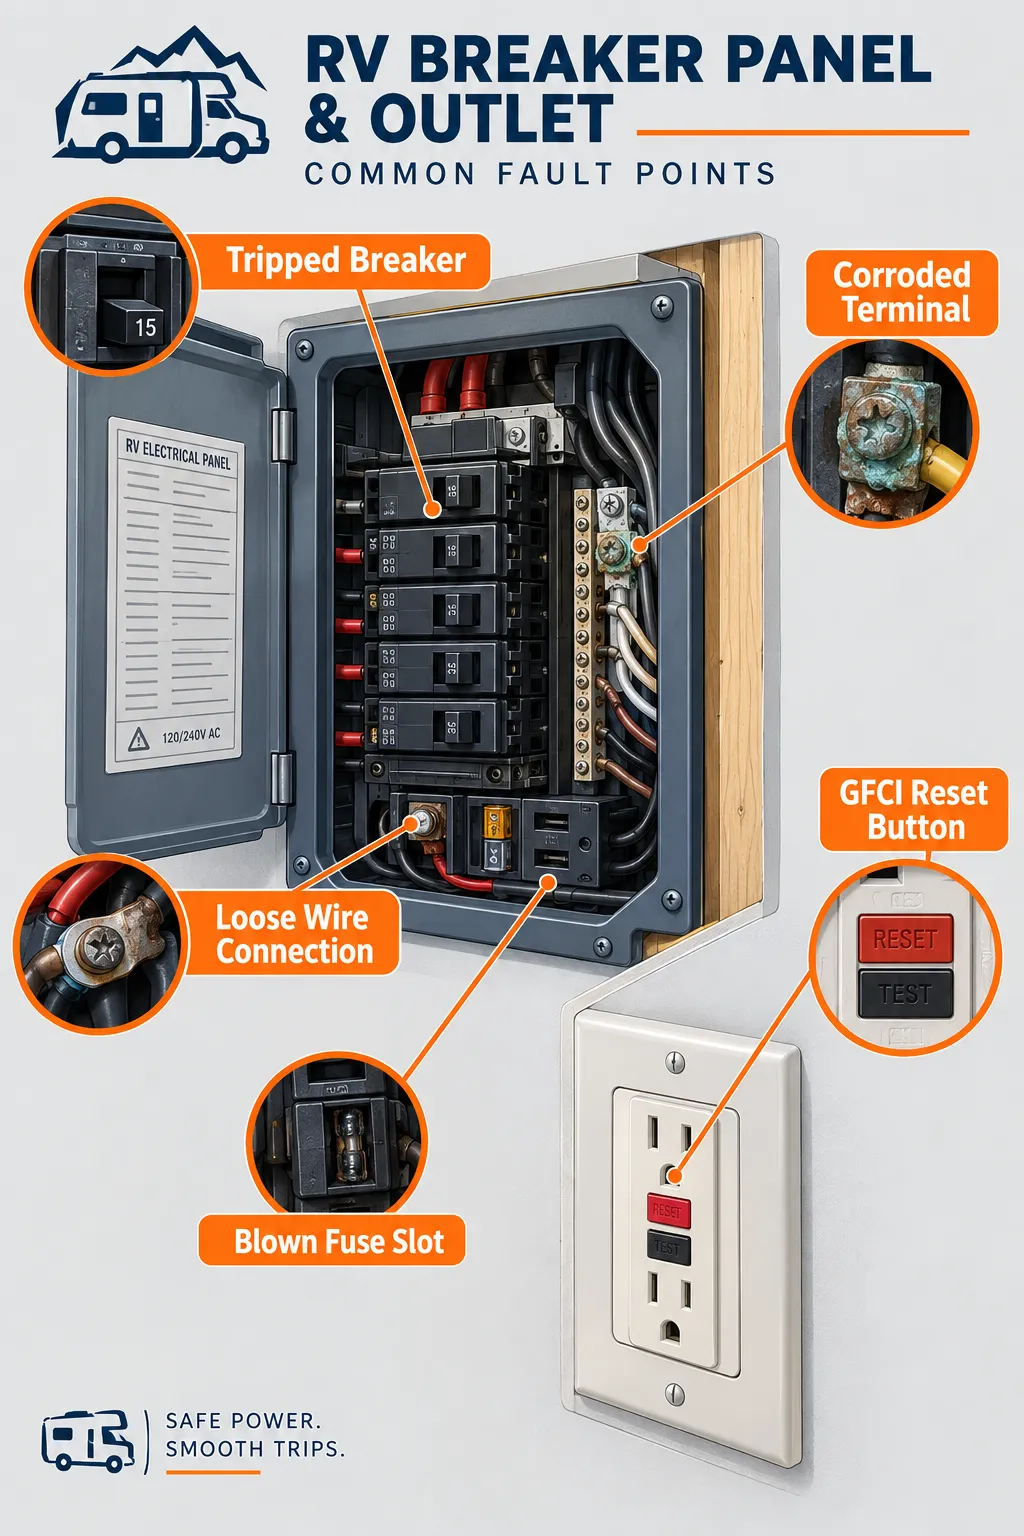
Notice that most of these fixes start with something cheap and simple, a cleaning, a test, or unplugging one device. Save the expensive parts swap for after you have ruled out the easy stuff. Many RV owners rush to replace a converter or battery when the real issue was a fifty-cent corroded connection[9].
If your troubleshooting keeps leading back to the same stubborn circuit no matter what you try, that pattern itself is useful information, it usually means the wiring itself, not the plugged-in device, is the actual problem.
Shore Power Troubleshooting: Pedestal, Cord, and Inlet Checks
Shore power problems are some of the most common rv electrical system problems reported at campgrounds, and they are also some of the easiest to test correctly if you follow the right order.
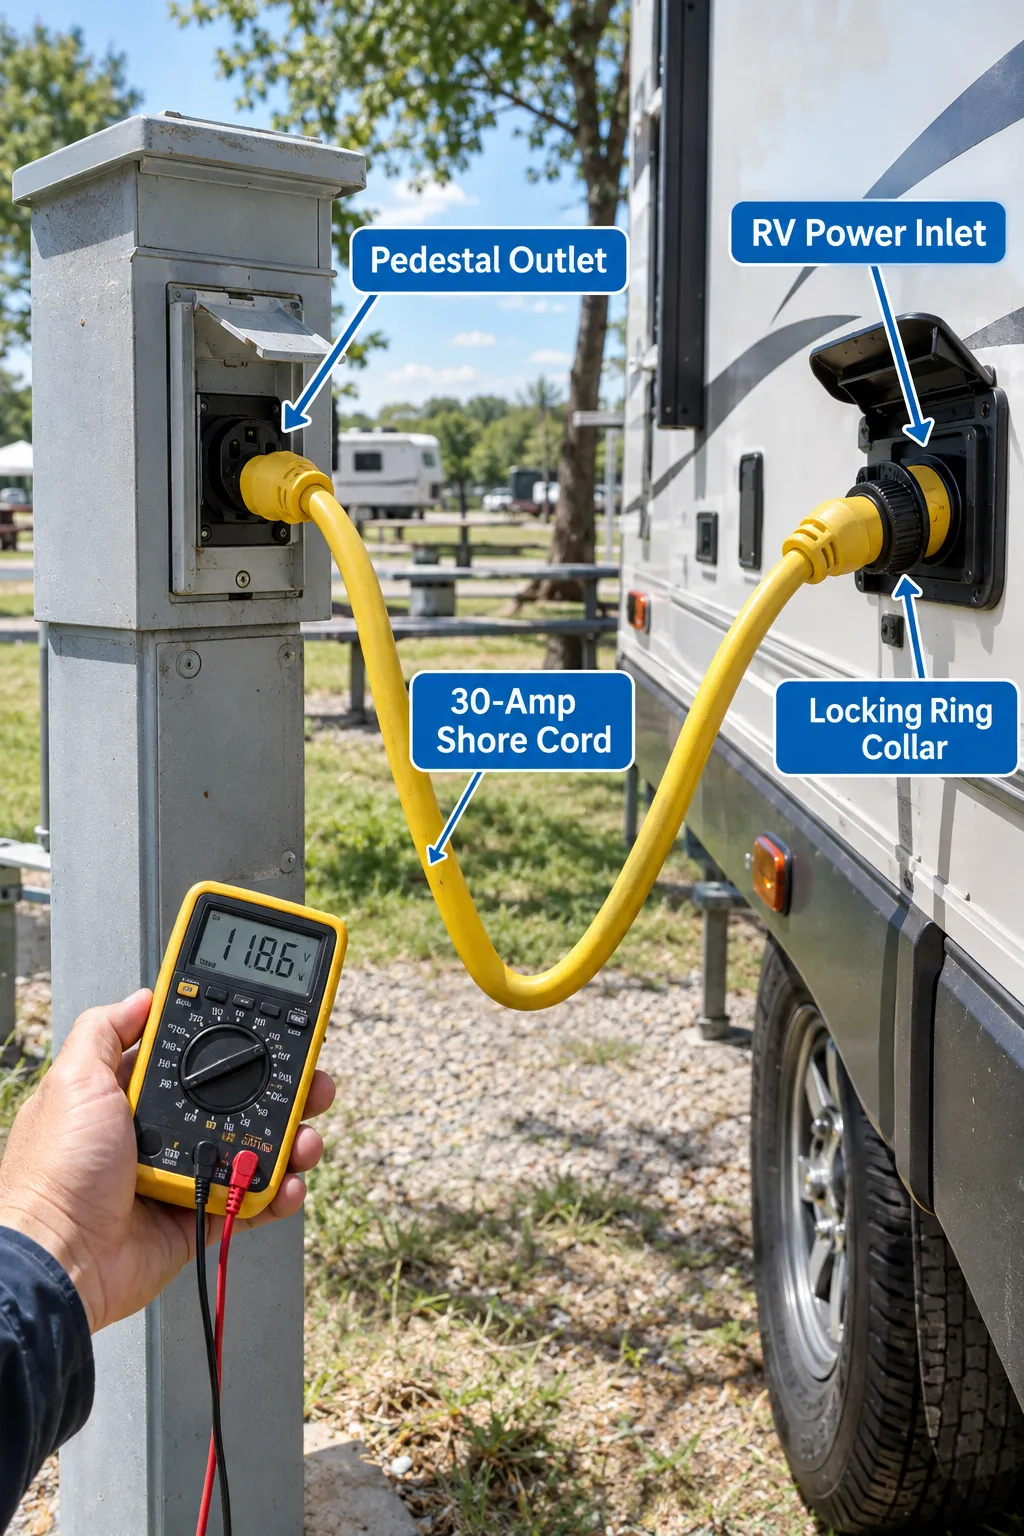
Before you even plug in, test the campground pedestal outlet with a multimeter. A healthy 120-volt outlet should read somewhere in the range of roughly 108 to 132 volts[9]. Anything far outside that window means the pedestal itself may be the problem, not your RV.
Next, confirm you are using the correct service. A 30-amp pedestal and a 50-amp pedestal look different and need the right adapter, mixing them up can overload your system.
Once plugged in, check your RV’s main shore power breaker inside the panel. It should be fully in the ON position. Then use the multimeter to check for a short by measuring resistance between the shore power’s hot wire and the RV’s metal frame. Infinite resistance is normal and safe. A reading between 0 and 10 ohms signals a short circuit somewhere in the system, and that RV should not be used on shore power until it is fixed[1].
Finally, look over the entire length of the shore cord for cuts, melted spots, or bent prongs, and check that it clicks in fully at both the pedestal and the RV inlet[9]. A cord that looks fine but is loose at the inlet can cause arcing, heat buildup, and intermittent power loss that seems to come and go for no reason.
If you regularly deal with electrical quirks across different vehicles and equipment, it helps to build good testing habits everywhere, the same logic used for common mistakes RV owners make applies just as well to shore power checks as it does to routine maintenance mistakes owners overlook.
When RV Electrical System Problems Are Actually Recalls
Here is something many owners never consider: sometimes the “electrical glitch” is not a maintenance issue at all. It is a factory defect covered under a safety recall. Several recalls issued in 2026 show exactly how this happens.
Keystone Montana Fifth Wheels
On March 18, 2026, Keystone Montana fifth-wheel trailers were recalled because 12-volt and 120-volt wiring near the bedroom slide-out was not secured properly. As the slide moved in and out, it could pinch and damage the wires, leading to electrical faults and fire risk. The fix requires a dealer to inspect and properly secure the wiring at no cost to the owner[2][6].
Forest River Impression Fifth Wheels
On March 16, 2026, Forest River Impression fifth wheels were recalled after inspectors found wire insulation that had been stripped incorrectly, leaving bare copper exposed and at risk of arcing. Dealers were told to inspect and fix the wiring wherever needed[3].
Wildwood and Salem Travel Trailers
Multiple 2024 through 2026 Wildwood and Salem travel trailers were recalled in mid-2026 because fireplace outlets were wired incorrectly. The wire conductors did not make solid contact inside the outlet, which increases the amount of current the connection has to handle and raises fire risk from loose, high-resistance connections. The fix replaces both the outlet and the wiring[7][10].
Grand Design Imagine Travel Trailers
On July 28, 2026, Grand Design Imagine travel trailers were recalled because outlet cover screws could touch the wiring behind them, creating a short circuit or an electrical arc. Dealers are required to inspect and repair every affected outlet[5].
Forest River Trailers, 7-Way Connector
A Transport Canada recall issued January 28, 2026 for certain Forest River trailers found that the 7-way connector wiring, the plug that links your trailer’s lights and brakes to your tow vehicle, lacked proper circuit protection. That means the wiring harness could overheat and melt before a breaker even had a chance to trip. The fix involves dealer rewiring and adding the missing protection[8].
Recall Red Flags Table
| Warning Sign | What It Might Mean |
|---|---|
| Warm or hot plug near the tow hitch connector | Missing circuit protection in the wiring harness[8] |
| Scorch marks or bare copper near an outlet | Improperly stripped or exposed wiring[3] |
| Sparking when touching an outlet cover screw | Screw contacting live wiring behind the cover[5] |
| Electrical fault appearing only when the slide-out moves | Wires pinched or damaged in the slide mechanism[2][6] |
| Hot outlet face near a built-in fireplace | Loose, high-resistance wiring connection[7][10] |
If any of these signs show up in your RV, stop using that circuit and contact your dealer instead of continuing to troubleshoot on your own. A recall repair is free, but a house fire is not.
GFCI Trips and Ground Faults: Not Always Nuisance Tripping
Many RV owners have learned to shrug off a GFCI outlet that trips now and then, treating it as an annoying quirk of RV power systems. That habit is becoming riskier as electrical codes tighten.
A 2025 working draft from the National Electrical Code panel that governs ground-fault protection is shaping stricter rules for how 125-volt circuits, including many found in RVs and at campground pedestals, must be protected[4]. As these standards tighten, a GFCI that keeps tripping is far more likely to be catching a genuine electrical leak, a miswired outlet, or a failing appliance than it is to be a random false alarm.
If a GFCI outlet trips only when one specific appliance is plugged in, that appliance likely has a fault. If it trips no matter what is plugged in, or trips even with nothing plugged in, the wiring behind the outlet needs inspection. Either way, resist the temptation to just keep pressing reset. That button is a safety warning, not an inconvenience to work around.
Preventative Maintenance to Stop RV Electrical System Problems Before They Start
The best way to deal with rv electrical system problems is to catch them before they turn into a dead battery at a campground or a fried outlet at home. A short monthly routine goes a long way[9]:
- Test battery voltage with a multimeter once a month, even during storage.
- Clean battery terminals with a baking-soda-and-water paste to remove corrosion buildup.
- Scan the breaker panel for any switch sitting halfway between ON and OFF.
- Plug in a three-light outlet tester at each outlet to catch wiring faults early.
- Check pedestal voltage with a multimeter before plugging in at a new campground, confirming it falls in the 108 to 132 volt range[9].
- Inspect the shore power cord for cuts, melted ends, or bent prongs before every trip.
- Look inside slide-out wiring channels for pinched or rubbed wires, especially on trailers with known slide-out wiring recalls[2][6].
Battery care habits carry over well between different types of vehicles and equipment. Owners who also run electric marine gear can compare notes with battery testing lessons from an ePropulsion electric outboard motor, since the same basic voltage-checking discipline applies whether the battery is powering an RV converter or a boat motor.
When to Call a Professional Instead of DIY
Some RV electrical repairs are simple enough for a confident owner with a multimeter and a screwdriver. Others are not. Knowing the difference keeps everyone safe.
Safe to try yourself:
- Cleaning corroded battery terminals
- Resetting tripped breakers and testing whether they trip again
- Testing outlets with a plug-in tester
- Replacing a blown fuse with the correct size
- Checking pedestal voltage before plugging in
Call a professional immediately if you see:
- Charring, scorch marks, or a burning smell near any panel or outlet[3]
- Exposed bare copper wire anywhere in the system[3]
- Sparking at an outlet, breaker, or shore power connection[5]
- A shore power inlet or plug that feels hot to the touch[8][11]
- Repeated breaker trips on the same circuit even after unplugging everything[9]
- A tingling sensation when touching the RV’s metal skin during shore power use
These warning signs match exactly the conditions described in the 2026 recall notices, pinched wires, exposed conductors, loose connections, and missing circuit protection[2][3][5][7][8]. In every one of those cases, the manufacturer’s fix required a trained technician, not a home repair. Treating these signs the same way protects you even if your RV was never part of a formal recall.
For comparison, some RV electrical-adjacent repairs really are DIY-friendly once you understand the basics, for example, drivers handling trailer brake wiring issues can check out this guide on fixing electric drum brakes yourself for a sense of which jobs are reasonable to tackle at home versus which ones need a shop.
Frequently Asked Questions
Why does my RV lose power only on shore power, but the lights still work fine? This usually means the problem is in the 120-volt system, not the battery. Check the main breaker, the shore power cord, and the pedestal voltage in that order[1].
Is it normal for a GFCI outlet to trip once in a while? Occasional tripping during a storm or with a faulty hair dryer can happen. But repeated tripping with no clear cause points to a real electrical fault and should be checked by a professional[4].
How often should I test my RV battery? Once a month, even in storage, using a multimeter. A healthy battery reads close to 12.6 volts at rest[9].
What voltage should a campground pedestal outlet read? Roughly 108 to 132 volts is considered a normal range for a 120-volt pedestal outlet. Anything far outside that range means the pedestal itself may be at fault[9].
Should I keep resetting a breaker that trips right away? No. A breaker that trips again immediately after resetting is warning you about a short circuit or overload. Repeated resets can create a fire risk instead of solving the problem[9].
How do I know if my RV is affected by an electrical recall? Check your Vehicle Identification Number against the manufacturer’s recall list or contact your dealer directly. Recent recalls have affected Keystone Montana, Forest River Impression, Wildwood, Salem, and Grand Design Imagine models[2][3][5][6][7][10].
Conclusion
Diagnosing rv electrical system problems does not have to feel like guesswork. Start with one question, is it a 12-volt problem or a 120-volt problem, and then work through the battery, converter, breaker panel, GFCI outlets, and shore power cord in that exact order[1][9]. Most issues trace back to something simple: a corroded terminal, a tripped breaker, or a worn shore cord.
But 2026 has been a reminder that not every electrical fault is routine wear and tear. Pinched slide-out wiring, exposed conductors, miswired outlets, and unprotected connector harnesses have all triggered real safety recalls this year[2][3][5][7][8]. Any sign of scorching, exposed copper, sparking, or unusual heat deserves a professional inspection, not another breaker reset.
Build a simple monthly habit: test the battery, clean the terminals, scan the breaker panel, and check the shore cord before every trip. That routine, paired with knowing when to stop and call a dealer, is the difference between a minor fix on a Saturday afternoon and a much bigger problem down the road.
References
[1] Rv Electrical Problems Checklist – https://thesmartrver.com/wp-content/uploads/2026/01/RV-Electrical-Problems-Checklist.pdf [2] Rcak 26v161 7736 – https://static.nhtsa.gov/odi/rcl/2026/RCAK-26V161-7736.pdf [3] Weekly Recalls Listed 6 – https://www.rvnews.com/weekly-recalls-listed-6/ [4] 70 A2025 Nec P07 Fd Prelimfr – https://docinfofiles.nfpa.org/files/AboutTheCodes/70/70_A2025_NEC_P07_FD_PrelimFR.pdf [5] 26v490000 – https://carsafetyrecord.com/recalls/26v490000/ [6] Rv Recall Updates Mar 31 2026 – https://blog.campingworld.com/news/rv-recall-updates-mar-31-2026/ [7] Rv Recalls June 30 2026 – https://blog.campingworld.com/news/rv-recalls-june-30-2026/ [8] Transport Canada Recall 2026027 Forest River – https://recalls-rappels.canada.ca/en/alert-recall/transport-canada-recall-2026027-forest-river [9] How To Troubleshoot Common Rv Electrical Problems – https://www.habitatista.com/13218/how-to-troubleshoot-common-rv-electrical-problems/ [10] Rcak 26v352 5551 – https://static.nhtsa.gov/odi/rcl/2026/RCAK-26V352-5551.pdf