Last Updated on January 30, 2026
When the temperature drops and the garden tools are tucked away, your garage doesn’t have to become a cold storage unit for junk. In fact, winter is the absolute best time to retreat into the workshop, fire up a space heater, and finally tackle those organizational upgrades you’ve been putting off all summer.
Whether you’re looking to reclaim your workbench from a sea of clutter or you want to build custom storage that makes every tool easy to find, these 28 DIY garage workshop projects are designed to keep your hands busy and your space productive. From simple jigs to full-scale workstation builds, let’s turn this off-season into your most productive building season yet.
1) Install foam board insulation to keep your garage warm
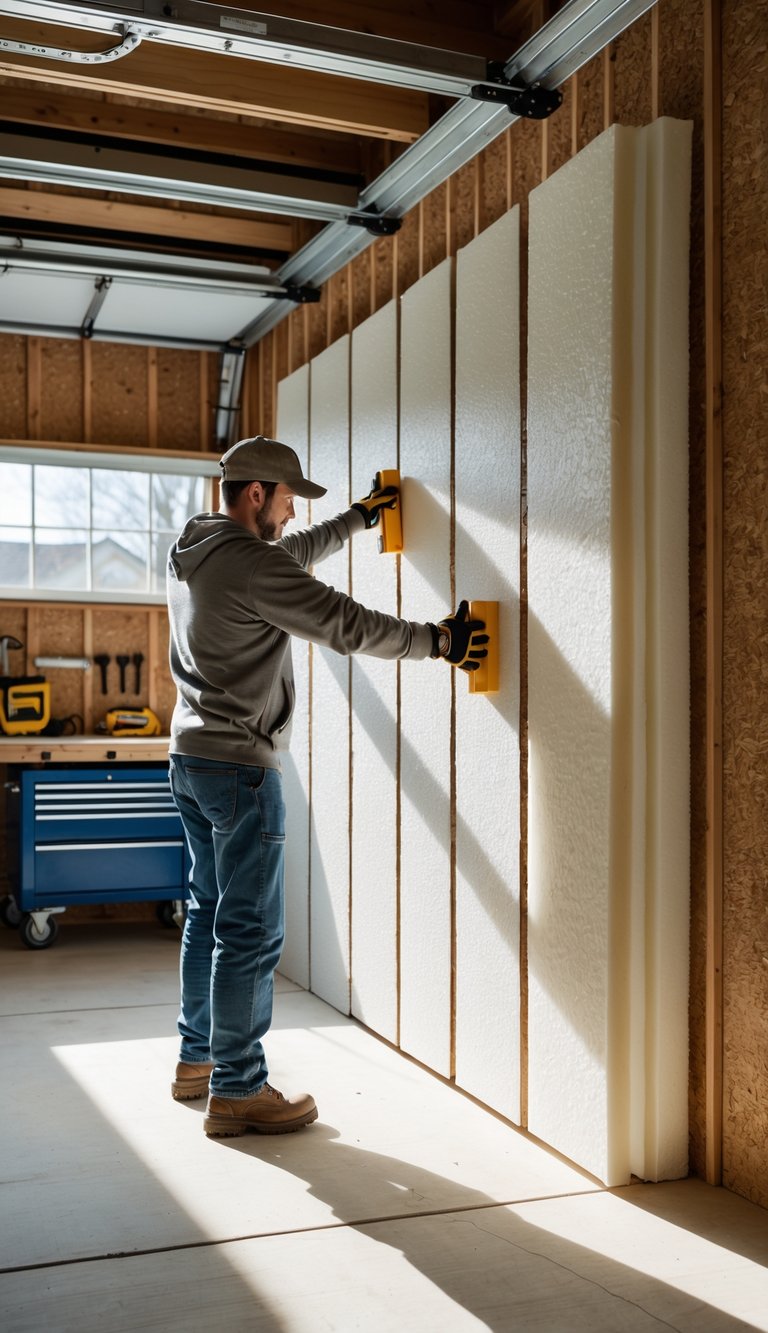
Foam board insulation gives your garage a solid thermal barrier. You can cut panels to fit between studs or mount them directly to drywall or plywood. This helps keep heat in during winter and reduces drafts around your workspace.
Choose the right R-value for your climate; higher R-values work better in colder areas. Seal seams with foil tape and use spray foam or caulk around edges to stop air leaks. Wear gloves and eye protection when cutting foam to avoid irritation.
PRO TIP
When you install foam board, plan for a fire-safe finish. Many foam boards need a thermal barrier like drywall if the garage connects to living space or if local codes require it. Measure and dry-fit panels before applying adhesive or fasteners to avoid gaps. Use foil-faced foam on walls that receive direct sunlight; the foil helps reflect radiant heat. For ceilings, secure boards with support battens or furring strips to prevent sagging. If you need wiring or plumbing access, leave a small removable panel instead of gluing everything down. Taking these steps saves time and keeps your garage safer and more energy efficient.
2) Add LED shop lights for bright, energy-efficient lighting
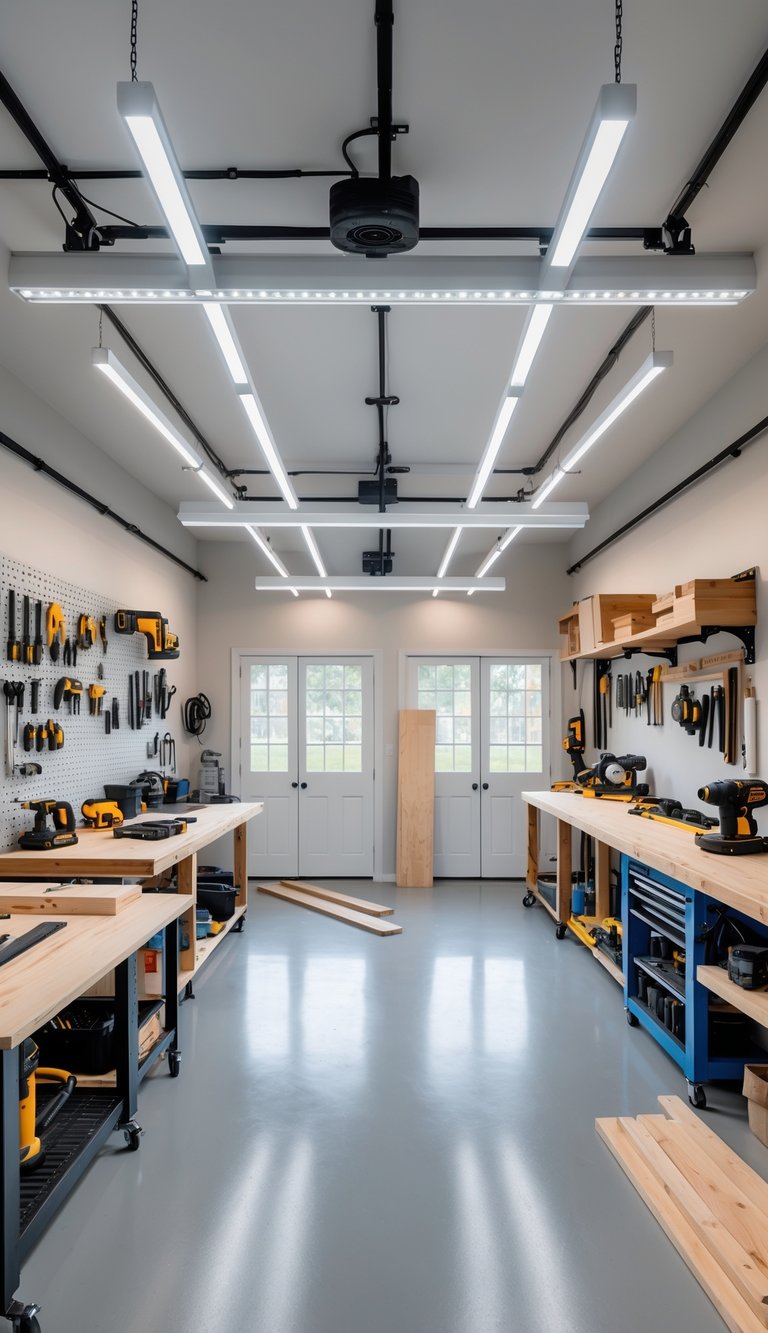
Swap old bulbs for LED shop lights to make your garage brighter and cut energy use. LEDs give even, flicker-free light that helps when you work on small parts or read plans. They last much longer than incandescent or fluorescent lights, so you replace them less often.
Plan your layout so light covers every corner and your workbench gets focused illumination. Many LED fixtures are easy to mount and wire, and some plug in for a no-fuss install. Choose daylight-balanced LEDs for truer colors and less eye strain while you tinker.
PRO TIP
When you pick LED shop lights, check lumen output and color temperature to match your tasks. Aim for higher lumens if you do fine work, and choose 4000K–5000K for a neutral, clear light. Look for fixtures with a wide beam angle to avoid dark spots, and consider motion sensors or task lamps for targeted use. If you plan simple wiring, pick linked fixtures that daisy-chain to reduce cords and switches. Finally, measure the space and sketch a layout before buying to avoid overbuying or dead zones.
3) Build a fold-down workbench to save space
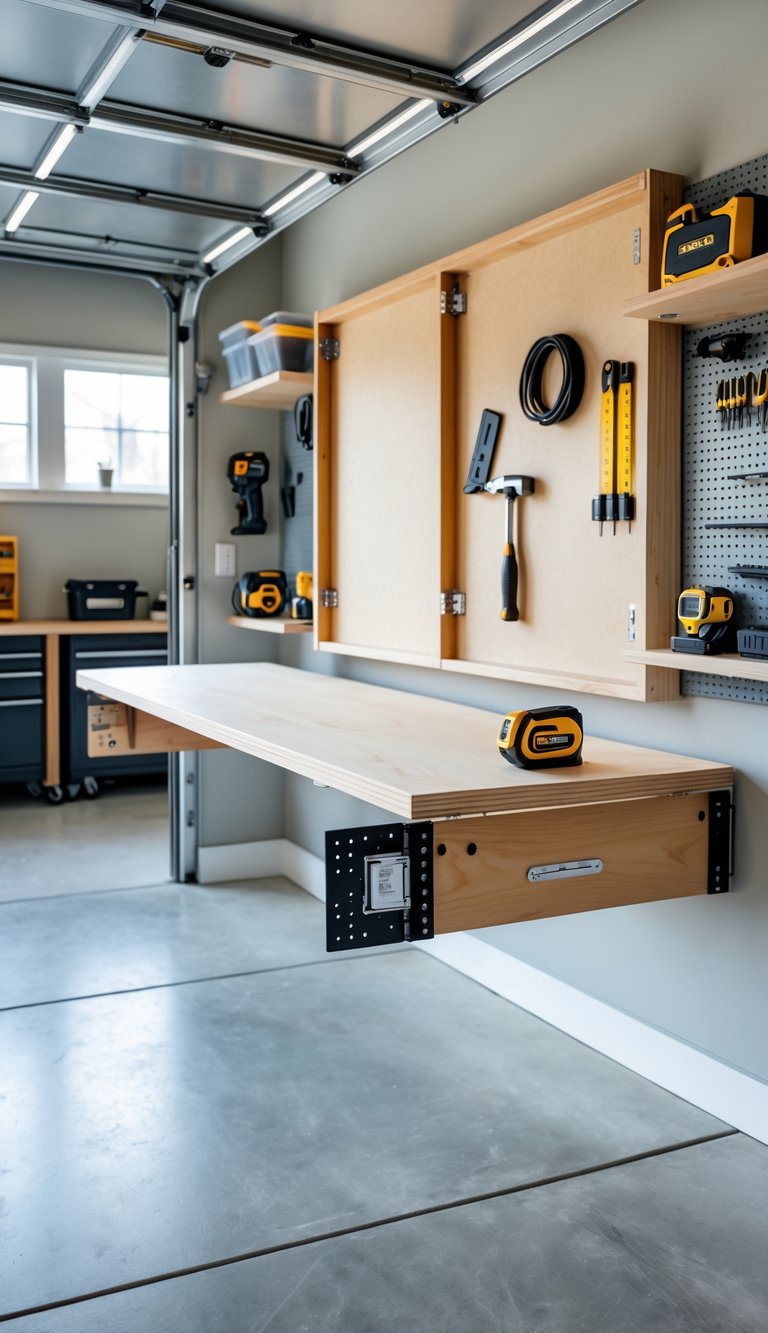
A fold-down workbench gives you a solid workspace that hides away when you’re not using it. Mount it to a wall and fold the top up to free floor space in a small garage or shed.
You can make one with plywood, basic hardware, and simple folding brackets or hinge arms. Keep the design sturdy: use thick plywood for the top and strong supports that lock when the bench is down.
Add a simple lip or cleat to stop tools and small parts from rolling off. Paint or seal the surface to protect it from stains and wear.
PRO TIP
You’ll save time and money by planning the fold-down bench around how you work and what you store. Measure the area where you plan to mount it, and decide the bench height based on your comfort while standing. If you often sit while working, plan for a lower height or leave room for a stool. Pick brackets or hinge arms rated for more weight than you expect to use, and add a simple locking pin or strap to keep the bench secure when folded. Consider shallow drawers or a pegboard above the bench for tool storage that stays accessible when the bench is down. Finally, pre-cut your plywood and assemble parts on sawhorses to speed up the build and make installation cleaner.
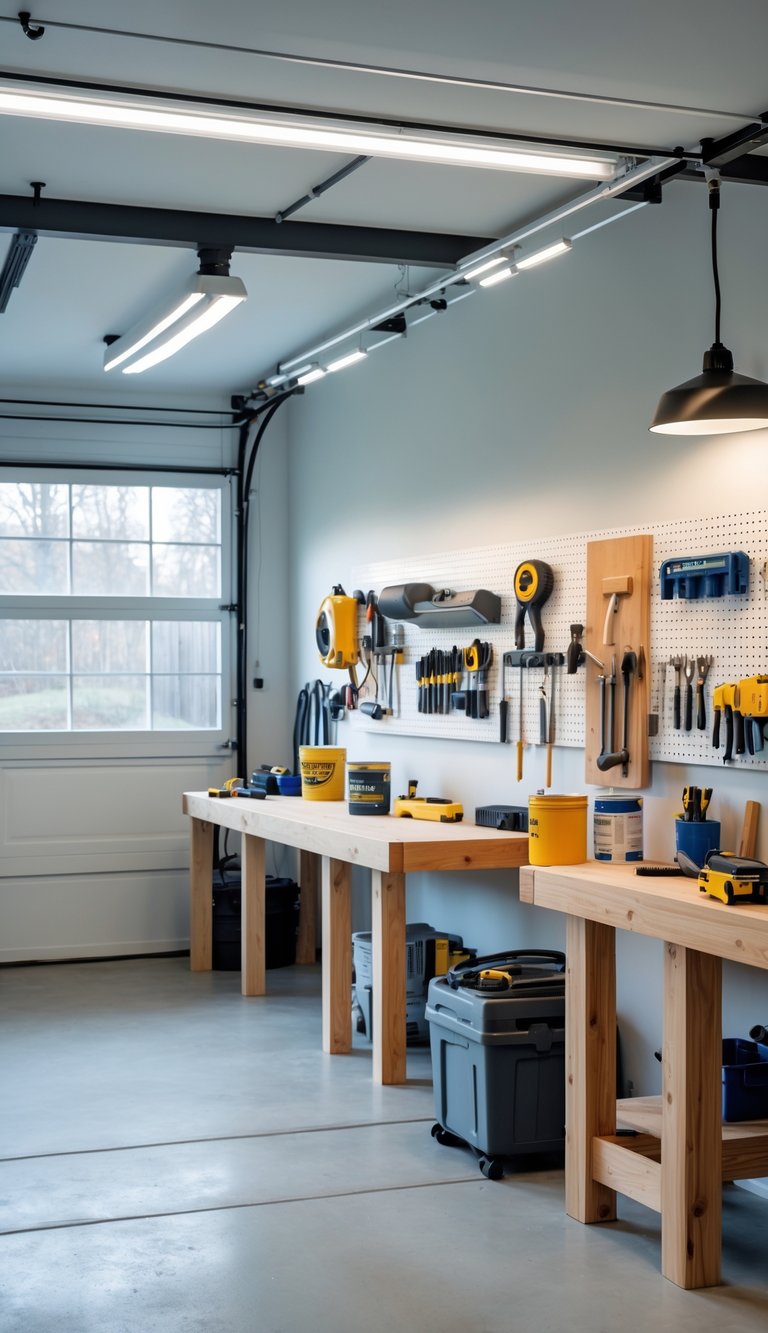
4) Create wall-mounted pegboards for tool organization
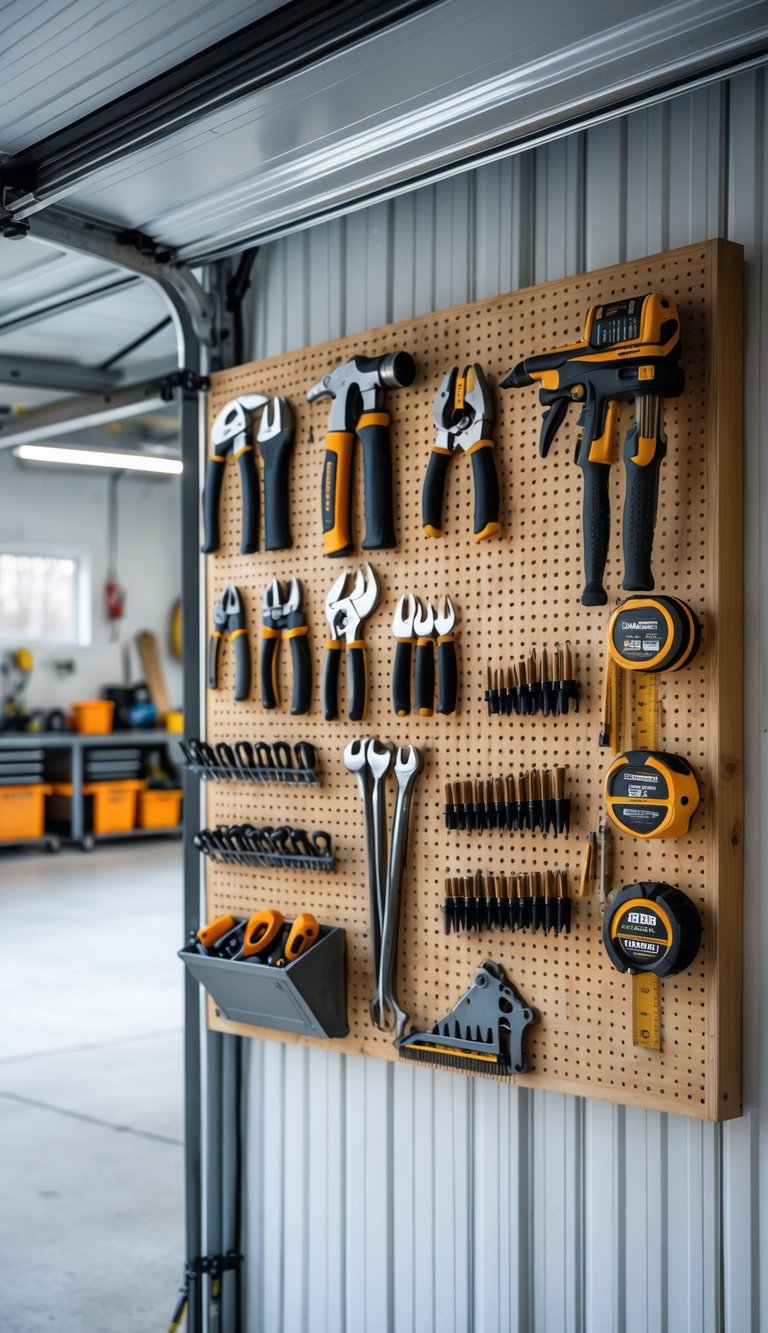
A pegboard makes tools easy to see and grab when you need them. Mount it on a clear wall in your garage to free up counters and workbenches.
Measure the wall and plan a layout before you cut or buy materials. Use pegboard panels, furring strips for spacing, and proper fasteners into studs so the hooks hold heavy tools.
Customize hooks, bins, and shelves to fit your tools and work habits. You can add magnetic strips for small bits or a shelf for chargers and spray cans.
PRO TIP
Pick a durable pegboard material like tempered hardboard or metal if you store heavy tools or work in a damp garage. Space the board about 1 inch from the wall using strips of wood so hooks can slip through and hang securely. Label zones for common tasks — electrical, woodworking, or gardening — to speed up cleanup and job prep. Try a mix of open hooks, baskets, and small shelves to hold irregular items like tape measures or glue bottles. Paint or finish the pegboard to match your workshop; a bright color helps tools stand out and makes the wall easier to maintain.
5) Add a small portable heater for cozy warmth
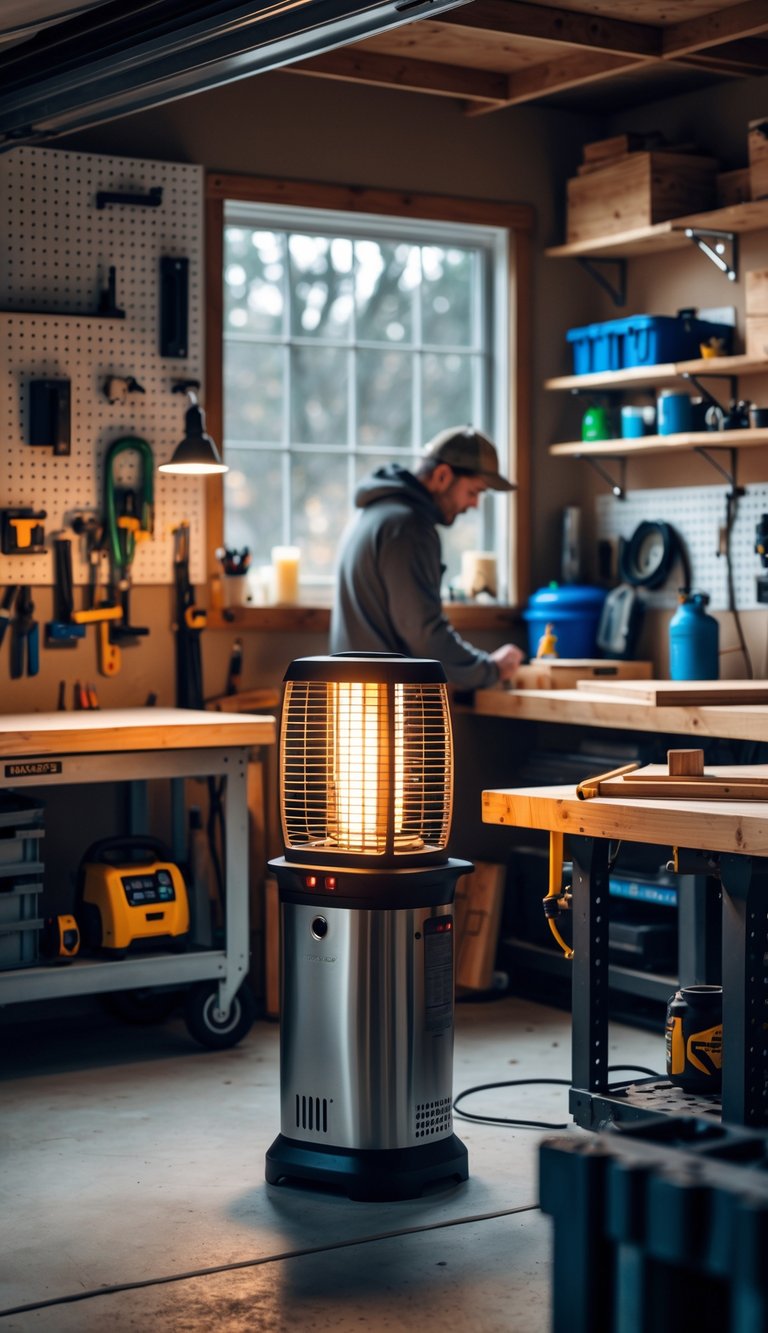
A small portable heater can make your garage workshop much more comfortable on cold days. Place it near your workbench but away from flammable materials to keep your tools and projects safe.
Choose a model with a tip-over switch and overheat protection. Ceramic or infrared heaters heat quickly and are energy efficient for short tasks.
Keep the heater on a stable, non-flammable surface and never leave it running unattended. Use a heavy-duty extension cord if needed, and avoid running cords under rugs or across walkways.
PRO TIP
When picking a heater, match its size to the space—too small won’t warm the area, too large wastes energy. Consider a unit with a thermostat so it cycles on and off to keep temps steady without constant fuss. If you plan to work near the heater, get one with quiet operation and adjustable heat settings so you can focus on tasks. For safety, install a smoke detector in the garage and keep a small fire extinguisher nearby. Regularly inspect the heater’s cord and plug for wear, and unplug it when you finish working.
6) Use magnetic strips to hold metal tools within easy reach
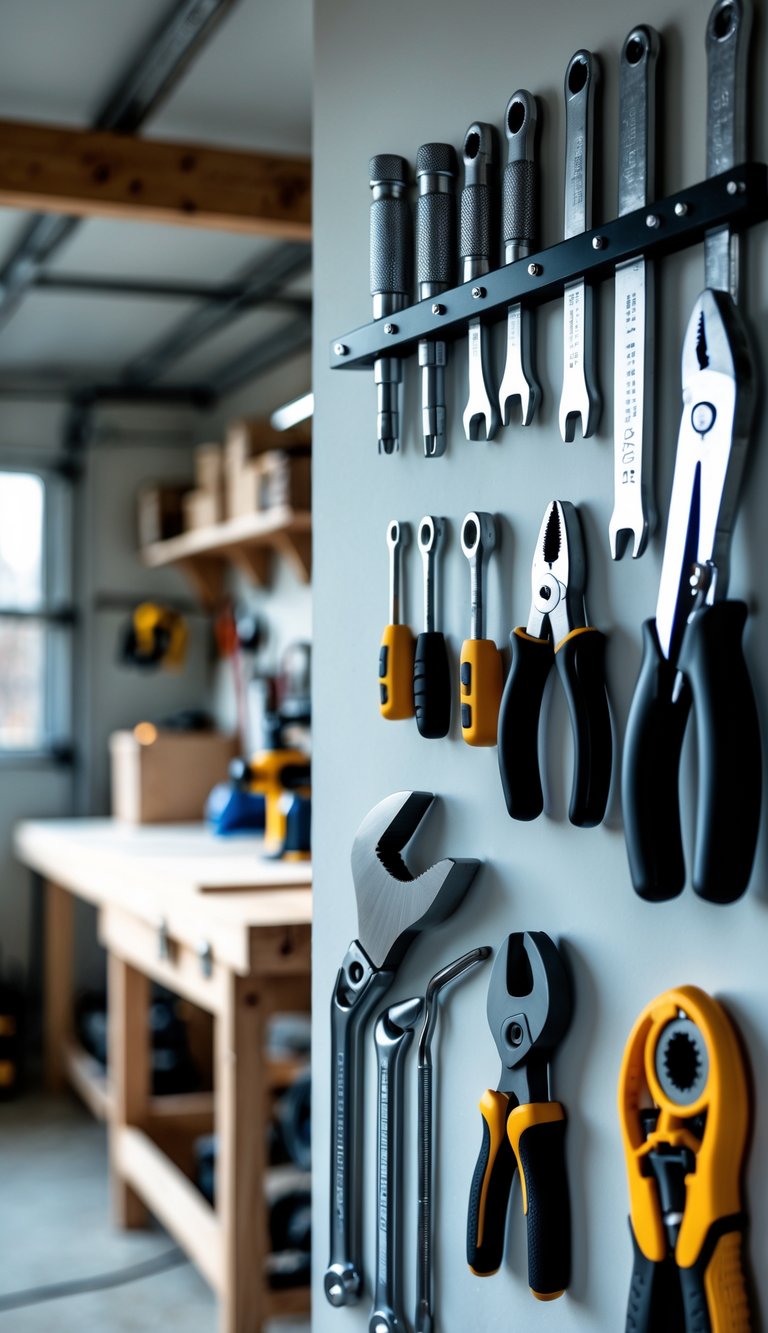
Magnetic strips free up drawer and bench space while keeping metal tools visible. Mount them on a wall near your workbench so you grab what you need without digging through clutter.
Place strips at different heights to hold screwdrivers, pliers, wrenches, and small metal parts. You can mix long bars with short strips to fit odd shapes and save room for larger tools.
Install strips into studs or use proper anchors for heavy loads. Label areas for tool types so you return items to the same spot and find them fast.
PRO TIP
Choose strong neodymium magnetic strips for a secure hold, especially for heavier tools like hammers and large wrenches. Buy a few lengths so you can create zones on your wall: one for hand tools, one for cutting tools, and one for bits and blades. Test each strip’s hold before mounting by pressing a tool to it; a weak bond means the strip needs a better mount or a stronger magnet. Keep magnets away from sensitive electronics and credit cards to avoid damage. If you want a cleaner look, paint the wall first and mount strips on small painted wooden blocks to match your garage decor.
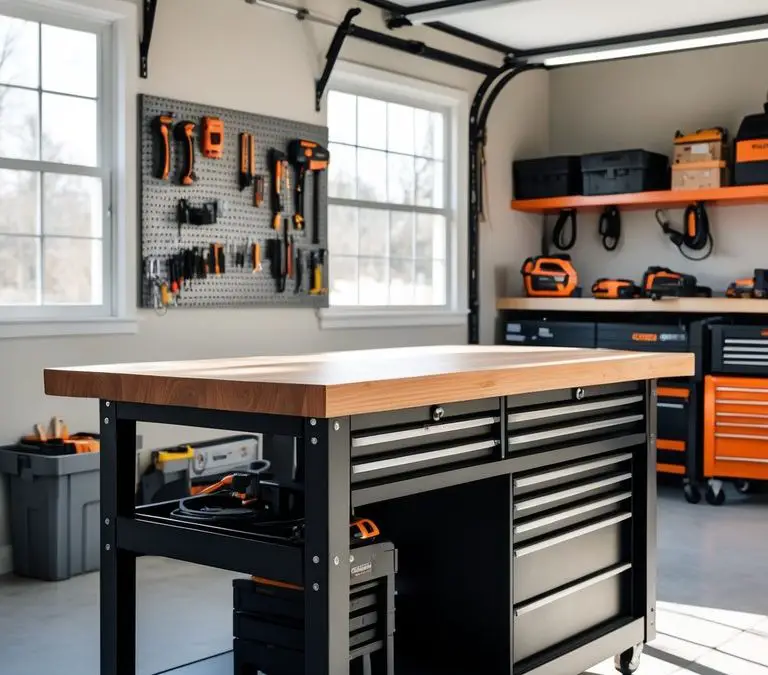
7) Set up a rolling tool chest for mobile storage
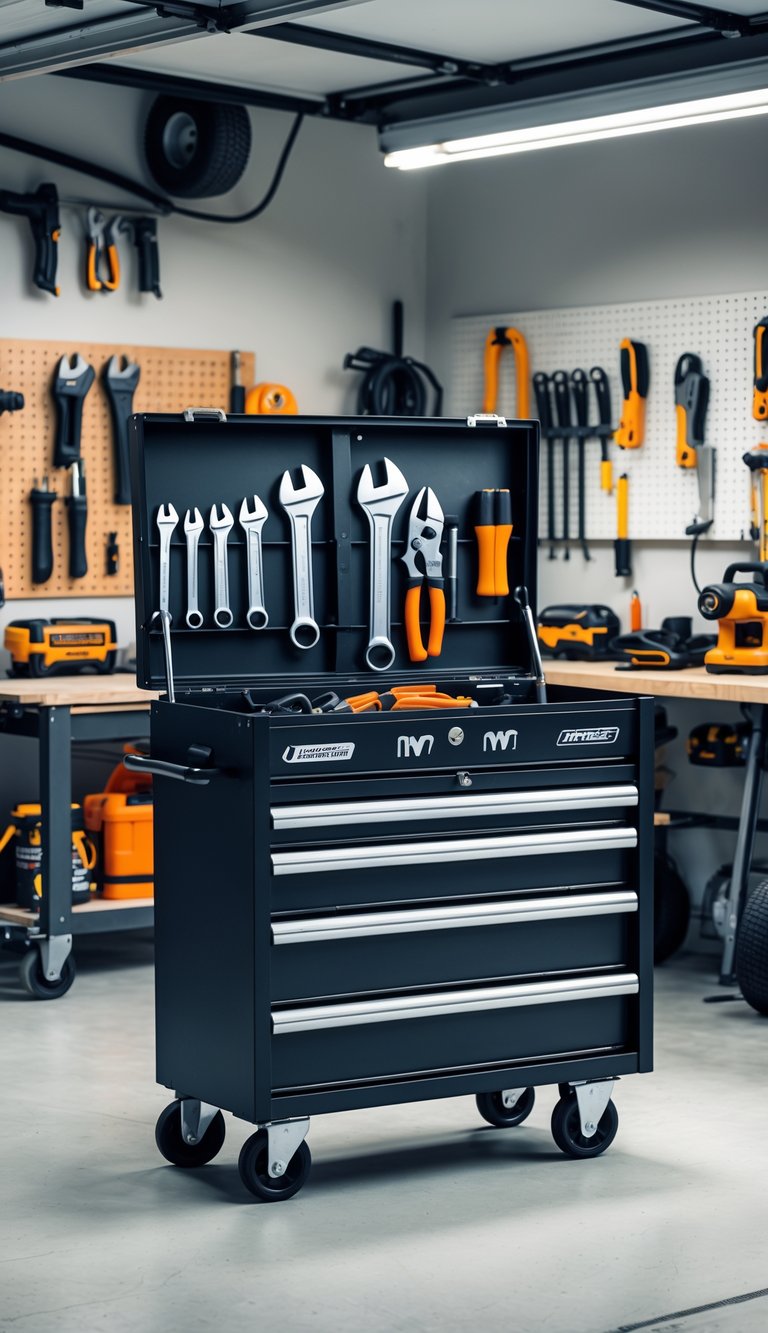
A rolling tool chest keeps your tools close where you work. You can move it across the garage so you don’t carry heavy items back and forth.
Start with a sturdy base and quality casters rated for your cart’s weight. Add drawers sized for sockets, wrenches, and hand tools to keep things organized and easy to reach.
Use pegboard or magnetic strips on the sides for pliers, screwdrivers, and tape measures. That way you can see what you need at a glance and grab it quickly.
Customize drawer foam or dividers to protect delicate tools. Label each drawer so you spend less time searching and more time working.
PRO TIP
Choose swivel casters with locking brakes so the cart stays put while you work. Mount a power strip on the side to charge cordless tool batteries and run a small lamp. If you plan to store heavy items, reinforce the frame with corner braces and use full-extension drawer slides rated for the load. Paint or seal the wood to resist moisture, and add non-slip liners to prevent tools from shifting. Keep a small bin on top for project parts and a hook for your tape measure so essentials are always within arm’s reach.
8) Install a vinyl floor mat for easy cleanup and comfort
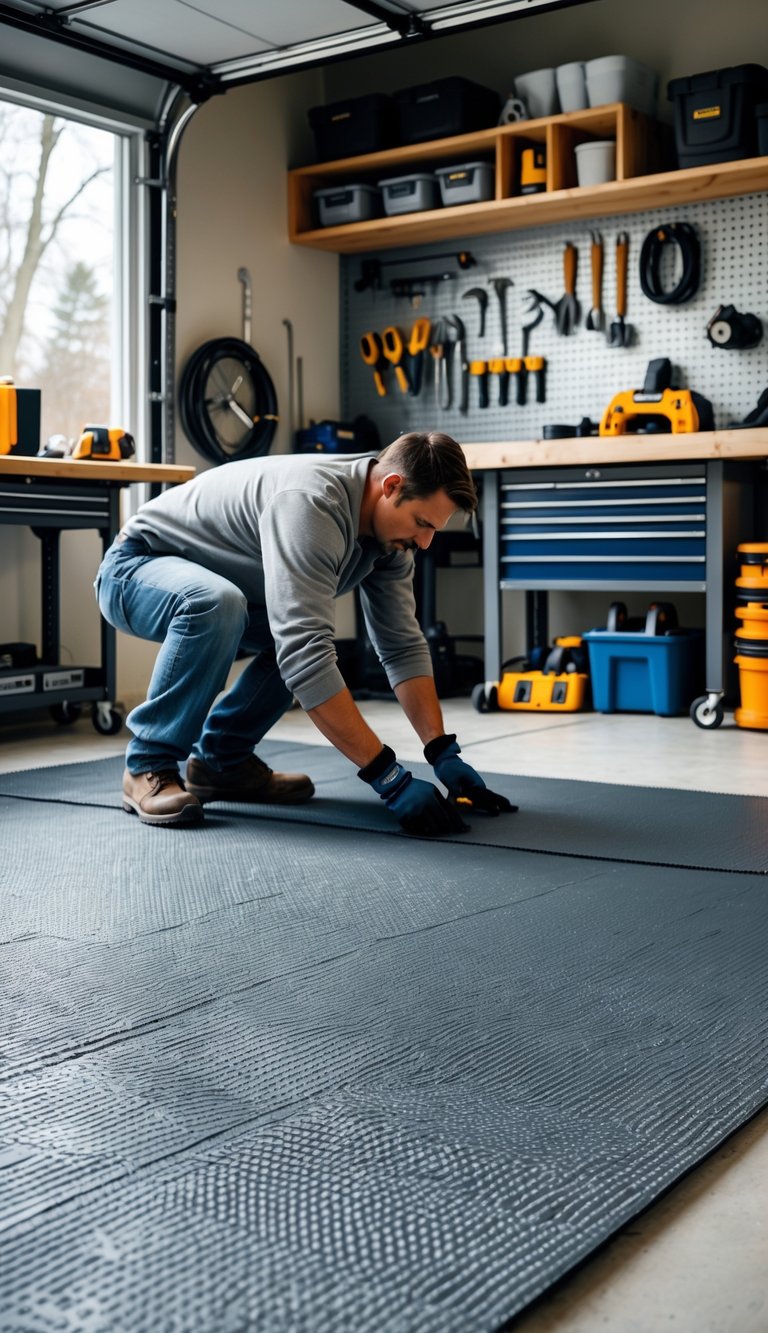
A vinyl floor mat makes your garage workshop easier to clean and more comfortable to stand on. You can roll it out over concrete to protect the floor from spills and to reduce fatigue during long projects.
Start by sweeping and washing the floor so the mat lies flat. Let the mat relax for up to 72 hours if it was tightly rolled, and trim edges for a custom fit if needed. Many mats stay in place by weight, but you can secure the leading edge with double-sided tape or adhesive for a neater look.
Choose a durable, non-slip vinyl that fits your tools and traffic. You’ll notice less dust and faster cleanups after a quick sweep or mop.
PRO TIP
When you shop for a vinyl garage mat, look for a thickness and surface texture that match your work habits and climate. Thicker mats give more comfort underfoot and hide small floor imperfections better, while textured surfaces improve traction when the floor gets wet. If you plan to roll heavy equipment, choose a mat rated for weight and consider placing plywood over it for extra support. Measure your space before trimming and keep a utility knife with a straightedge for clean cuts. To prevent curling, allow the mat to lay flat at room temperature for a day or two, and check for moisture beneath it before sealing edges. Regularly lift sections to dry if you see trapped water; this prevents mold or sticking and keeps the mat in good shape.
9) Add shelves above the workbench for extra storage
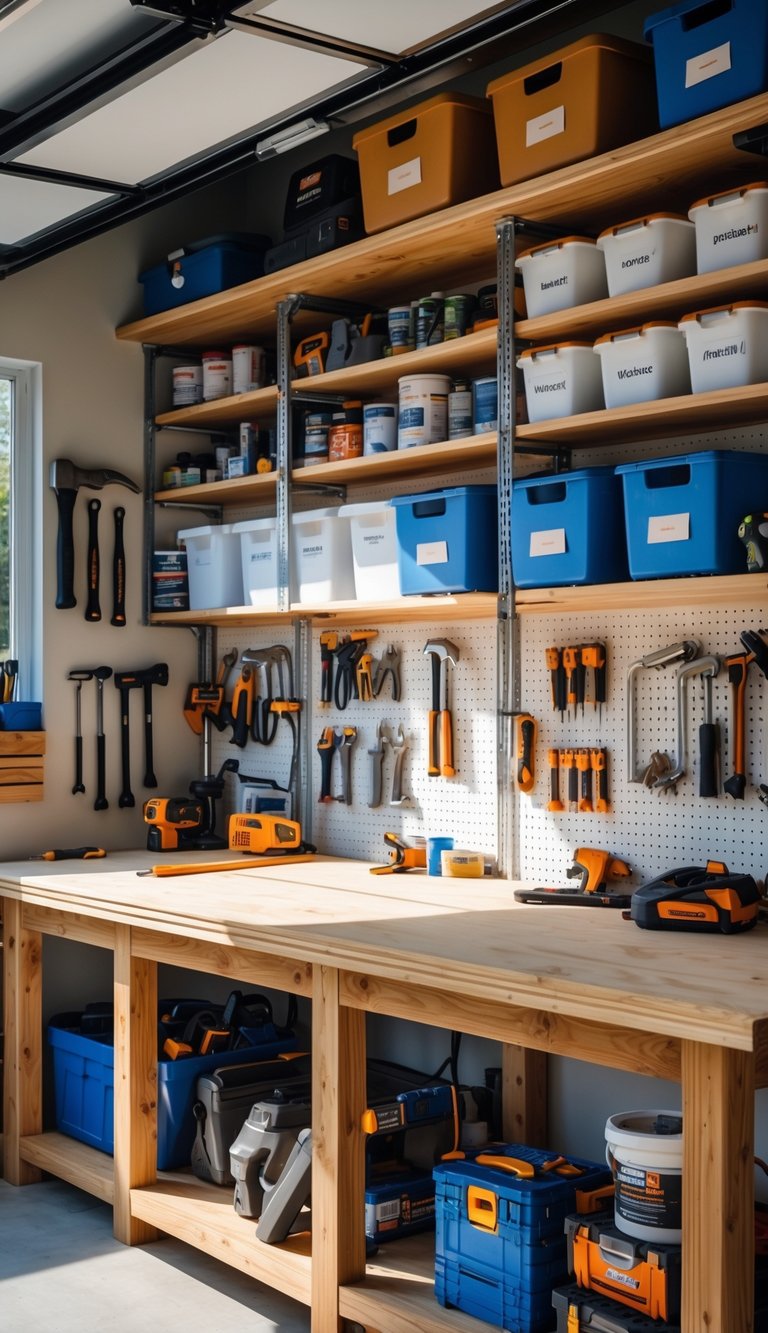
Adding shelves above your workbench makes tools and supplies easy to reach. You can free up floor space and keep frequently used items visible. Open shelves work well for paint cans, small bins, and project parts.
Build shelves from 2x4s and plywood for a strong, affordable option. Anchor the shelf brackets into wall studs to hold heavy loads. Adjustable shelves give you room to store taller items as your needs change.
Use clear bins or labeled containers so you can find things fast. Add a small lip to prevent items from sliding off. Good lighting above the workbench helps you see stored items and keeps the workspace safe.
PRO TIP
Think about the types of projects you do before building the shelves. If you use power tools often, leave more vertical space for larger tool cases and batteries. For hobby work like painting or small repairs, shallow shelves at eye level keep supplies handy without blocking your view. Install a pegboard on the underside of the top shelf to hang frequently used tools within arm’s reach. Consider adding a small rail or bungee cord across the front of each shelf to stop jars and cans from tipping forward when you open the garage door. Finally, plan shelf depth so you can reach the back without straining; 10–12 inches works for most small parts and containers.
10) Hang a shop clock to keep track of project time
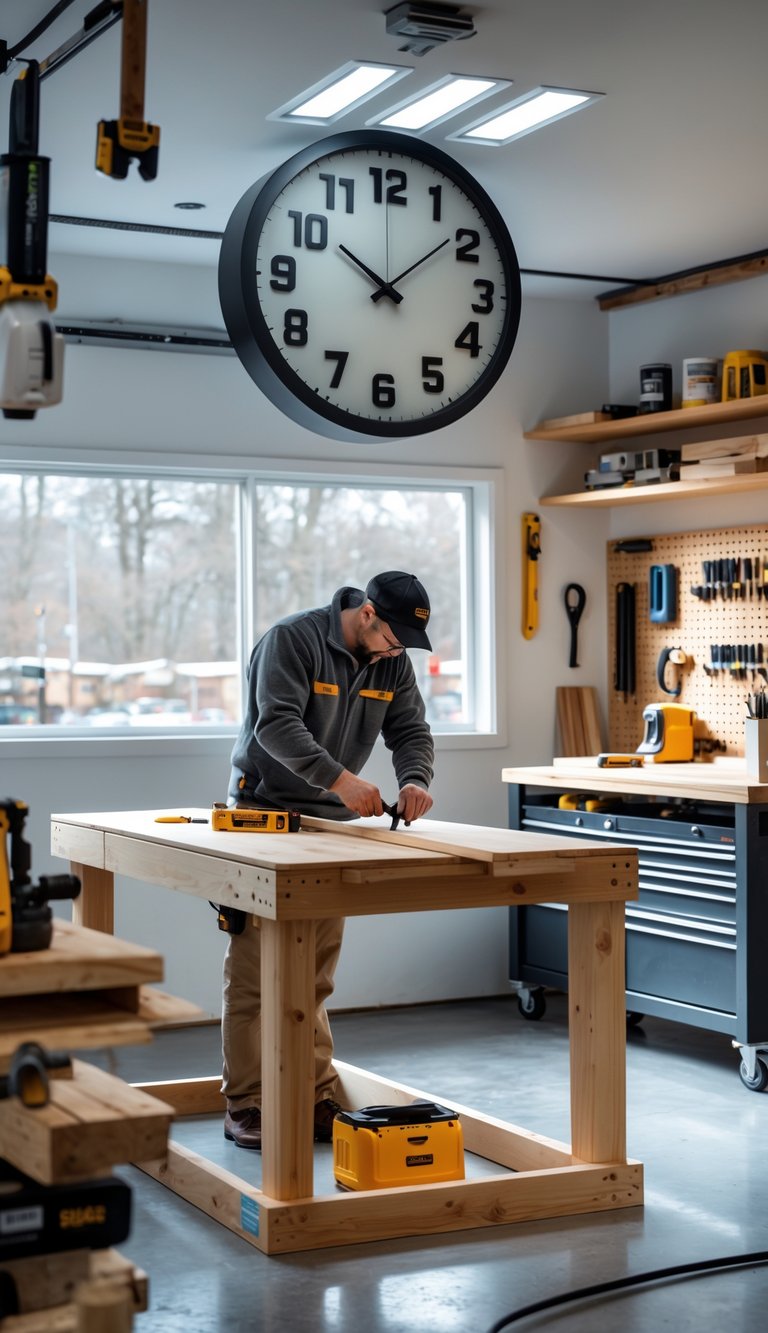
A clear, easy-to-read clock saves you from losing track of time while you work. Mount it where you can see it from your main bench and tool areas so you don’t need to stop what you’re doing to check your phone.
Choose a clock with big numerals and a durable case that can handle dust and bumps. Battery-powered quartz clocks stay accurate and keep you from running cords across the floor.
You can also use a clock to time glue cures, paint dry times, or breaks. Set simple alarms or keep a wall clock plus a small timer for jobs that need precise timing.
PRO TIP
Pick a clock with a silent sweep second hand if you want less noise while you focus. If your garage gets cold, choose one rated to work in lower temperatures so it keeps correct time. Consider mounting it above eye level to avoid accidental knocks, and secure it with proper anchors for drywall or masonry. Add a small, labeled sticky note pad and marker nearby so you can jot start times, cure times, or deadlines quickly. Finally, keep spare batteries in a labeled container so the clock never stops when you’re mid-project.
11) Build a dedicated sanding station with dust collection
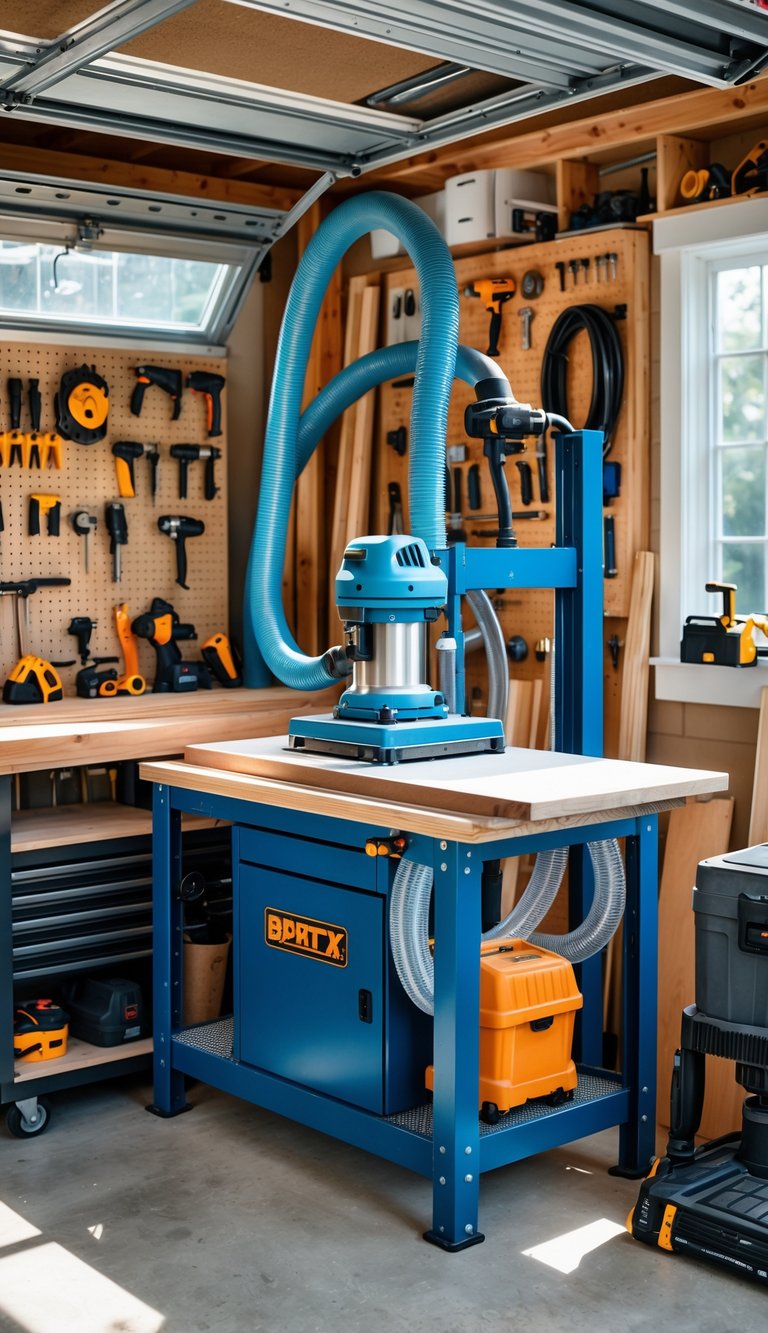
A sanding station keeps your shop tidy and makes sanding safer. You can design it to hold a disk or spindle sander and add a grate top that pulls dust straight into a collector. That reduces airborne dust and keeps your work visible.
Use a simple frame with a roomy cabinet below for a dust separator or shop vac. Include cutouts and hose fittings so you can hook tools directly to the dust port. Casters make the station mobile if you need to move it.
Think about airflow when placing the grate and port; aim for a direct path from work surface to collector. Store extra sanding discs, belts, and sanding sticks inside so everything stays organized and close at hand.
PRO TIP
Plan the port size to match your dust collector or vac for best suction. A smaller hose or too many bends will cut airflow and lower performance, so measure before you cut. Add a removable catch tray or drawer under the grate for quick cleaning. Line the inside with simple baffles or acoustic foam to quiet the collector if noise bothers you. Consider a switch that controls both the sander and the dust system together to make one-step operation easier. Finally, test the setup with coarse and fine sanding to confirm chips and fine dust both move into the collector; adjust grate openings or add a blast gate if needed.
12) Create labeled bins for nuts, bolts, and fasteners
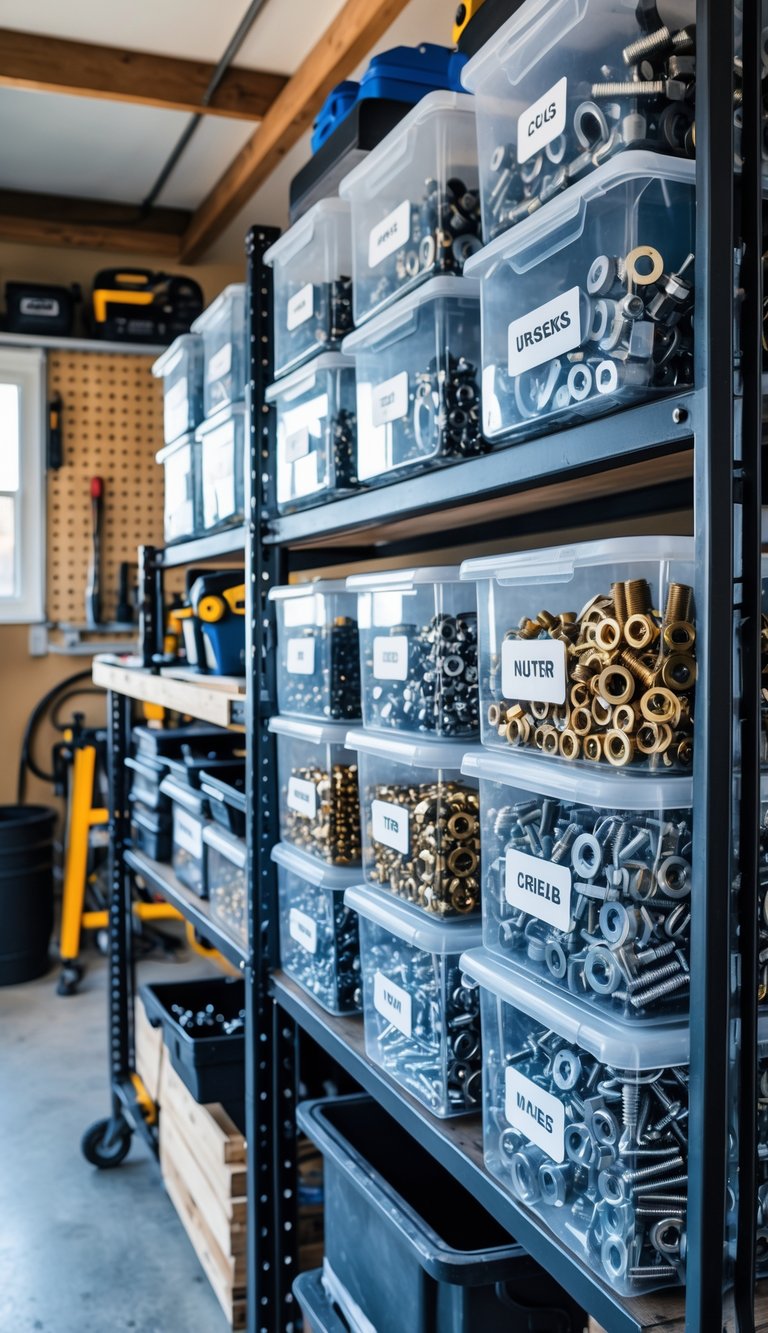
You can save time by sorting fasteners into clear, labeled bins. Use small plastic bins, recycled containers, or a parts cabinet so you see contents at a glance. Group by type and size to avoid digging through mixed piles.
Label each bin with a simple tag showing size and screw type. Write legibly or use a label maker for a neat look that lasts. Keep commonly used sizes within easy reach and rarer items higher up.
Mount a small shelf or stackable rack to keep bins tidy and mobile. Carry a handful of labeled bins to your work area so you don’t run back and forth. Refill and relabel bins after big projects to keep the system useful.
PRO TIP
Pick one labeling method and stick with it so you can find parts quickly without thinking. Use clear labels that include both size and thread type—like “1/4–20 Bolt” or “8 x 1/2 Sheet Metal Screw”—so anyone can grab the right piece. Color-code similar groups (washers, nuts, wood screws) to speed visual searches. Store tiny items in small compartments and rare sizes in a separate drawer to avoid clutter. If you buy bulk fasteners, split them into your labeled bins right away to avoid mixing. Finally, keep a small inventory list taped to the inside of a cabinet door so you know when to restock common items.
13) Install a retractable extension cord reel
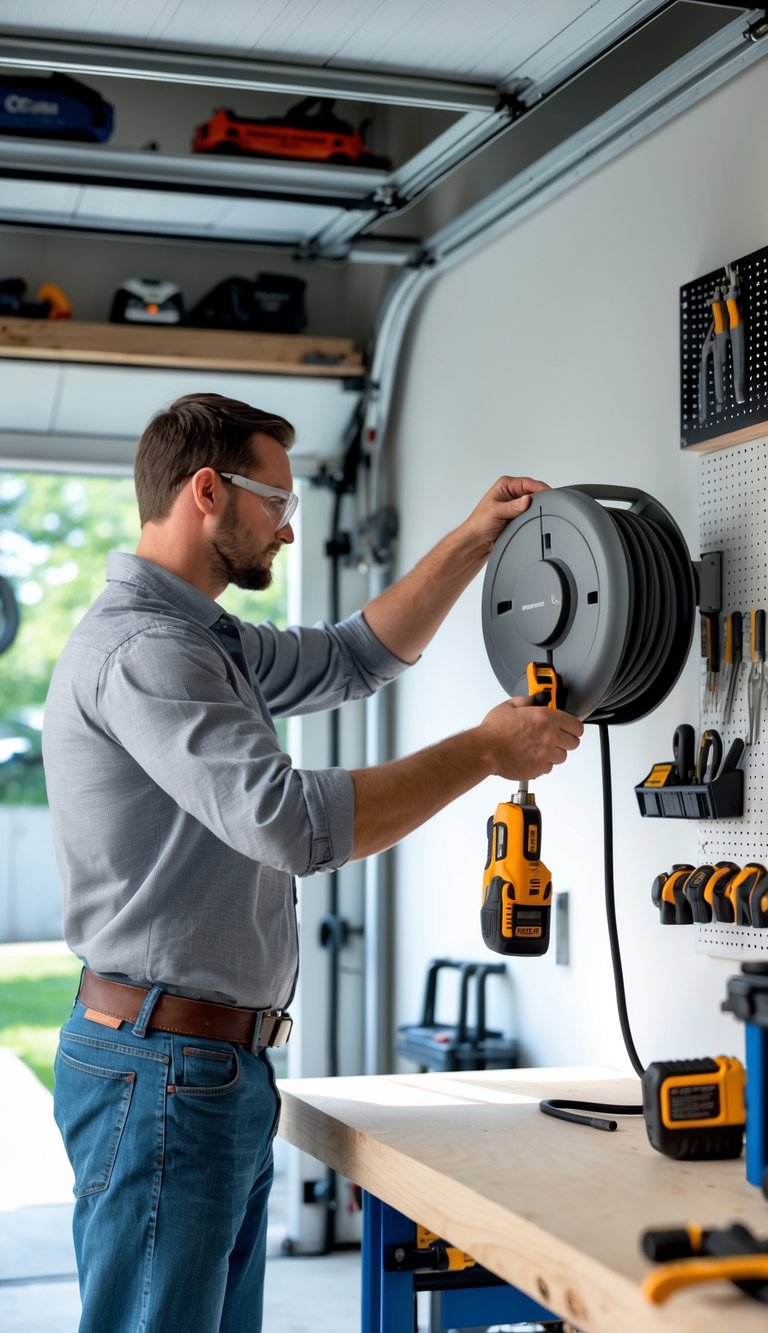
A retractable extension cord reel keeps your garage tidy and cuts down on trips and tangles. You can mount one on the ceiling or a wall near your main workbench, so the cord reaches tools when you need it and stows out of the way when you don’t.
Choose a reel rated for the cord length and amperage of your tools. Hardwiring a reel or using a dedicated outlet cut down on loose plugs and makes the setup safer. If you build your own reel, use durable materials and follow wiring rules to avoid overloads and shorts.
PRO TIP
Before you start, map the locations of lights, outlets, and equipment so the reel sits in the most useful spot. Buy a reel with a locking feature to hold common lengths in place and reduce wear from constant retraction. If you need longer reach, pick a reel designed for 50–100 feet rather than stringing multiple cords together, which can cause voltage drop and heat buildup. Always check the reel’s amp rating against your highest-draw tool, like a table saw or heater. Grounding and a properly sized wire are essential; if you are unsure about the wiring, hire a licensed electrician to connect the reel to a dedicated circuit. Regularly inspect the cord for cuts, exposed wires, or overheating marks and replace it when you see damage.
14) Set up a dual-purpose workbench with storage underneath
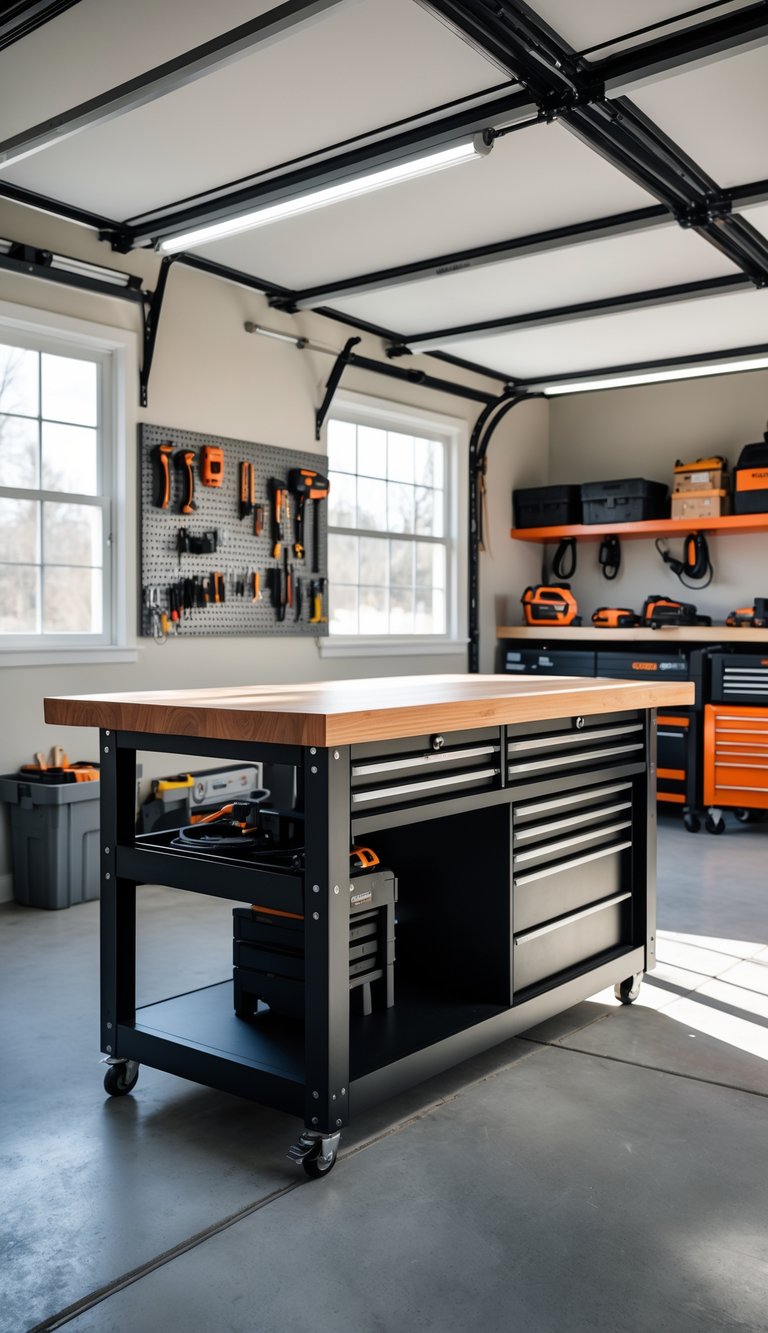
A dual-purpose workbench gives you a solid surface for projects and a place to store tools. Build a sturdy top from laminated plywood to resist warping and keep a flat work area.
Use the space under the bench for open shelves, drawers, or pull-out bins. This keeps heavy items low and tools easy to grab without crowding the tabletop.
Limit the bench footprint to save floor space while adding vertical storage like pegboard at the back. That way you can hang frequently used tools and still keep the bench clear for work.
Choose drawer slides rated for the weight you plan to store. Secure the frame with good joinery and add a finished edge to protect hands while you work.
PRO TIP
Plan the layout before you cut any boards. Measure the room, the tools you use most, and how tall you want to stand or sit while working. Sketch a simple plan with shelf heights and drawer widths so you avoid surprises. Consider modular storage: make shelves and drawers removable or adjustable so you can change the setup as your tools or projects change. Use full-extension drawer slides for easy access and label bins so you can find fasteners quickly. Add casters to the bench if you need to move it, and lock them when stationary. Finally, sand and seal plywood edges to prevent splinters and make cleanup easier.
15) Build a small parts organizer from wooden drawers
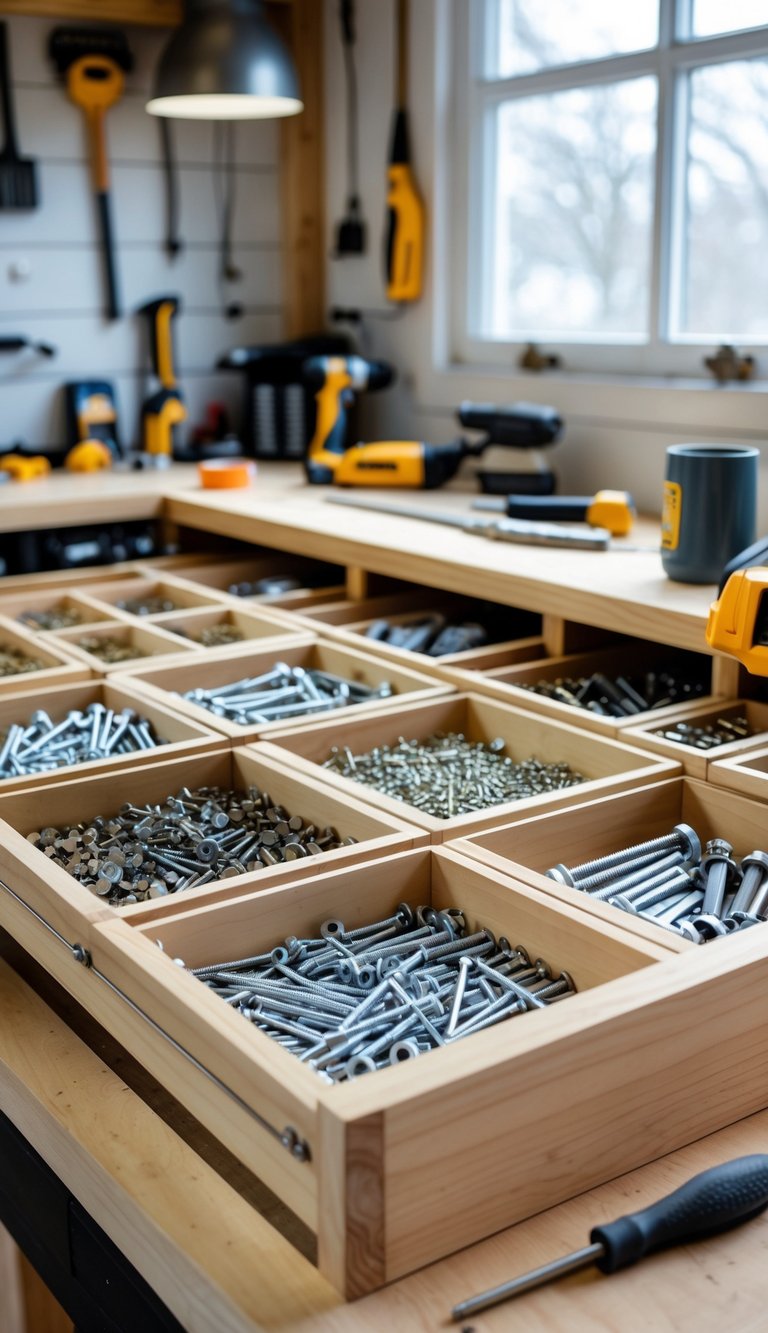
You can make a simple parts organizer using small wooden drawers or repurposed boxes. Stack the drawers in a frame or mount them on a pegboard so each drawer stays in place and slides easily.
Label each drawer with its contents to save time when you look for screws, nuts, or electrical parts. Use clear labels or a color code so you can find items at a glance.
Choose lightweight wood or thin plywood for the drawers to keep the unit easy to move. Add felt or foam liners to protect delicate items and reduce rattling when you open and close drawers.
PRO TIP
Think modular so you can change the layout as your needs change. Build the frame with simple dado or rabbet joints so drawers fit snugly but can be removed for cleaning. Keep a few extra shallow drawers for small fasteners and deeper ones for bulkier items like tape or wire spools. Consider making drawer fronts removable or interchangeable; that lets you replace worn fronts without rebuilding the whole organizer. If you plan to mount the unit, anchor it to studs and add stops to prevent drawers from falling out. Finally, photograph the drawer layout and store the image on your phone — it helps you remember where things live after a busy project.
16) Add weather stripping to garage doors to block drafts
If you feel cold air or see light under the garage door, add weather stripping to stop drafts. It’s an easy project that improves comfort and can lower heating costs a little.
Measure the gaps around your door first, then buy a seal made for garage doors. Bottom seals, vinyl trim, and top seals each block different gaps, so pick what fits your door.
Clean the door edge and track before you install the new stripping. Use basic tools like a screwdriver, utility knife, and adhesive or screws as the product requires.
Press or fasten the strip evenly so it seals without binding the door. Test the door several times to make sure it opens and closes smoothly.
PRO TIP
You can extend the life of your weather stripping by checking it each season and cleaning it with mild soap and water. Replace any cracked or flattened sections right away; worn strips let in drafts, pests, and moisture. If the door still leaks after new stripping, check the threshold and door alignment—often a simple adjustment fixes most gaps. For a tighter seal, combine a new bottom seal with side and top trim. Keep a spare length of the same material on hand so you can make quick repairs when needed.
17) Mount a foldable stool for quick sitting
Mount a foldable stool on a wall bracket to save floor space and give yourself a handy seat. You can use simple folding stool plans or a ready-made stool that hooks into a metal or wood bracket. Mount it near your workbench or paint area so you can sit without moving tools or supplies.
Choose a sturdy bracket and mount it into studs or use heavy-duty anchors for a safe hold. When folded, the stool tucks flat and won’t block traffic in the garage. When you need a break, pull it down and sit for a few minutes to rest or finish a small task.
PRO TIP
Think about height and reach before you mount the stool so your feet rest comfortably on the floor when seated. Mark the bracket position, test with a temporary clamp, and sit on the folded stool before final mounting to confirm comfort. If you build your own stool, use hardwood or reinforced plywood for the seat and legs, and add metal hinge plates for long-lasting support. Paint or seal the wood to resist garage moisture and dirt. Consider adding a small strap or latch to lock the stool closed when not in use, preventing it from opening accidentally.
18) Create a dedicated space for winter-specific car maintenance
Set aside one area in your garage just for winter car tasks like battery checks, antifreeze top-offs, and tire changes. Keep that space clear of clutter so you can roll your car in or pull a wheel out without moving half the garage.
Stock the area with cold-weather essentials: a battery charger, a tire inflator, a thermometer, and labeled containers for winter-grade fluids. Add a compact workbench and a sturdy floor mat to keep tools and parts off the cold concrete.
Install bright, adjustable lighting and a portable heater rated for garage use to keep hands nimble and fluids flowing. Use wall hooks and pegboards so each tool has a place and you can find what you need fast.
PRO TIP
Plan your winter space with safety first. Use a small, vented heater meant for garages and never run the car inside without proper ventilation. Keep a fire extinguisher, spill kit, and a clearly marked first-aid kit nearby. Label fluid containers with dates and type to avoid mixing antifreeze or oil grades. Store battery chargers and power cords neatly to prevent trip hazards. Rotate consumables like de-icer and washer fluid so old supplies don’t sit unused. Finally, create a simple checklist for winter tasks and tape it to the wall so you don’t miss seasonal maintenance when the cold weather hits.
19) Use clear storage bins with labels for seasonal tools
Clear storage bins let you see what’s inside at a glance. That saves time when you hunt for rakes, snow shovels, or leaf blowers. You won’t pull down every box to find one tool.
Label each bin by season and item type. Use large, bold labels that you can read from the floor. Keep similar items together so you don’t mix winter gear with summer garden tools.
Stack bins on sturdy shelves to protect tools and free floor space. Place heavy items low and lighter ones higher. Leave a small aisle so you can reach bins without moving everything.
PRO TIP
Choose bins with secure lids and slightly larger sizes than you think you need. Add silica gel packets or a moisture absorber to prevent rust and mildew, especially for metal tools and electronics. Use removable, reusable labels or a laminated card tucked inside a clear pocket so you can change labels each season without sticky residue. Write labels with a weatherproof marker, or print them on waterproof paper. Group small parts in clear zip bags and tape them inside the lid for quick access. Finally, photograph the stacked bins and save the image on your phone so you can find the right box fast when you’re in a hurry.
20) Build a wood rack to neatly stack firewood
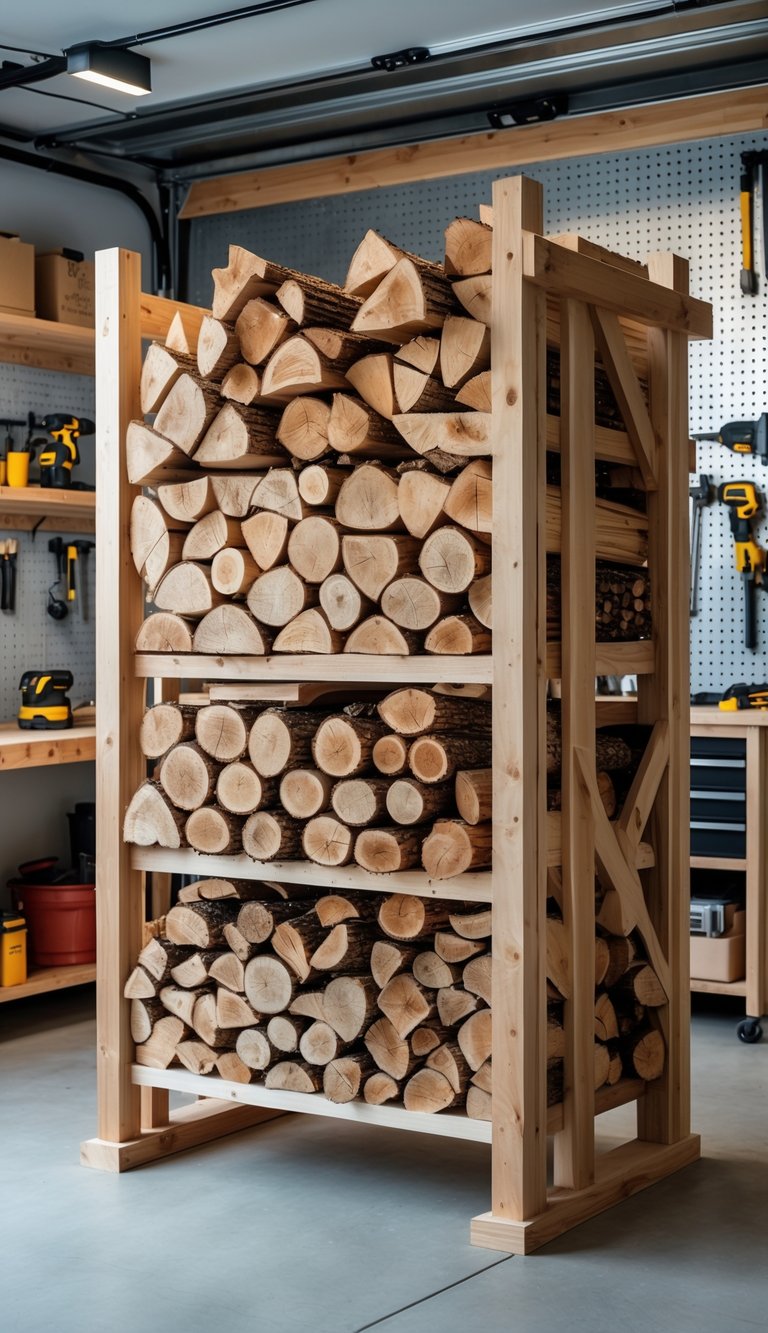
A wood rack keeps your firewood off the ground and lets air flow around the logs so they dry better. You can build a simple rack from lumber, cinder blocks, or an old pallet in a single afternoon.
Pick a location that stays dry and gets some sun. That helps prevent rot and pests. Keep the rack a few inches from any siding to avoid attracting insects to your house.
Make the rack sturdy enough for a cord of wood and raise it at least 4–6 inches. Nail or screw the frame solidly, and add end supports to stop logs from rolling off.
PRO TIP
When you build your rack, choose pressure-treated or rot-resistant wood for the base and legs so it lasts through wet seasons. Line the bottom with a few inches of gravel or use a solid platform to keep moisture away from the wood. Space the slats or boards about 1–2 inches apart to allow good airflow; too-tight stacking slows drying. Store the rack under a small overhang or add a simple top cover to shield the top layer from rain while leaving the sides open. Stack the newest wood on the bottom and use older, drier wood first so each log gets time to season.
21) Paint the walls a light color to brighten the workspace
Painting your garage walls a light color makes the whole space feel brighter and larger. Light paint reflects more light from windows and fixtures, so you can see details while you work without adding extra lamps.
Choose durable, moisture-resistant paint made for garages or basements to handle damp and stains. Whites, pale grays, and soft creams keep things neutral and help tools and storage stand out against the walls.
A light color also helps you spot dirt, spills, and wear early, so you can clean or touch up before problems grow. If you want a bit of contrast, paint one wall a slightly darker shade to create a focal point without sacrificing brightness.
PRO TIP
Pick a satin or semi-gloss finish for the lower half of walls where scuffs and marks appear most. These sheens wipe clean easily and resist moisture better than flat paint. For extra durability, prime bare drywall and patched areas before you paint; primer improves adhesion and gives a more uniform look. If your garage lacks natural light, use a white or cool-toned light color to balance the warmth of incandescent bulbs. Tape off trim and outlets, and roll paint in large, even strokes to avoid lap marks. Allow proper drying time between coats so the finish stays smooth and tough.
22) Install a wireless Bluetooth speaker for music while working

Pick a durable Bluetooth speaker you can mount or place high and out of the way of dust and tools. A water- and dust-resistant model will last longer in a busy garage, and a rechargeable unit keeps you untethered.
Mount the speaker near your main work area so sound reaches you without blasting. If you work in different spots, consider a small speaker on wheels or multiple inexpensive units linked together.
Pairing is simple: turn on Bluetooth, open settings on your phone, and select the speaker. Keep a short charging cable nearby and a small shelf or magnetic mount to prevent bumps and drops.
PRO TIP
Think about wiring a switched power outlet that boosts convenience and safety. Mount a USB outlet or 12V socket near your workbench so you can charge the speaker and phone without running cables across the floor. Use an inline surge protector if your garage sees power fluctuations. If you prefer permanent wiring, install a fused accessory circuit off your breaker with a licensed electrician to meet code. Label the switch so others know where to power the speaker, and test waterproofing and mount stability before leaving the speaker unattended.
23) Add a ceiling-mounted bike rack to free floor space
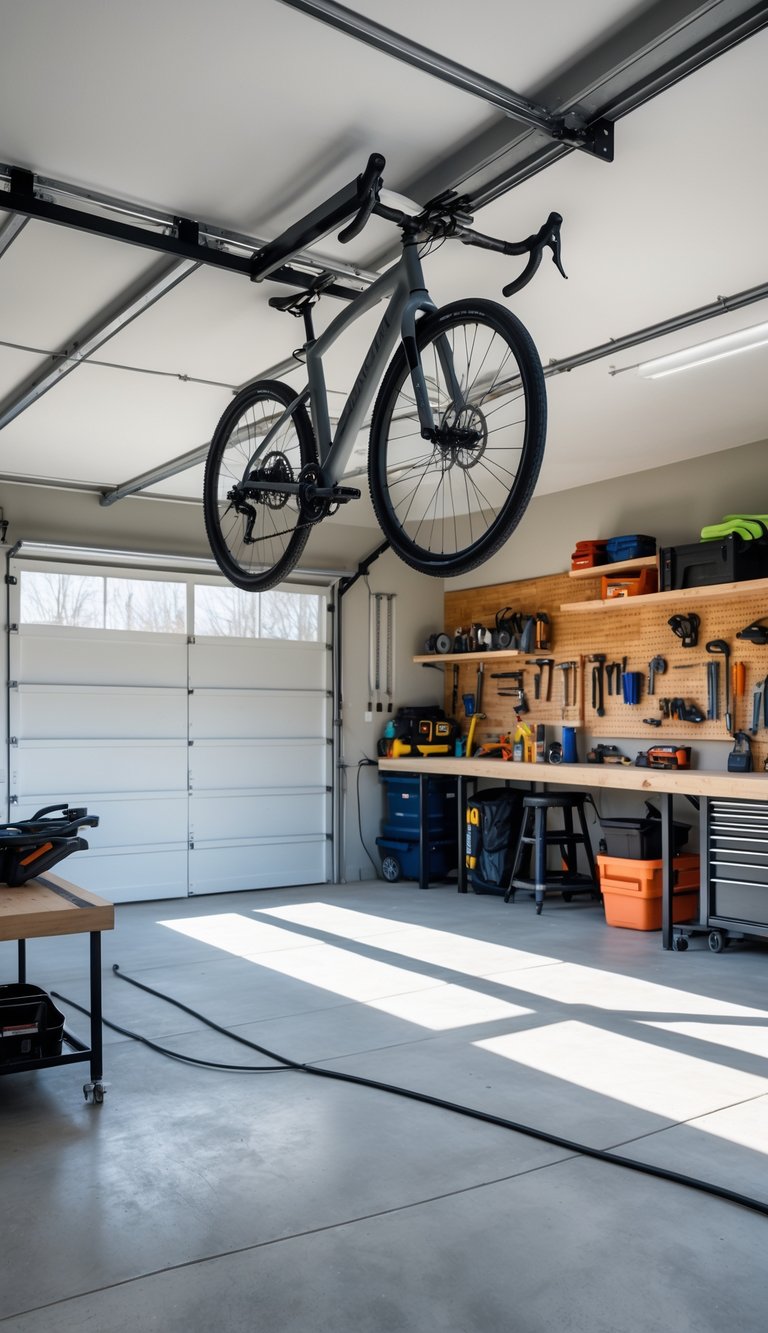
A ceiling-mounted bike rack helps you reclaim floor space fast. You lift bikes overhead and out of the way, so you can move around the garage or use the spot for a workbench.
Choose a system that fits your ceiling type and bike weight. Simple pulley hoists work for one or two bikes, while rail systems hold several and slide along the ceiling.
Install into ceiling joists or beams for safety. Use proper anchors and check weight limits before you hang e-bikes or heavy mountain bikes.
PRO TIP
When you install a ceiling bike rack, plan the layout before drilling. Measure bike width and handlebars, then mark where bikes will hang so they don’t bump into each other or other items. Balance weight across joists; for multiple bikes, spread mounts along different joists instead of loading one beam. Consider using a rail system if you need frequent access—you can slide bikes to the edge and lower one at a time. If your ceiling is finished drywall over joists, locate joists with a stud finder and use lag bolts or structural screws rated for the load. For concrete ceilings, use appropriate masonry anchors and follow torque specs. Regularly check fasteners and cables for wear, and lower bikes gently to avoid strain on mounts.
24) Set up a mini-fridge for drinks and snacks
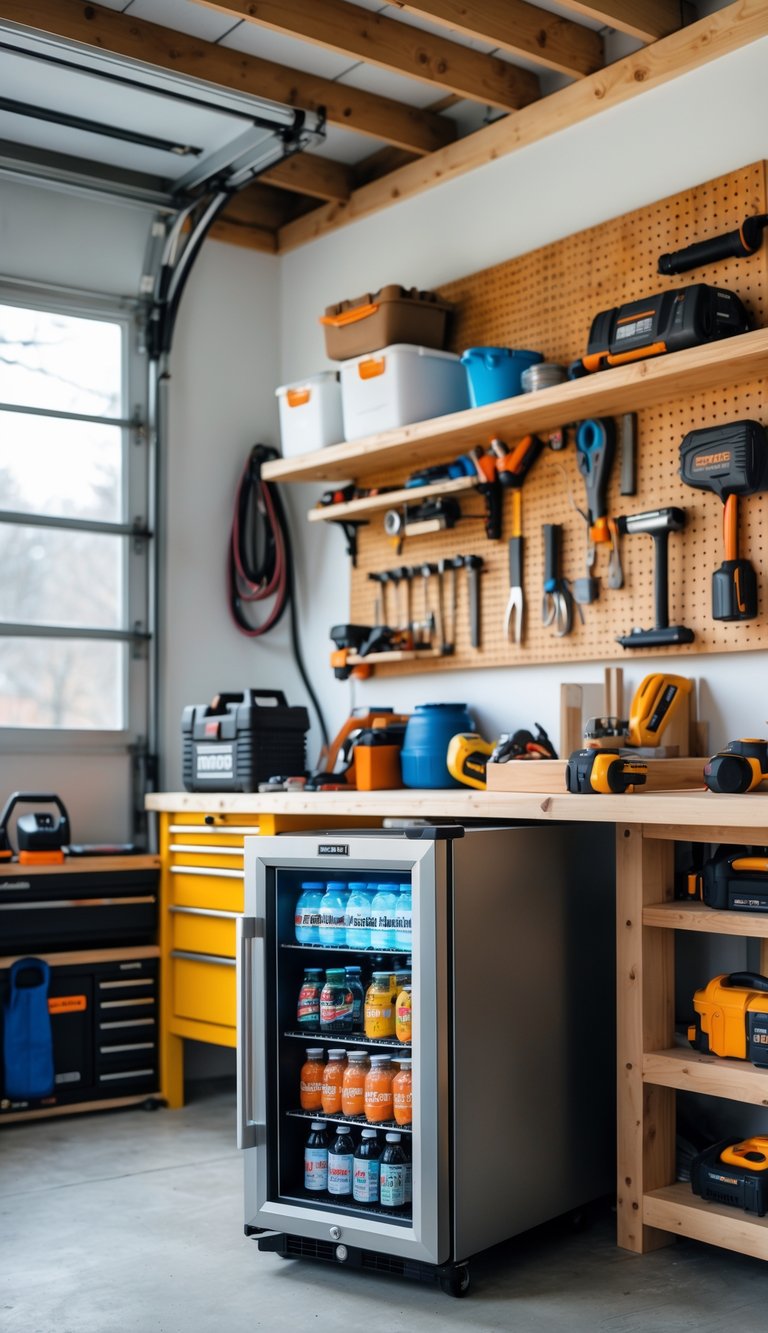
A mini-fridge makes your garage workshop more comfy and keeps drinks and snacks within reach. Pick a spot with a stable floor and some ventilation space behind the unit. Measure first so the door can open fully and you won’t block walkways.
Choose a compact fridge that fits your needs — a small beverage cooler for cans or a unit with a freezer for snacks. Plug it into a grounded outlet and avoid long extension cords. Keep the fridge elevated a few inches to protect it from damp concrete.
Organize items so you reach what you need fast. Use small bins or magnetic shelves and wipe spills right away to prevent smells. Label shelves if multiple people use the space.
PRO TIP
Place the mini-fridge near a power strip with surge protection so your compressor stays safe during storms or power swings. If the garage gets very cold in winter, pick a fridge rated for lower ambient temperatures or add slight insulation behind it to help the compressor run efficiently. Clean the condenser area every few months to remove dust and improve cooling. Keep a small thermometer inside so you can check temperatures at a glance, and rotate perishables to avoid spoilage. Consider a lock or simple cover if kids will be around, and add a small LED light nearby for late-night visits.
25) Hang a whiteboard for project notes and plans
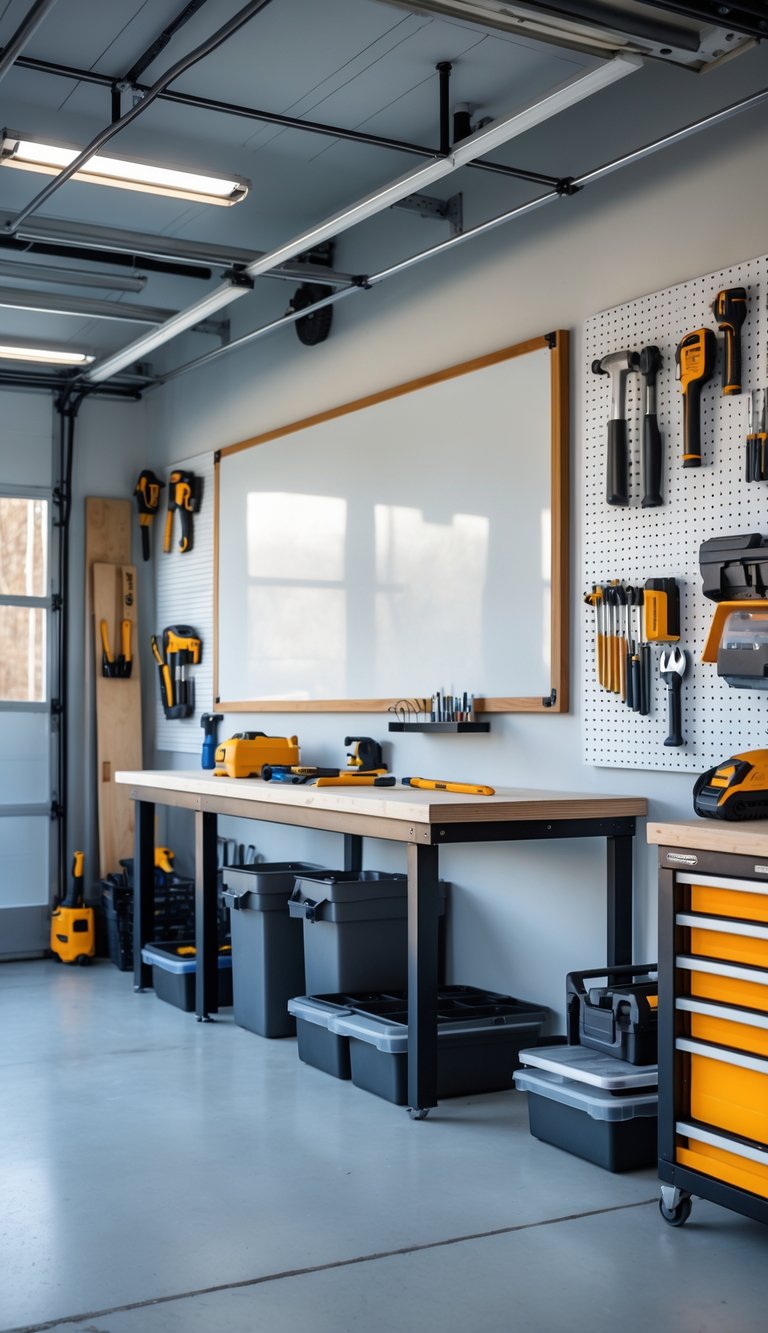
A whiteboard gives you a clear place to sketch plans, list materials, and track tasks. Mount it at eye level near your workbench so you can quickly jot ideas and check measurements while you work.
Use a magnetic whiteboard to hold small parts, templates, and quick reference sheets. You can add a simple tray for markers and an eraser to keep everything within reach.
Choose a size that fits your wall and the projects you build. If you work on large pieces, pick a wider board so your sketches and dimensions stay legible.
PRO TIP
Pick a whiteboard with a durable surface that resists staining and ghosting; cheaper boards can stain quickly and become hard to read. Clean it regularly with isopropyl alcohol or a whiteboard cleaner to keep writing crisp. Consider adding a cork strip beside the board for tacking receipts, cut lists, and printed plans. Use colored markers to separate tasks, measurements, and notes, which helps you see priorities at a glance. If your garage gets cold, bring markers inside before use since low temperatures can affect ink flow. Magnetic accessories like clips and holders keep small tools and notes visible and off your work surface, reducing clutter and saving time.
26) Build a pegboard charging station for cordless tools
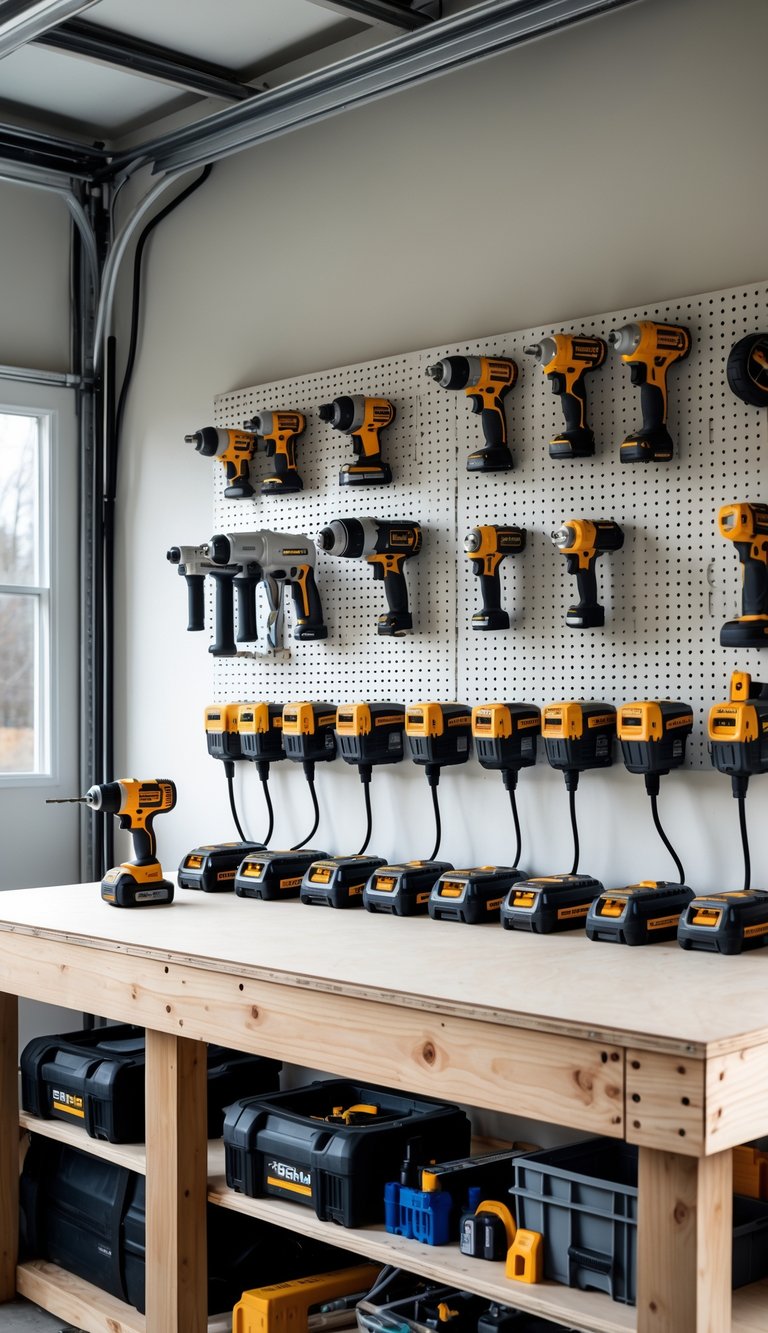
A pegboard charging station keeps your drills, drivers, and chargers neat and easy to reach. You mount a pegboard on the wall, add hooks and small shelves, and place chargers where cords can run behind the board for a cleaner look. This setup saves bench space and makes it simple to grab a fully charged tool.
Use scrap plywood or a quarter sheet to build shallow shelves for chargers so batteries sit upright. Label spots for each tool to avoid mix-ups. Keep the station near an outlet and consider adding a power strip with built-in surge protection.
PRO TIP
Plan the layout before you drill any holes. Measure each charger and battery so you can place hooks and shelves at the right heights. Leave room for cord routing behind the pegboard and use zip ties or adhesive cord clips to keep wires tidy. If you have many tools, group similar types together and mark each spot with a permanent marker or small label maker. Drill a few extra holes for future changes; pegboard systems are easy to adjust but harder to redo once mounted. Finally, consider mounting the board at a comfortable reach so you don’t strain when swapping batteries.
27) Add a chalkboard wall for quick reminders and sketches
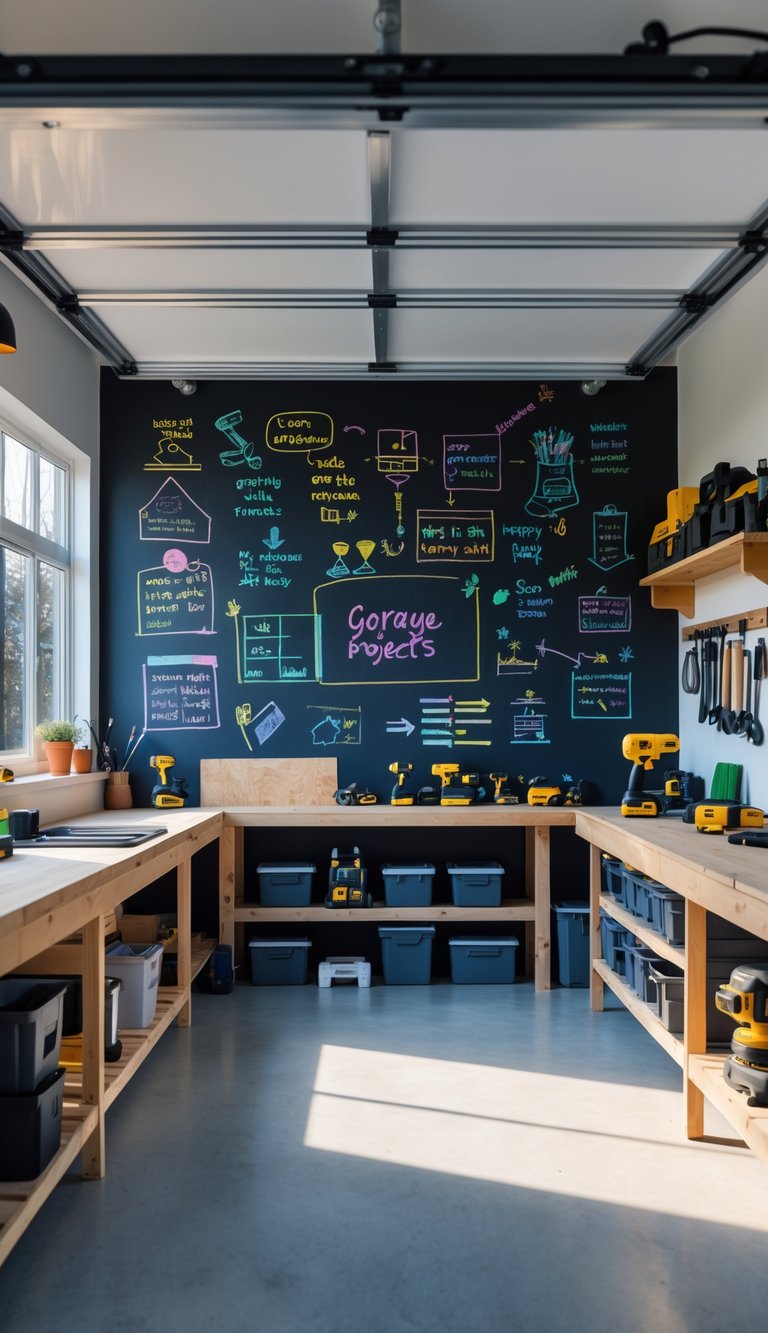
A chalkboard wall gives you a big, simple surface for notes, measurements, and quick sketches. You can mark measurements, sketch parts, or list tools you need without searching for paper.
Paint a smooth section of drywall or a plywood panel with chalkboard paint. It dries fast and stays usable; you can frame the board or leave it plain for a cleaner look.
Use the wall for project timelines, material lists, or step-by-step reminders. Change ideas quickly, erase mistakes, and keep your workspace organized while you work.
PRO TIP
Choose high-quality chalkboard paint and sand the surface lightly before you paint to get a smooth finish that erases cleanly. Prime the wall if it’s new drywall or a glossy surface to help the paint stick. Apply two thin coats, letting each dry fully, and season the board by rubbing the side of white chalk over the whole surface and wiping it off; this prevents ghosting. Mount the board at a comfortable height so you can write while standing. Keep a small shelf or magnetic strip nearby to hold chalk, erasers, and a wet cloth. If you want extra function, use chalkboard sheets or add a magnetic primer under the paint to hold small metal parts or notes.
28) Create a compost bin area for garden waste

Set aside a corner of your garage yard or patio for a compost bin to keep garden waste organized. A simple bin made from pallets, wire mesh, or a plastic tumbler gives good airflow and keeps critters out.
Place the bin on bare soil or gravel so worms and microbes can move in and help break down material. Layer greens like vegetable scraps and grass with browns such as leaves and paper to balance moisture and speed decomposition.
Label a small bin for kitchen scraps and another for yard waste to make sorting easy while you work in the garden. Check moisture and turn the pile every few weeks so it stays active and doesn’t smell.
PRO TIP
Choose a size that fits your garden and composter habits; a 3-bin system works well if you want to move material through stages. Keep a small covered bucket inside the garage for kitchen scraps so you don’t track food waste around. If space is tight, try a vertical or tumbling composter to save room and speed up mixing. Line the bottom with coarse sticks for drainage, and add finished compost to raised beds in spring. Wear gloves when turning the pile and avoid adding meat, dairy, or diseased plants to prevent pests and pathogens.


