Last Updated on October 19, 2026
A carburetor bowl left half-full of ethanol-blended gasoline for six months can gum up jets so badly that a full rebuild becomes the only fix. That single mistake, repeated every spring across thousands of garages, is the top reason snowmobiles refuse to start the following winter. Knowing how to store a snowmobile in the off-season, fuel stabilizer, battery care, track lift, and covering included, is not optional maintenance. It is the difference between a sled that fires up on the first pull in November and one that needs a carburetor rebuild, a new battery, and a replacement drive belt before it ever sees snow.
This guide walks through a complete spring-to-fall storage routine, including how carbureted and fuel-injected sleds differ, and the specific mistakes that cause hard starting or belt damage.
Key Takeaways
- Fuel decision matters most: Either run a stabilizer through a full tank and the fuel system, or fully drain the tank and carburetor bowls. Mixing the two approaches is the top cause of spring no-starts [6][9].
- Battery removal beats in-sled storage whenever practical. Store it indoors between 50°F and 80°F and recharge every 30 to 60 days to keep voltage near full capacity [1][3].
- Track lift stands prevent flat-spotting and runner corrosion by keeping the track and skis off the floor for the entire off-season [6][8].
- Release belt tension before storage; a drive belt pinched under constant pressure for months can develop cracks or a permanent set that throws off clutch engagement [9][10].
- A breathable, properly fitted cover controls UV damage and moisture without trapping condensation that invites rust and mold [4][5].
How to Store a Snowmobile in the Off-Season: Fuel Stabilizer Basics for Carbureted and EFI Sleds
Fuel is where most storage routines go wrong, and the fix depends partly on whether the sled is carbureted or fuel-injected. Manufacturers are consistent on one point: old, untreated gasoline left sitting in a fuel system is the single biggest cause of hard starting after a long layoff [6][9].
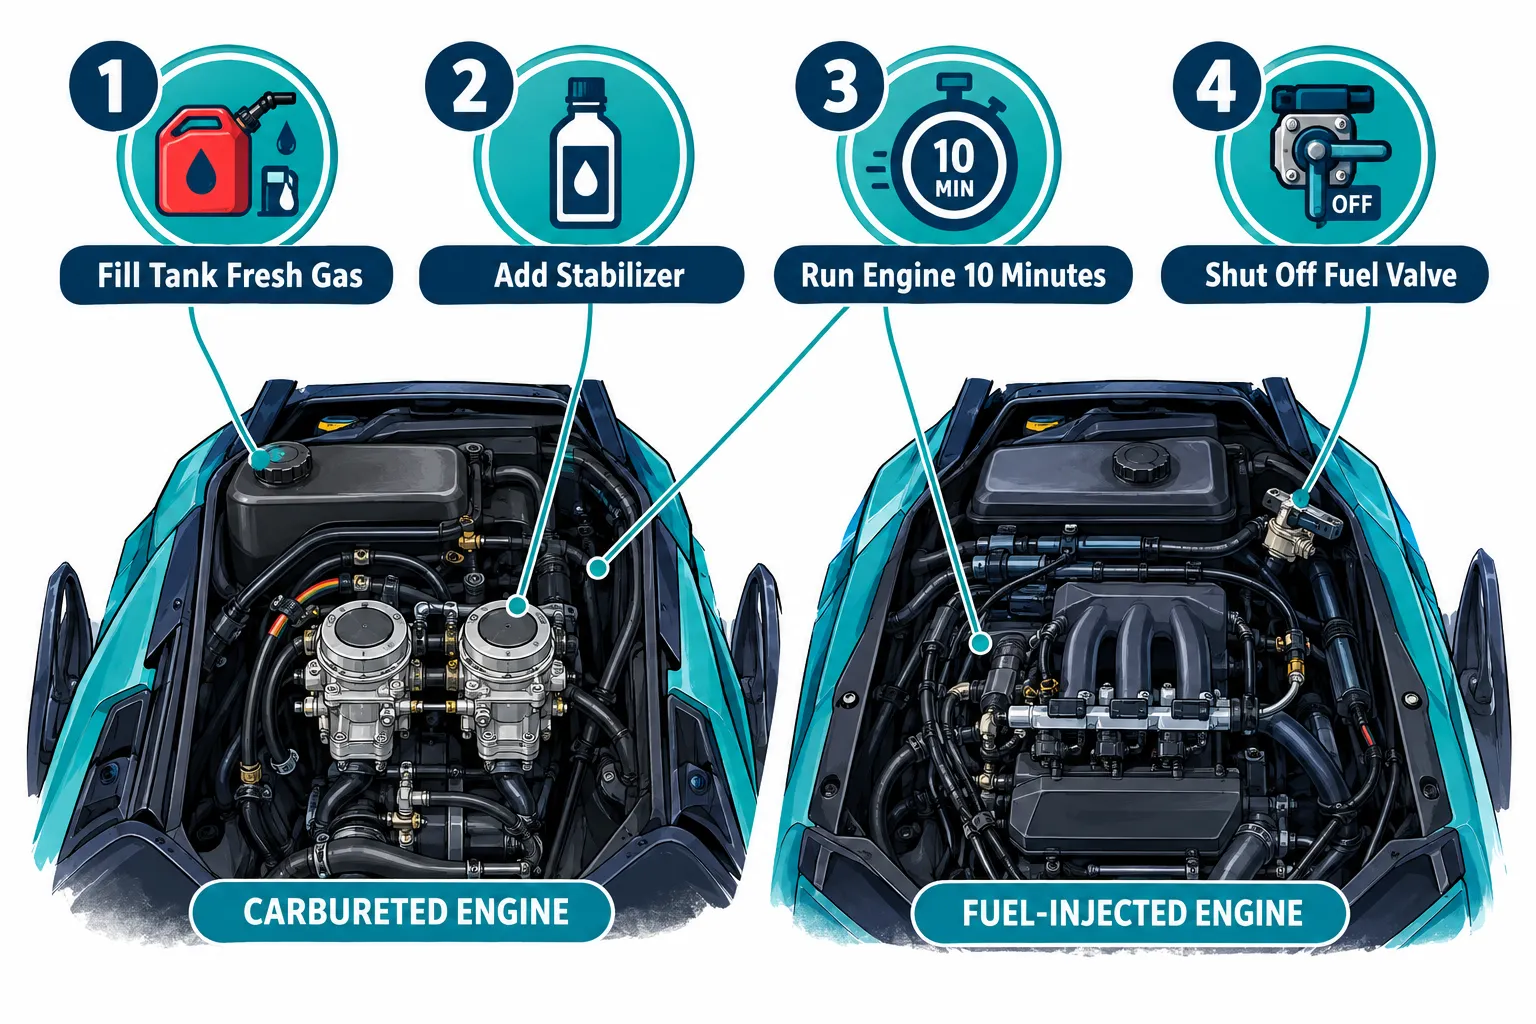
Ethanol-blended fuel absorbs moisture over time and separates, leaving a gummy varnish residue in carburetor jets, fuel lines, and injectors. On a carbureted sled, that varnish clogs tiny passages that are difficult and expensive to clean. On a fuel-injected sled, degraded fuel can gum up injectors and foul the fuel pump, triggering check-engine codes or a no-start the following season [9].
There are two acceptable approaches, and the OEM guidance is clear that picking one and following it fully matters more than which one is chosen [1][2][6]:
- Stabilize a full tank. Fill the tank with fresh gasoline, add a quality fuel stabilizer at the manufacturer-recommended ratio, and run the engine for 10 to 15 minutes so treated fuel circulates through the lines, carburetor bowls or injectors, and fuel pump. A full tank also reduces the air space available for condensation to form over the summer [6][9].
- Fully drain the system. For sleds that will sit longer than six months or in climates with big humidity swings, draining the tank, fuel lines, and carburetor bowls removes the fuel-degradation problem entirely. This takes more effort but eliminates any risk of varnish buildup [9].
What owners should never do is leave old, untreated fuel sitting in the tank “because it will probably be fine.” Training and safety organizations that publish conservative seasonal protocols are blunt about this: stale fuel left untreated through summer heat is responsible for a disproportionate share of spring service calls [9][10].
A quick note on fuel-injected models: because EFI systems are sealed and pressurized, some owners assume they are immune to storage fuel problems. They are not. Injectors can still foul, and the fuel pump still sits in degraded fuel if the tank isn’t treated or drained. The run-the-engine step after adding stabilizer is just as important on EFI sleds, since it is the only way to get treated fuel past the injectors themselves [6][9].
For sled owners weighing whether their current machine is even worth the long-term upkeep versus replacement, it helps to understand overall ownership costs; see this breakdown of how much a snowmobile actually costs to put storage effort in context.
How to Store a Snowmobile in the Off-Season: Battery Care Fundamentals
Battery care has gotten more precise guidance in recent years, with manufacturers now specifying voltage targets and temperature ranges rather than vague “keep it charged” advice [1][3]. A lead-acid battery left connected and uncharged through a hot summer loses capacity fast, and heat accelerates that self-discharge far more than cold does.
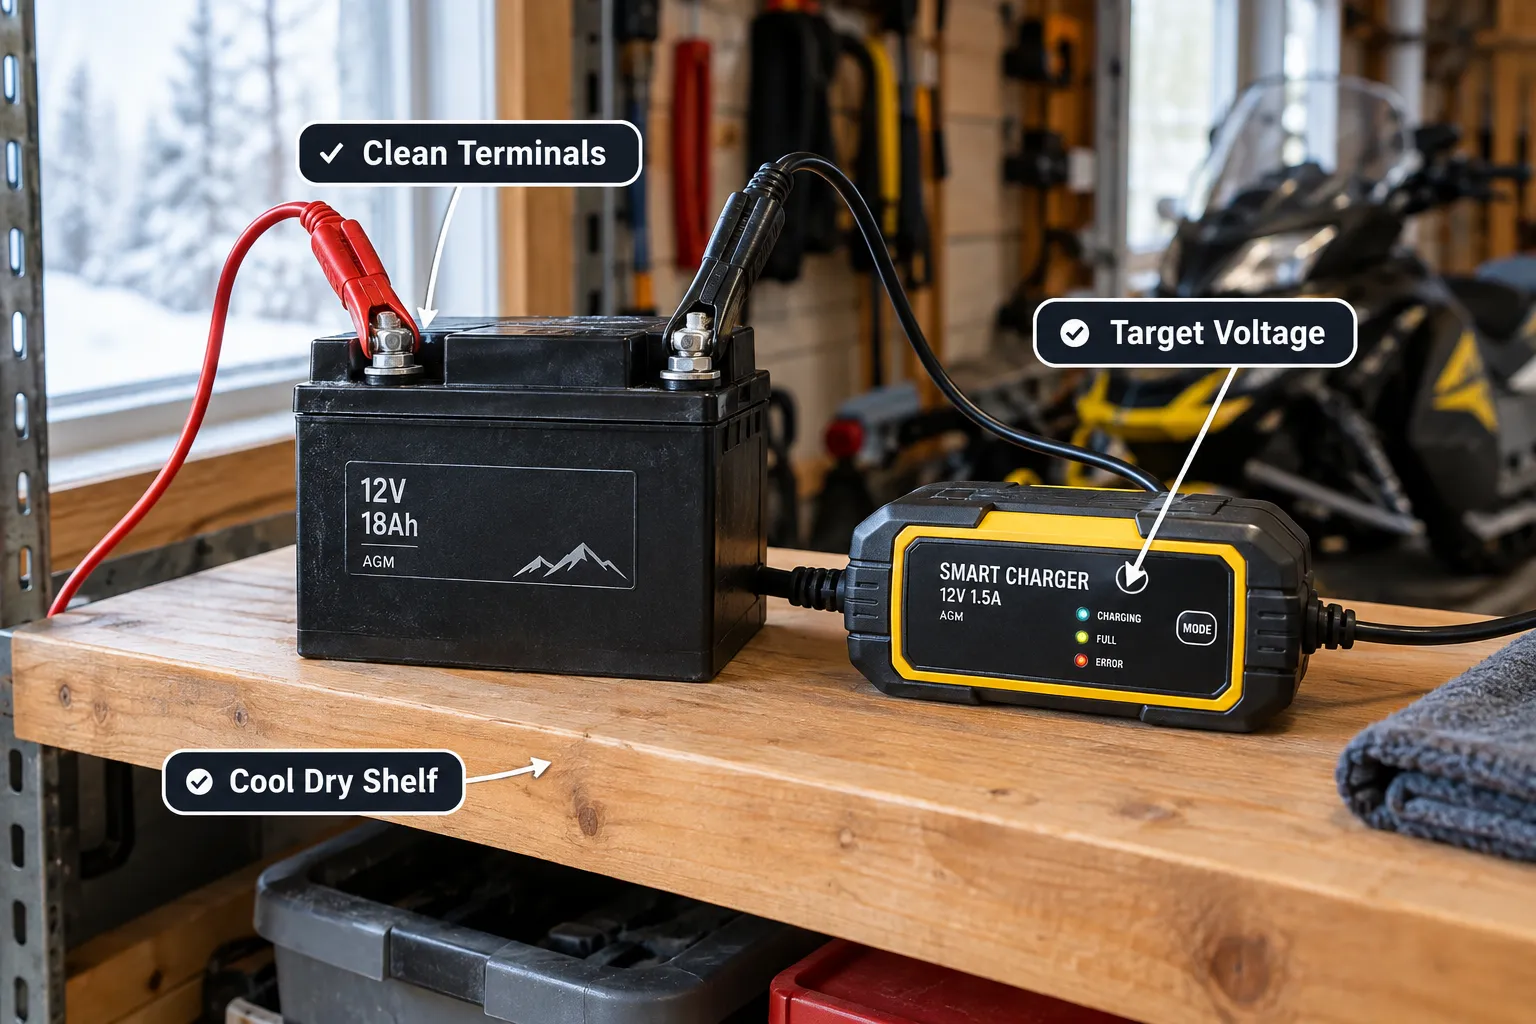
The preferred approach is removal. OEM service documentation favors pulling the battery out of the sled for off-season storage whenever it’s practical to do so, rather than leaving it in place and hoping the parasitic draw from gauges or accessories stays low [1][3]. Once removed:
- Clean the terminals with a wire brush and a baking-soda-and-water solution to clear corrosion.
- Store the battery indoors, ideally between 50°F and 80°F, garages that swing into freezing or sweltering extremes shorten battery life.
- Place it on a non-conductive surface, not directly on bare concrete, to avoid accelerated self-discharge.
- Use a smart trickle charger or battery maintainer set to the correct voltage profile, and check it every 30 to 60 days rather than charging once and walking away [1][3].
If removal genuinely isn’t practical, say, the battery is difficult to access on a particular model, disconnecting the negative terminal and attaching a maintainer in place is the fallback. But in-sled maintenance without disconnecting anything is the weakest option and the one most likely to produce a dead battery by December [3].
A battery that sits at a partial charge for months doesn’t just fail to start the engine; sulfation on the plates can permanently reduce capacity, meaning even a full charge afterward won’t restore the original performance. That’s a far more expensive mistake than the price of a maintainer.
Track Lift and Suspension Support: Preventing Flat Spots and Corrosion
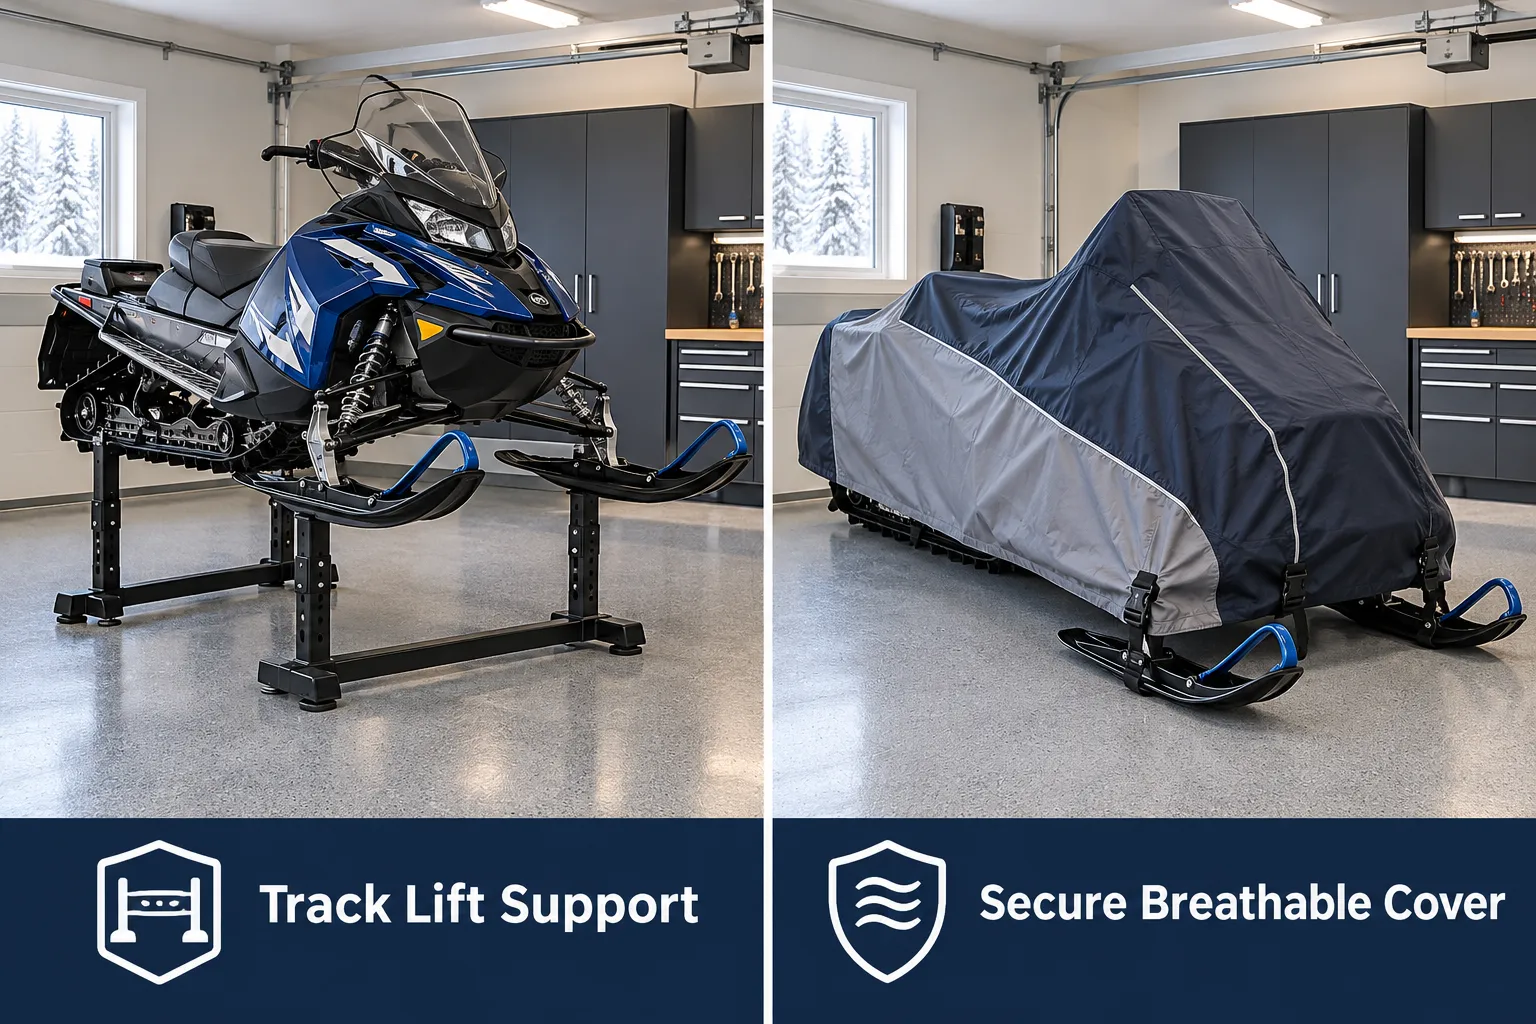
Letting a snowmobile sit on its track and skis for five or six months straight puts constant pressure on the same points of rubber and metal. Track lift and sled support stands are strongly recommended specifically to prevent that kind of damage, especially for machines stored outdoors or in unheated structures [6][8].
Two separate problems show up when a sled sits flat for an entire off-season:
- Track flat-spotting. The track material compresses at the same contact points for months, and that deformation can translate into vibration and uneven wear once the sled is running again.
- Ski and runner corrosion or pitting. Skis and carbide runners sitting on a damp garage floor, especially one with residual road salt tracked in from other vehicles, are prone to rust pitting that is never fully reversible [6][8].
A track lift stand, essentially a frame that raises the rear of the sled so the track hangs free, paired with front supports under the skis, solves both issues at once. It also makes it far easier to spin the track periodically to redistribute any remaining lubricant and check for cracks.
Equally important, and often skipped: release tension on the drive belt before storage. A belt left clamped tight between the drive and driven clutches for months can develop a permanent crease or small cracks at the bend point. That deformed belt then causes uneven clutch engagement, shudder, or a belt failure early into the next season, one of the most common and entirely avoidable storage mistakes [9][10]. Loosening the belt, or removing it and storing it flat in a cool, dark spot, takes a few minutes and prevents a problem that otherwise shows up as a frustrating mid-trail breakdown.
Garage setup matters here too. A clean, organized space with a dedicated lift area makes this whole process faster each year; for ideas on building out that kind of functional garage, see these garage lighting and layout ideas for transforming a man cave space, or browse these lake house boat garage storage concepts that apply equally well to sleds and powersports gear.
How to Store a Snowmobile in the Off-Season: Track Lift and Covering Essentials
Covering strategy has shifted toward three specific priorities: UV protection, moisture management, and a secure fit that won’t blow off or chafe the finish [4][5]. A cover that fails on any one of those fronts can do more harm than no cover at all.
UV protection matters because seats, plastic panels, and graphics fade and crack under direct sun exposure over a full summer. Even sleds stored in a garage near a window benefit from UV-rated cover fabric.
Moisture management is the trickiest part. A cover that’s too airtight traps condensation underneath it, which is exactly the environment that breeds rust on exposed metal and mildew on seats. The best covers use breathable, woven fabric rather than a solid plastic tarp. A plain poly tarp thrown over a sled might seem like an easy fix, but it frequently causes more corrosion than it prevents by sealing moisture against the machine [4][5].
Secure fit prevents wind from working a loose cover back and forth across the hood and windshield, which causes fine scratches over time, sometimes called “cover rash.” Covers with built-in straps or elastic hems that cinch around the skis or running boards hold position far better than a generic tarp.
| Covering Factor | What to Look For | Why It Matters |
|---|---|---|
| Material | Breathable woven fabric, not solid plastic | Prevents trapped condensation and rust |
| UV rating | Treated or UV-resistant fabric | Stops fading and plastic cracking |
| Fit | Elastic hem or ski straps | Prevents wind-driven cover rash |
| Storage location | Indoors, out of direct sun when possible | Reduces overall UV and heat exposure |
For sleds stored outdoors under a carport or lean-to, pairing the right cover with a raised track lift stand does double duty: it keeps the undercarriage off wet ground while the cover handles everything from the belly line up.
Cleaning and Corrosion Control Before Storage
Skipping the wash-down before storage is a quiet mistake that compounds over the off-season. Road salt, trail grime, and leftover debris trap moisture against metal surfaces, and that combination is exactly what accelerates corrosion over several warm, humid months [6][8].
A proper pre-storage cleaning routine should include:
- Rinse the entire chassis and undercarriage, paying close attention to the suspension, heat exchangers, and tunnel where salt and grit accumulate.
- Dry thoroughly before applying any corrosion inhibitor, sealing moisture in with a protective spray defeats the purpose.
- Apply a corrosion inhibitor or light oil to exposed metal components, especially the track studs, suspension bolts, and any unpainted steel.
- Lubricate the chassis per the manufacturer’s grease points, since dried-out grease fittings invite moisture and rust over a long sit.
- Change the oil (four-stroke engines) or check injection oil levels before storage, since used oil holds acidic combustion byproducts that can etch internal engine surfaces over months of inactivity [6][9].
This is also the right moment to inspect belts, bearings, and the exhaust for anything that needs attention before next season, so there are no surprises when it’s time to pull the cover off.
Choosing the Right Storage Environment
Where a snowmobile sits for the off-season matters almost as much as how it’s prepped. The consistent 2026 guidance is to avoid heat and humidity extremes and prioritize ventilation and indoor space whenever possible [5][6].
A few environment guidelines worth following:
- Avoid attics, direct sun exposure, and non-ventilated metal sheds, all of which can push interior temperatures far higher than ambient air and accelerate rubber and plastic degradation.
- Choose a dry, ventilated space over a sealed, airtight one, stagnant humid air is worse for rust than slightly cooler, moving air.
- Elevate off bare concrete where possible using a track lift stand or wood blocks, since concrete can wick moisture upward.
- Consider off-site storage if home garage space is tight; purpose-built vehicle storage facilities often offer better climate consistency than an unheated backyard shed [5].
Pest control deserves specific mention here, since rodent damage has become one of the more highlighted off-season risks in current storage advice [5]. Mice and other small animals are drawn to warm engine compartments and seat foam for nesting, and they can chew through wiring harnesses and fuel lines in a matter of weeks. Sealing air intakes with fine mesh, setting traps or deterrents nearby, and avoiding leaving food-grade grease or rodent-attracting residue on the sled all reduce this risk substantially.
Common Mistakes That Cause Hard Starting or Belt Damage
Most spring service calls trace back to a short list of repeatable mistakes. Avoiding these is often more impactful than any single extra step:
- Mixing fuel strategies. Adding stabilizer to an already-old tank of gas, or draining the tank but leaving old fuel in the carburetor bowls, defeats the purpose of either method [6][9].
- Leaving the drive belt under tension for the entire off-season, which can permanently warp the belt and cause clutch engagement problems [9][10].
- Storing the battery in the sled, fully discharged, which allows sulfation to set in and permanently reduces capacity [1][3].
- Using a non-breathable tarp, which traps condensation and accelerates rust rather than preventing it [4][5].
- Skipping the undercarriage rinse, leaving road salt in contact with metal for months [6][8].
- Letting the sled sit flat on its track and skis instead of using a track lift stand, risking flat-spotting and runner corrosion [6][8].
Any one of these mistakes alone might not cause a major failure. Combined, they are exactly why so many sleds need carburetor cleaning, a new battery, and a belt replacement before the first snowfall every single year.
Step-by-Step Off-Season Snowmobile Storage Checklist
For a quick reference, here is the complete sequence in order:
- Wash and dry the chassis, undercarriage, and tunnel thoroughly.
- Decide on fuel strategy: stabilize a full tank and run the engine, or fully drain the fuel system.
- Change engine oil or check injection oil levels.
- Remove the battery, clean terminals, and place it on a maintainer in a temperature-stable indoor space.
- Release drive belt tension or remove the belt entirely.
- Lubricate chassis grease points and apply corrosion inhibitor to exposed metal.
- Raise the sled on a track lift stand so the track and skis are off the floor.
- Seal intakes against rodents and set deterrents nearby.
- Fit a breathable, properly sized cover with secure straps.
- Store indoors or in a ventilated, dry space away from direct sun and temperature extremes.
Owners comparing the overall cost of ongoing upkeep against other powersports options might also find it useful to look at current pricing and value trends for UTVs and ATVs, since storage discipline affects resale value across all of these vehicle types in similar ways.
Frequently Asked Questions
Does a fuel-injected snowmobile need fuel stabilizer, or just a carbureted one? Both need it. EFI systems still hold fuel in the tank, lines, and injectors, and degraded fuel can foul a fuel pump or injector just as easily as it gums up a carburetor jet [6][9].
How often should a stored battery be charged over the off-season? Check and recharge every 30 to 60 days using a smart maintainer, rather than charging once at the start of storage and leaving it [1][3].
Is a track lift stand really necessary, or can a sled just sit on a flat floor? It’s strongly recommended, especially for outdoor or unheated storage, because sitting flat for months risks track flat-spotting and ski or runner corrosion [6][8].
What kind of cover works best for long-term storage? A breathable, UV-rated fabric cover with a secure strap or elastic-hem fit outperforms a plain plastic tarp, which traps moisture and can accelerate rust [4][5].
Conclusion
Storing a snowmobile correctly is less about any single product and more about following a complete routine consistently. The core sequence, clean it, commit fully to one fuel strategy, remove and maintain the battery, lift the track and release belt tension, and cover it with breathable, UV-rated fabric in a dry, ventilated space, addresses nearly every common cause of spring breakdowns [1][3][6][9]. Skipping even one of these steps, like leaving old fuel untreated or letting the belt sit under tension, is what turns a quick pre-season check into an expensive repair bill.
The payoff for following this routine shows up the moment the sled comes out of storage: a battery that holds charge, a fuel system that runs clean, a belt that hasn’t warped, and a track and suspension free of flat spots or rust. Set aside an afternoon before the season ends, work through the checklist above, and next year’s first ride starts with a pull of the cord instead of a trip to the shop.
References
[1] publications.polaris – https://publications.polaris.com/owner/owners-manuals/9942065/0001002275.xml/$/0000482283 [2] publications.polaris – https://publications.polaris.com/owner/owners-manuals/9942065/0001002275.xml/$/0000482290 [3] Ka 01130 – https://www.polaris.com/en-us/snowmobiles/owner-resources/help-center/article/KA-01130/ [4] Best Snowmobile Covers For Winter Storage – https://www.fccj.org/best-snowmobile-covers-for-winter-storage/ [5] Small Vehicle Storage – https://www.extraspace.com/self-storage/vehicle-storage/small-vehicle-storage/ [6] Snowmobile Summer Storage – https://ski-doo.brp.com/us/en/owners/your-vehicle/maintenance/snowmobile-summer-storage.html [7] Best Snowmobiles – https://www.thirstybear.com/best-snowmobiles/ [8] Prepare Snowmobile Long Term Storage – https://www.sroa.com/blog/storage-tips/prepare-snowmobile-long-term-storage [9] Snowmobile Summer Storage Checklist – https://blog.amsoil.com/snowmobile-summer-storage-checklist/ [10] Snowmobile Maintenance Off Season – https://www.yellowstoneadventures.com/blog/snowmobile-maintenance-off-season